CDP Studio - Help Mode Manual
Help Mode
In Help mode you have all the different manuals, examples and other information available. You can find help by Contents, Index and Search by selecting the dropdown menu in top left corner. In addition you can Bookmark interesting pages.
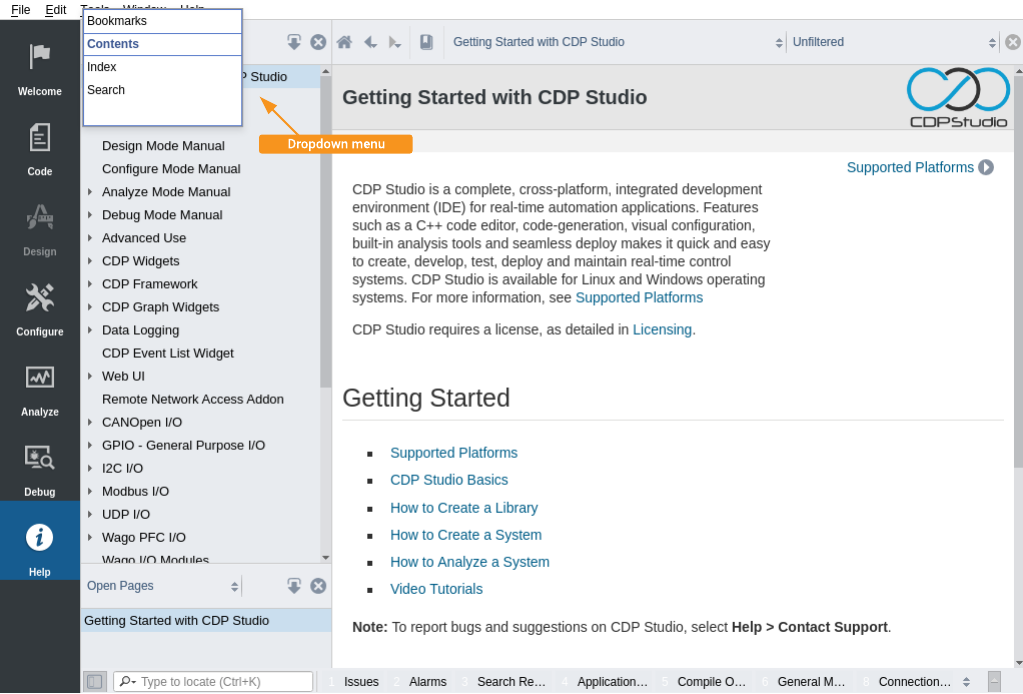
If you have chosen "Search" to find some topic or info, enter your searchword and click at the "Search"-button to the right. There is also an "Advanced search" possibility.
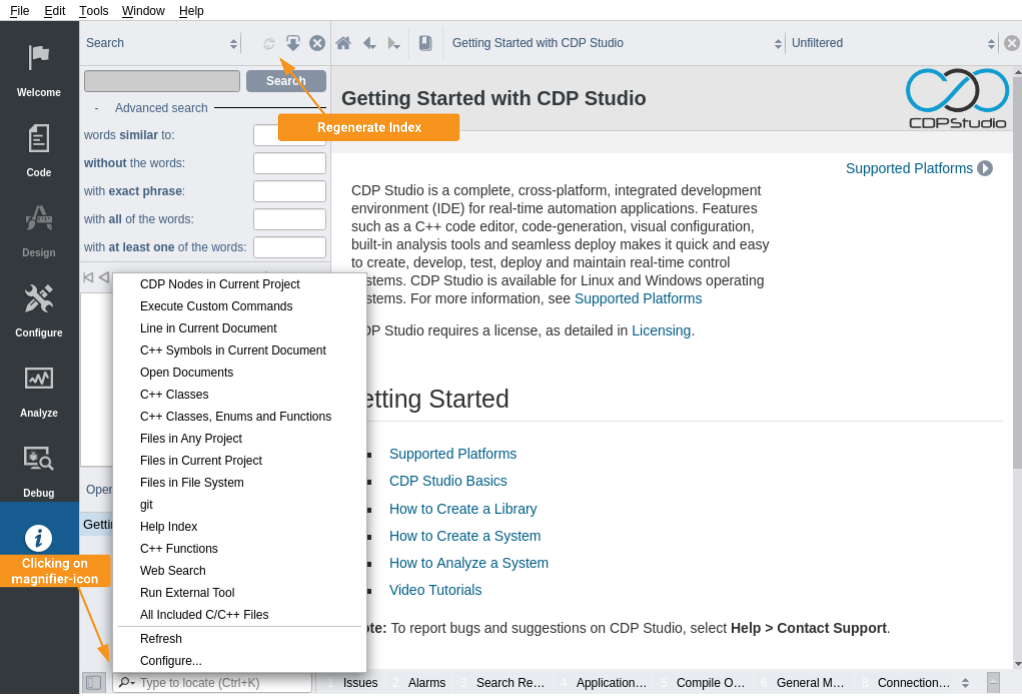
Note: If you don't get any search-matches at all, you may need to click at the "Regenerate Index" icon first, see below.
In bottom left part, you may also search for help. If you click at the magnifier-icon, you get this menu:
If you click to the right for the magnifier-icon, you get this menu:
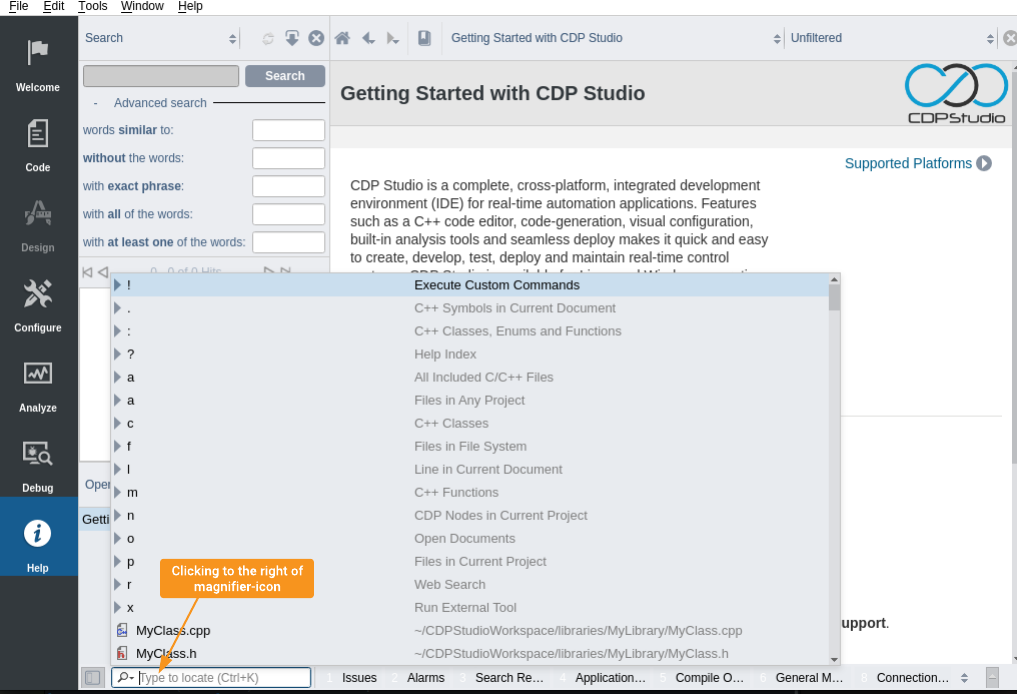
Note: Remember to have a space after the key-character before you type what you are searching for (e.g. '? ioserver'). Then you will get up a list of matching topics. By clicking enter, you select the highlighted topic.
Contextual Help in CDP Studio
To access context related Help in other CDP Studio modes like Code mode, Design mode, Configure mode etc. select context item with mouse cursor and press F1 key. The items to which contextual help is bound relates to the items in each respective mode:
- In Code mode Context help is available for: Variable names, Class names or Function calls.
- In Design mode Context help is available for: UI Widget in Form editor/Object inspector or Properties in Property editor (only properties that are added by CDP Widget classes have contextual help)
- In Configure mode Context help is available for: Components in Project tree or Resources in Resource tree (also after navigating into Objects with button in Configure mode Sections)
Tooltips in CDP Studio
To view Tooltips is CDP Studio modes like Code mode, Design mode, Configure mode etc. mouse cursor needs to be hovered over an item in question for one second, after which Tooltip overlay is displayed. Tooltips are available in many places in CDP Studio, similar to Context based help.
How to Get Help into External Window
If you want to have Help in an external window, e.g. when you are following an example, follow these steps:
- Choose Tools->Options from the menu
- Click at Help and choose General-tab
- In the 'On context help', choose 'Always Show in External Window'
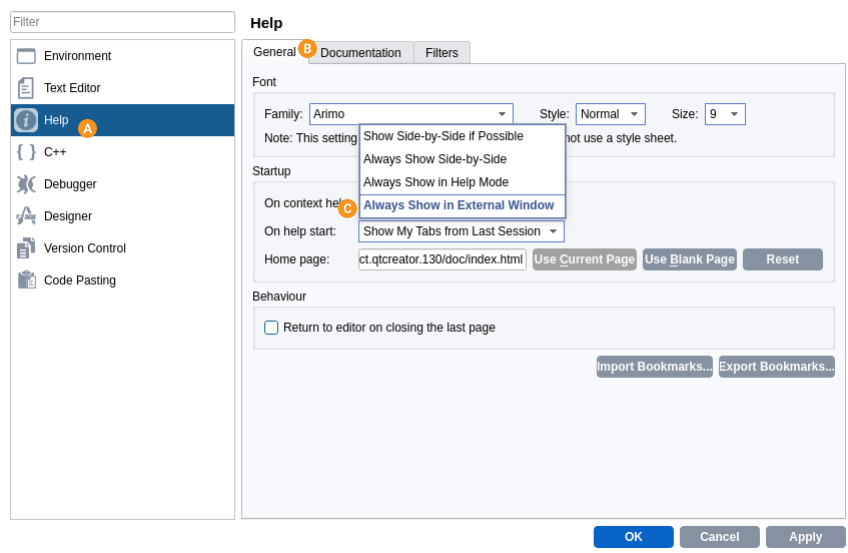
- Click Apply and OK
- Go to e.g. Configure mode and push the F1 key
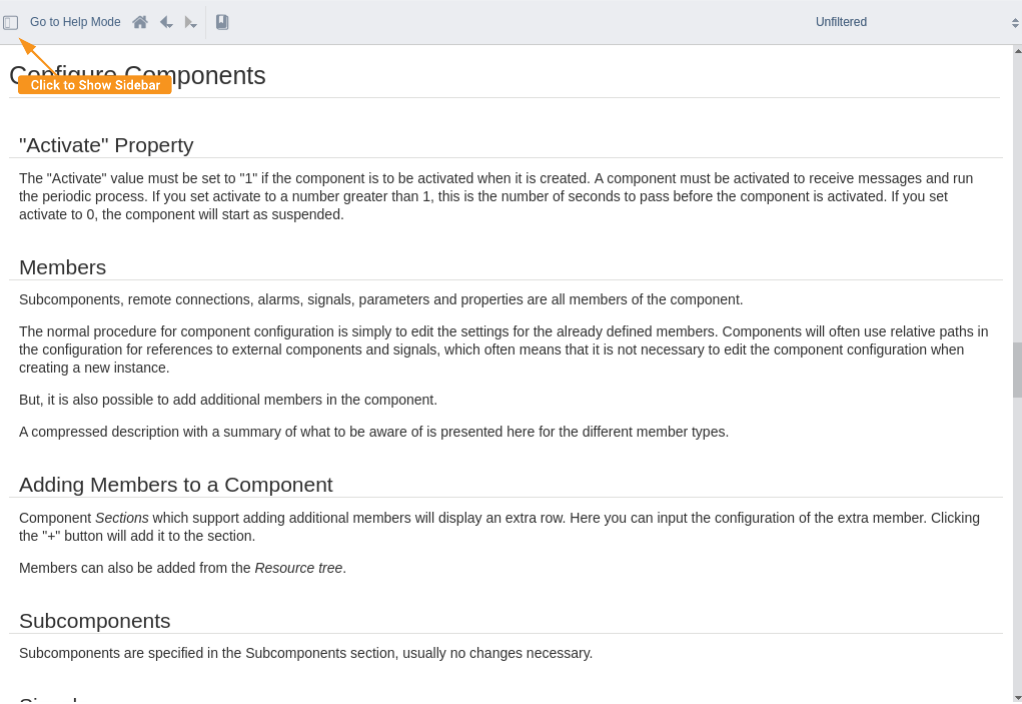
- To show the manuals and examples, click at the Show Sidebar icon
Documenting Your Library Project
While Help mode contains documentation for all libraries provided with CDP Studio, it is possible to add pages for your own library project.
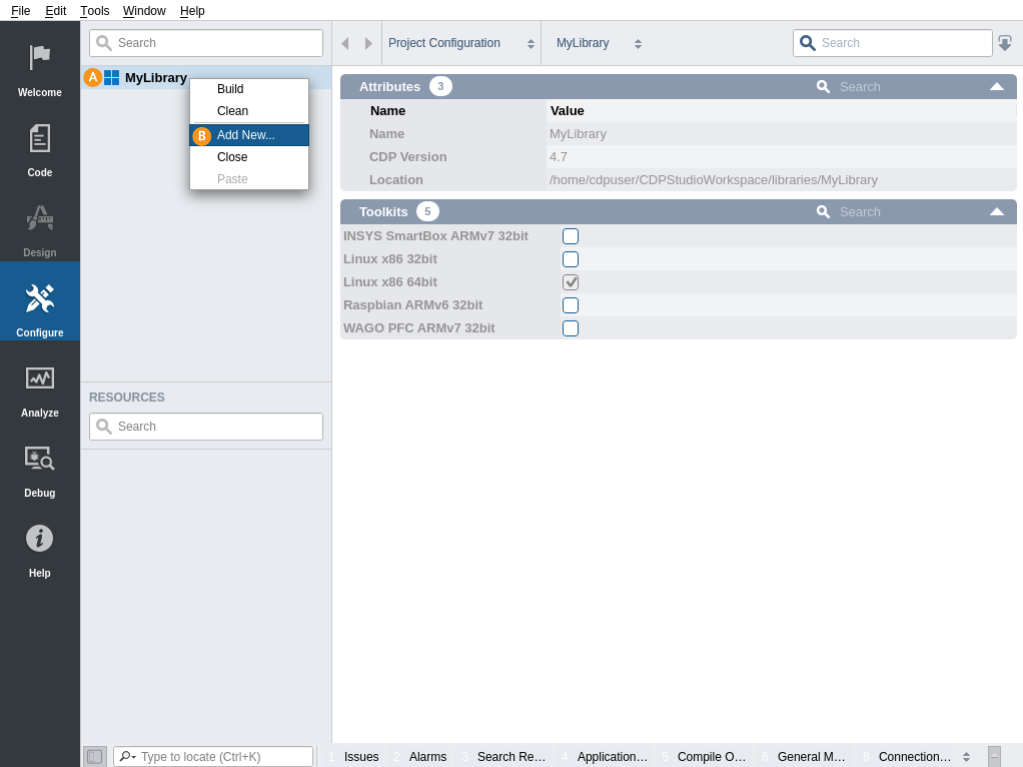
- Open your library project.
- Right click on the library node in the Project tree.
- Select the Add new... option in the context menu.
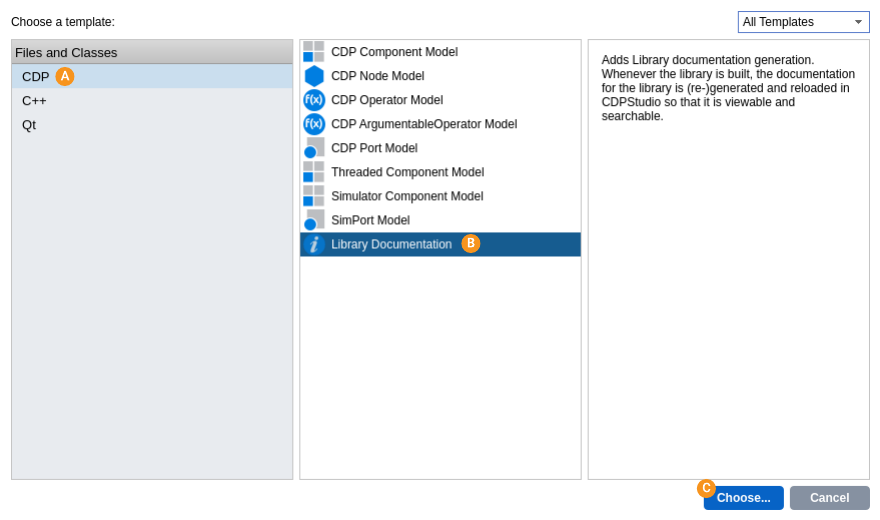
Next a dialog opens.
- Select CDP from the left column.
- Select Library Documentation from the middle column.
- Click Choose...
- Click Next.
- Click Finish.
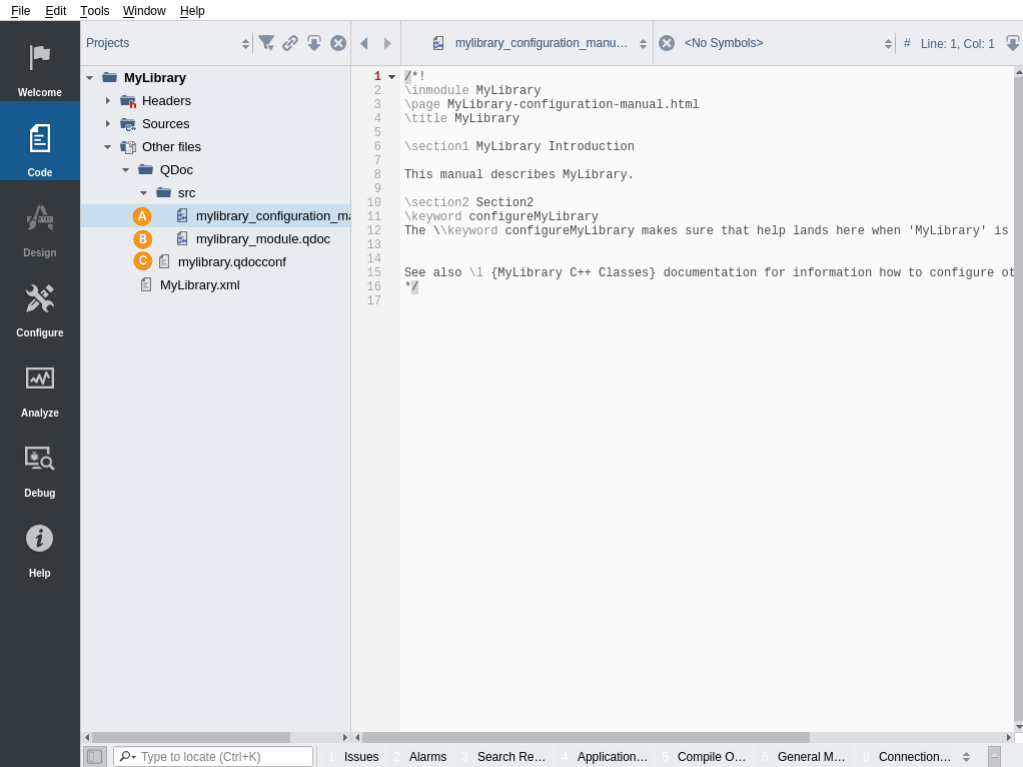
Several files are now added to the project. They are listed in Code mode Project tree under "LibraryName.Other files.QDoc".
- src/libraryname_configuration_manual.qdoc - landing page for library documentation. Write here general information about your library, describe important components and perhaps add some examples for how to use your library.
- src/libraryname_module.qdoc - should not be modified. Generates a page for every C++ class in your library.
- libraryname.qdocconf - contains general configuration of QDoc documentation building. This file must be modified if one wishes to add more subpages to generated documentation.
Building Documentation
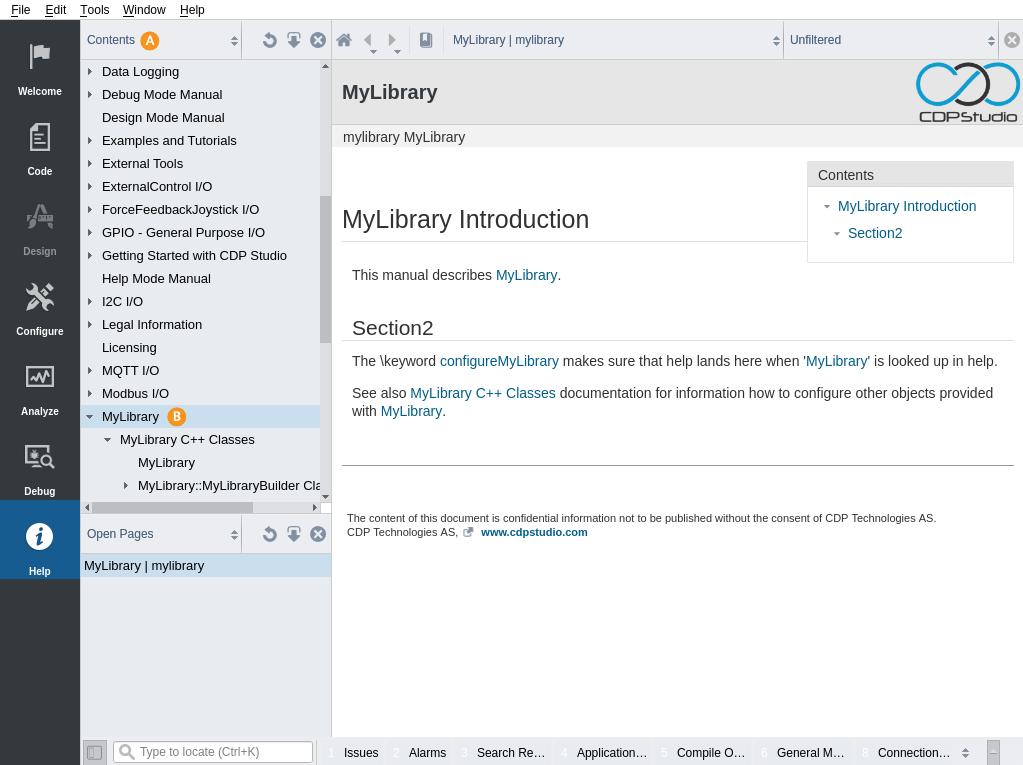
Documentation is built automatically with the rest of the library. Right click on the library node in the Project tree and select Build. After build is finished, go to Help mode. Select Contents from the dropdown in top left corner. The library should be listed .
Syntax
CDP Studio documentation uses QDoc syntax. Read the QDoc manual for a list of all available commands.
Some of the more important ones are described here.
Stand-alone Page
Each qdoc file in QDoc/src directory must begin with following:
/*!
\inmodule libname
\page mydoc.html
\title My Documentation Page
Write your documentation here.
* /
To create a new subpage, create a new qdoc file (e.g. mydoc.qdoc) in the QDoc/src directory and make sure that \page and \title are unique for each qdoc file. Next add the following to the libraryname.qdocconf file:
qhp.libname.subprojects += mydocsubpage
qhp.libname.subprojects.mydocsubpage.title = My Documentation Page
qhp.libname.subprojects.mydocsubpage.indexTitle = My Documentation Page
qhp.libname.subprojects.mydocsubpage.selectors = fake:dont_match_anything
Note: The libname must be replaced with your lowercase library project name and the indexTitle must match with qdoc file \title.
While usually QDoc tries to automatically create necessary links, it might sometimes be useful to add \keyword configureMyComponent to your stand-alone page. If you now in Configure mode go into a node named MyComponent and press F1, then the QDoc page with this keyword appears. The keyword command is used in separate qdoc files, class documentation in cpp files should be found automatically.
Class Documentation
Class documentation is written directly in the cpp file of the class. It should begin with following:
/*!
\class LibName::ClassName
\inmodule LibName
\brief Short description

Write here detailed description (after one blank line).
* /
To document methods, write a documentation comment before it:
/*!
  Short description.

  Write here detailed description (after one blank line). Refer to argument \a componentXML.
* /
void ClassName::Configure(const char* componentXML)
{
  ...
}
Note: It is possible to hide a class method completely from the documentation by adding the keyword \internal at the start of the documentation comment.
It is also possible to document member variables. Write into the cpp file:
/*!
  \variable LibName::ClassName::m_var
  Short description

  Detailed description (after one blank line).
* /
Some Basic Commands
Structure
\section1 Installation
  \section2 About
     This chapter describes how to ...
  \section2 How to Add the UDPIOServer ...
\section1 Customization
This will be rendered as:
Installation
About
This chapter describes how to ...
How to Add the UDPIOServer ...
Customization
Text markup
\b {bold text},
\c {code font},
\e {emphasis, italics}
This will be rendered as:
bold text,
code font, emphasis, italics
Notes
\startnote
  Make sure to fill the RemoteAddress property.
\endnote
This will be rendered as:
Note: Make sure to fill the RemoteAddress property.
Inline code
\code
 if (Input < 0)
   Output = Input * -1;
\ endcode
This will be rendered as:
if (Input < 0)
  Output = Input * -1;
Images
\image cdpstudio.png
This will be rendered as:
The actual file must be in the QDoc/images (case-sensitive) directory. Images should not be too large, we recommend a maximum size of 1024x768 pixels.
Bullet lists
There are two types of packets:
 \list
    \li InPacket
    \li OutPacket
 \endlist
This will be rendered as:
There are two types of packets:
- InPacket
- OutPacket
Tables
\table
\header
   \li Signal
   \li Description
\row
   \li Time
   \li The relative time.
\endtable
This will be rendered as:
| Signal | Description |
|---|---|
| Time | The relative time. |
Have a look at QDoc Command Index for all commands.
Get started with CDP Studio today
Let us help you take your great ideas and turn them into the products your customer will love.
