OpenCV - Open Source Computer Vision Library
OpenCV (Open Source Computer Vision Library) is an open source computer vision and machine learning software library and this integration allows you to develop control systems using computer vision. It is released under a BSD license and hence it’s free for both academic and commercial use.
Importing OpenCV to CDP Studio
Download the pre-compiled OpenCV 4.5.3 binaries for the CDP toolkits from https://download.cdpstudio.com/libs/opencv/4.5.3 and extract the archive.
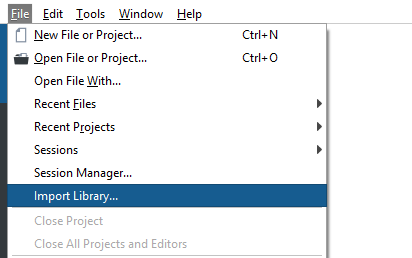
Select File -> Import Library...
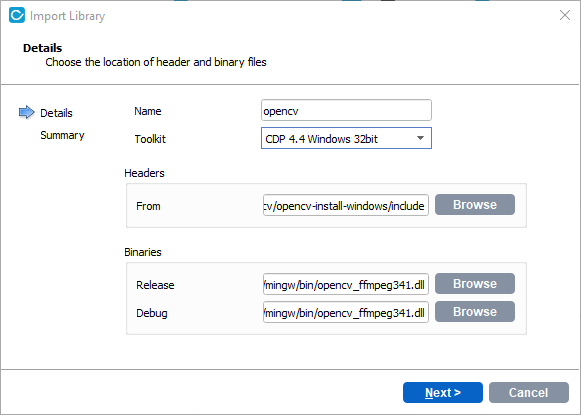
Next a dialog appears where one must specify headers directory and binaries. OpenCV header files are in include directory of the extracted archive.
- For Windows release binaries are in opencv-windows-release/x64/mingw/bin folder and debug versions in opencv-windows-debug/x64/mingw/bin. Select and add all .dll files.
- For other targets binaries are in lib directory. Select all .so files and add same files for both debug and release versions.
Note: Make sure to select a toolkit that matches the CDP version of your project.
Note: Import Library... dialog must be run for both host and target platforms. For example, when developing a CDP system using OpenCV on Windows and deploying it on Raspberry Pi, the dialog must be run once for Windows binaries and once for Raspbian binaries. Make sure to set the Name field to opencv each time.
Using OpenCV in a CDP Library
Adding Dependencies
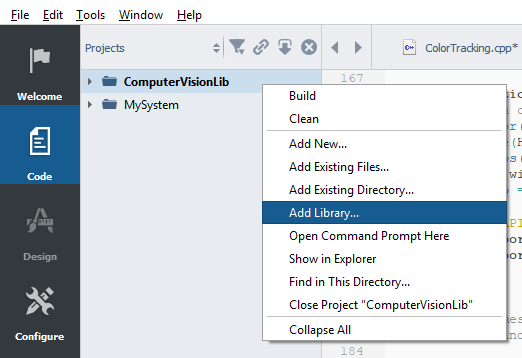
To use OpenCV in your CDP application one should first create a CDP library project. Next one must add OpenCV dependency to this library. For that go to Code mode, right click on the library project and select Add Library...
In the dialog select an External library and from the list opencv. Next open again the Add Library... dialog, select CDP library and from the list CDP2QtLib.
Code and Multi-threading
The UI part of OpenCV must always be accessed from main thread that runs the UI event loop. Do not create windows from CDP thread (like the Process() function in CDP Component). One easy way to execute code on UI thread is to use Application::RunInMainThread() function that takes lambda as an argument.
Also note that to access objects living in CDP Component thread (like CDPProperty, CDPSignal, CDPParameter) from UI thread, one should first lock component mutex or use RunInComponentThread() function.
#include <opencv2/opencv.hpp>
#include <opencv2/highgui.hpp>
#include <CDPSystem/Application/Application.h>

void MyComponent::Activate()
{
    Application::RunInMainThread([&] { Loop(); });
}

void MyComponent::Loop()
{
    m_capture.read(m_currentFrame); // Read camera image
    {
        OSAPIMutexLocker(GetMemberAccessMutex()); // Locks component mutex
        for (auto filter : m_filters) // m_filters lives in component thread
        filter->applyFilter(m_currentFrame);
    }
    cv::imshow(windowName, cameraFeed);
    cv::waitKey(30);
    Application::RunInMainThread([&] { Loop(); });
}
Adding Component to CDP Application
The pre-built OpenCV binaries bundled with this guide have a Qt dependency. Therefore, they work correctly only when dragged into a CDP GUI Application, which always bundles Qt. After creating a system with GUI application, drag your CDP Component from Resource pane into the GUI Application.
By default, the GUI Application includes an empty form called mainwidget for creating your own UI. If you have no need for it, disable it by changing the ui property:
- In Configure mode navigate to
YourApp.CDP2Qt. In caseCDP2Qtis not visible, the reason might be that standard CDP components are filtered away. To get them visible again, see the Filtering manual, and uncheck Hide Internal Items. - Find the property called ui in the Properties section. The default value will be "mainwidget.ui".
- Change the value to an empty string.
Get started with CDP Studio today
Let us help you take your great ideas and turn them into the products your customer will love.