SNMP Setup Guide
Introduction
This guide demonstrates the usage of SNMPManagerIO to send and receive SNMP messages over ethernet in CDP Studio, the independent automation software for open PC-based real-time distributed control systems.
To use SNMPManagerIO successfully, an actual SNMP agent device must be found on the same subnet. This demo assumes a managed Lynx ethernet switch (Lynx 3640-1800) is used as an SNMP agent device.
Set Up a Test System
First, we set up a system that the component can be tested in:
- Click Welcome mode to go to the Welcome Page
- In the Projects tab, under Create Project, Click New Project
- Select CDP System and click Choose...
- Type in "SNMPTest" in the Name text field. Click Next >
- Click Next > to select the default Framework version
- Choose Application Type Console and Application Name SNMPTestApp.
- Click Finish
- Select Configure mode.
- In the Editor Selector at the top, choose the 'Table Editor' tab.
- Select the SNMPTestApp that resides under SNMPTest in the Project tree.
Adding an SNMPManagerIO Component
- Select/expand the SNMPIO in the Resource tree.
- Right-click on SNMPManagerIO and select Add.
- Select the newly added SNMPManagerIO in the Project tree.
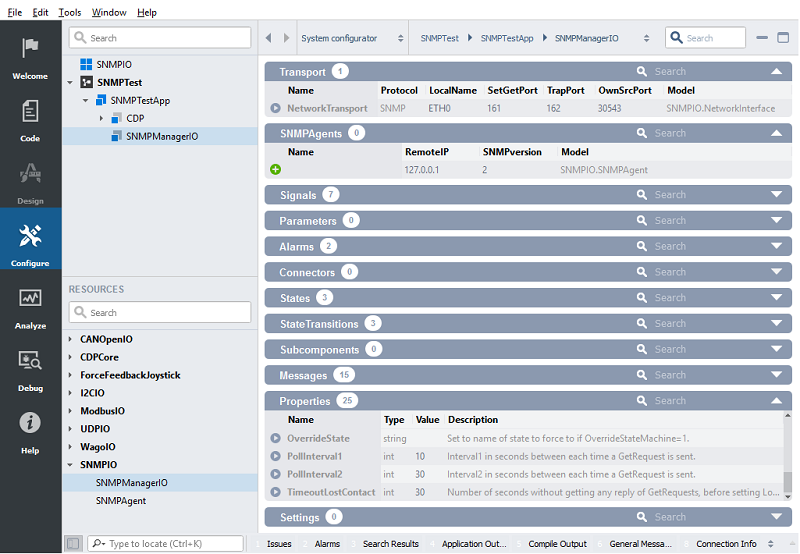
- In the Transport table, set LocalName to ETH0
- Set SetGetPort to 161.
- Set TrapPort to 162.
- Set OwnSrcPort to 30543.
- In the Properties table, set PollInterval1 to 10 seconds.
- Set PollInterval2 to 30 seconds..
- Set TimeoutLostContact to 30 seconds.
Adding an SNMP Agent
- Make sure that the SNMPManagerIO component is selected in the Project tree, and that the SNMPAgents table is visible.
- Right-click SNMPAgent in the SNMPIO resource in the Resource tree.
- Select Add.
- Click into the SNMPAgents table of the SNMPManagerIO.
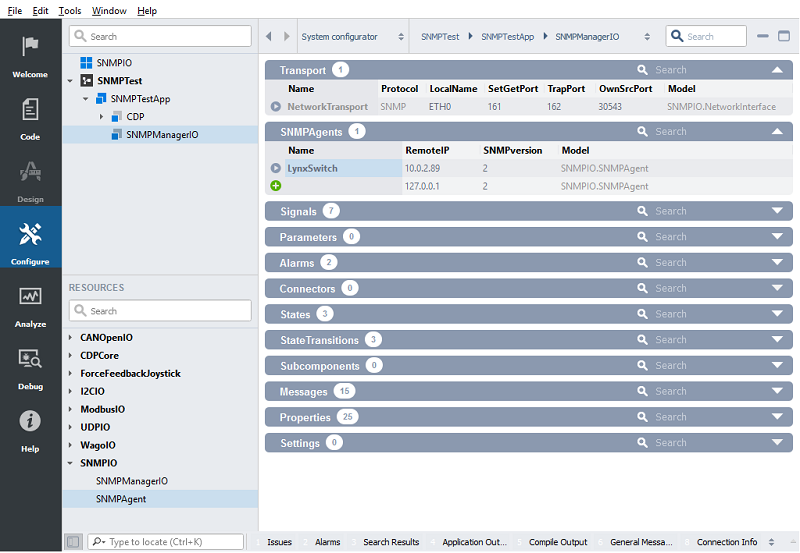
- Change 'SNMPAgent' under Name to 'LynxSwitch'.
- Set RemoteIP to the IP address of your Lynx switch.
- Set SNMPversion to 2.
Adding GetRequests
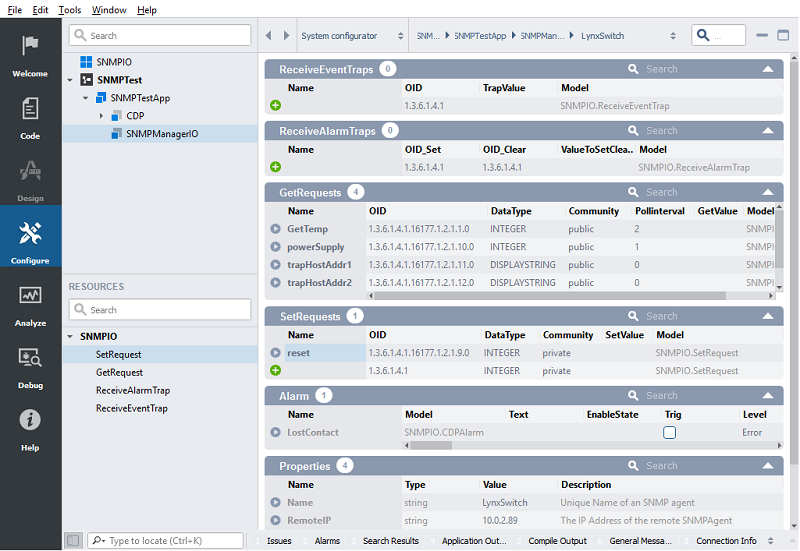
- Click on the in front of LynxSwitch to configure what to send and receive.
- Right-click GetRequest in the SNMPIO resource in the Resource tree.
- Select Add.
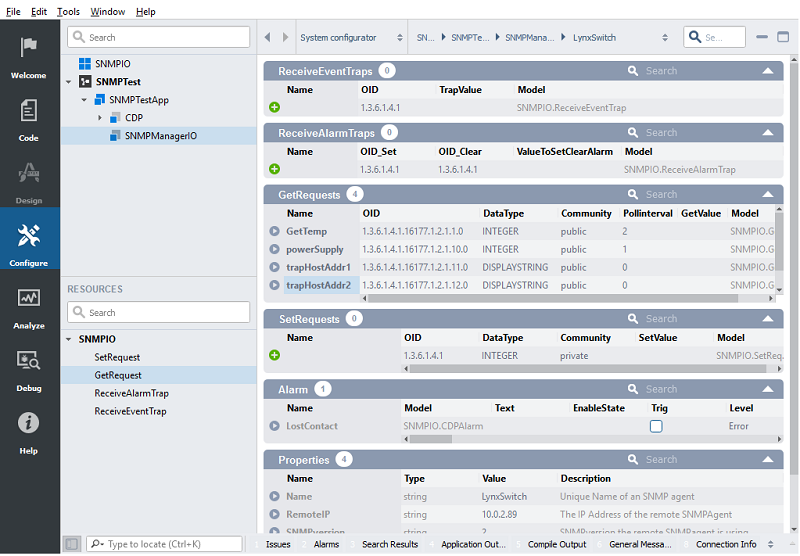
- Change 'GetRequest' under Name to 'GetTemp' in the GetRequests table.
- Change value under OID to '1.3.6.1.4.1.16177.1.2.1.1.0'.
- Select INTEGER under DataType, let Community get value 'public', and select '2' as the value under PollInterval.
- Add another GetRequest, and name it 'powerSupply'.
- Change OID to '1.3.6.1.4.1.16177.1.2.1.10.0', select INTEGER under DataType, let Community be 'public', and select '1' under PollInterval.
- Add another GetRequest, and name it 'trapHostAddr1'.
- Change OID to '1.3.6.1.4.1.16177.1.2.1.11.0', select DISPLAYSTRING under DataType, let Community be 'public', and select '0' under PollInterval.
- Add another GetRequest, and name it 'trapHostAddr2'.
- Change OID to '1.3.6.1.4.1.16177.1.2.1.12.0', select DISPLAYSTRING under DataType, let Community be 'public', and select '0' under PollInterval.
- Click on the in front of GetTemp.
- In the CDPCore resource in the Resource tree, right-click and Add a CDPSignalChannel<int>.
- Rename the newly added signal to 'Temperature'.
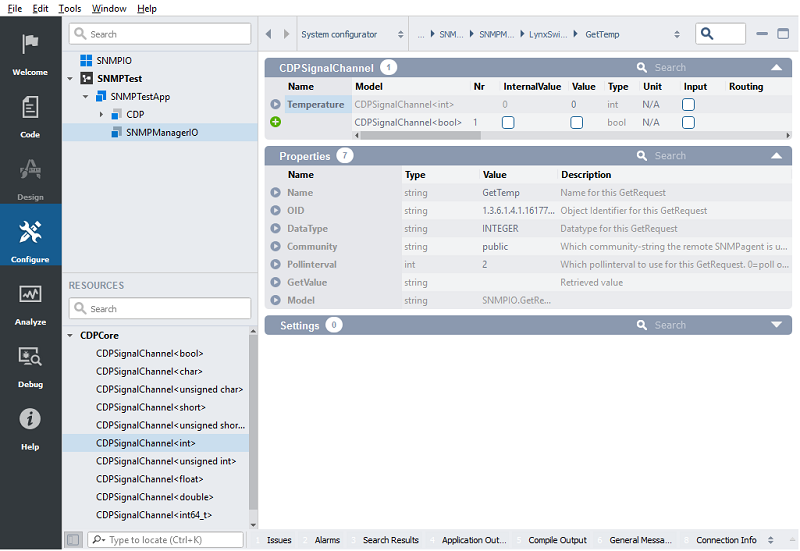
- Click on the left (back) arrow at the top, or click LynxSwitch in the location bar, to go back to LynxSwitch configuration.
- Click on the arrow in front of powerSupply.
- In the CDPCore resource in the Resource tree, right-click and Add a CDPSignalChannel<int>.
- Rename the newly added signal to 'Status'.
- Click on the left (back) arrow at the top, or click LynxSwitch in the location bar, to go back to LynxSwitch configuration.
Adding SetRequests
- Right-click SetRequest in the SNMPIO resource in the Resource tree.
- Select Add.
- Change 'SetRequest' under Name to 'reset' in the SetRequests table.
- Change value under OID to '1.3.6.1.4.1.16177.1.2.1.9.0'.
- Select INTEGER under DataType, and let Community get value 'private'.
Adding ReceiveEventTraps
- Right-click ReceiveEventTrap in the SNMPIO resource in the Resource tree.
- Select Add.
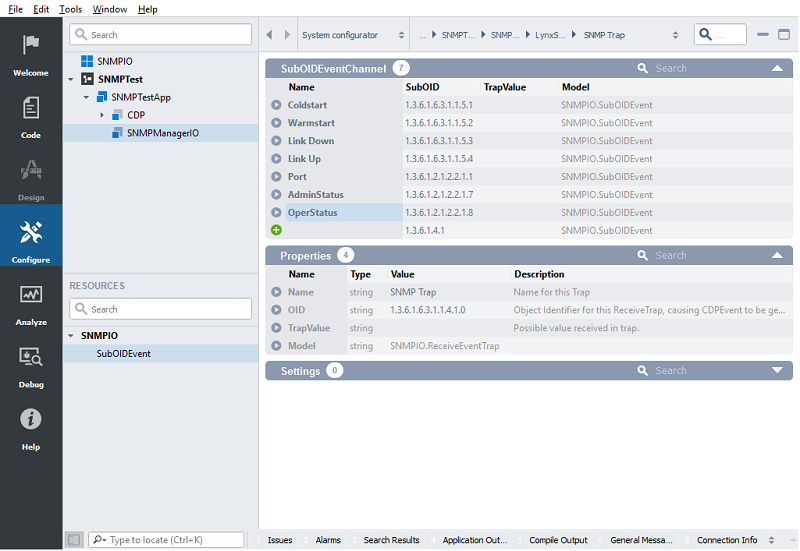
- Change 'ReceiveEventTrap' under Name to 'SNMP Trap' in the ReceiveEventTraps table.
- Change value under OID to '1.3.6.1.6.3.1.1.4.1.0'.
- Click on the in front of SNMP Trap.
- In the SNMPIO resource in the Resource tree, right-click and Add a SubOIDEvent.
- Change 'SubOIDEvent' under Name to 'Coldstart' in the SubOIDEventChannel table.
- Change value under SubOID to '1.3.6.1.6.3.1.1.5.1'.
- Add another 6 SubOIDEvent from the Resource tree.
- Let the Names and SubOIDs have these values:
- 'Warmstart' '1.3.6.1.6.3.1.1.5.2', 'Link Down' '1.3.6.1.6.3.1.1.5.3', 'Link Up' '1.3.6.1.6.3.1.1.5.4', 'Port' '1.3.6.1.2.1.2.2.1.1', 'AdminStatus' '1.3.6.1.2.1.2.2.1.7', 'OperStatus' '1.3.6.1.2.1.2.2.1.8'.
- Click on the left (back) arrow in the top, or click LynxSwitch in the location bar, to go back to LynxSwitch configuration.
Adding ReceiveAlarmTraps
- Right-click ReceiveAlarmTrap in the SNMPIO resource in the Resource tree.
- Select Add.
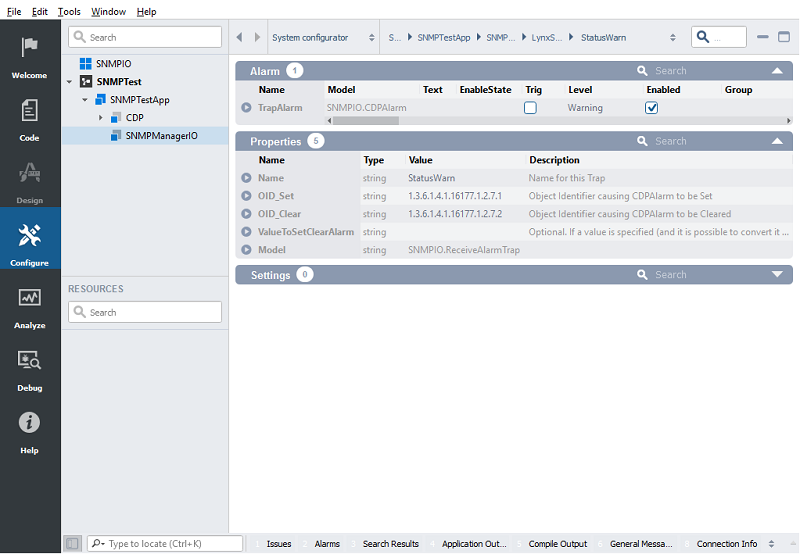
- Change 'ReceiveAlarmTrap' under Name to 'StatusWarn' in the ReceiveAlarmTraps table.
- Change value under OID_Set to '1.3.6.1.4.1.16177.1.2.7.1'.
- Change value under OID_Clear to '1.3.6.1.4.1.16177.1.2.7.2'.
- Let value under ValueToSetClearAlarm be empty.
- Click on the in front of StatusWarn.
- In the Alarm table, change Level to 'Warning' for the TrapAlarm.
- Click on the left (back) arrow at the top, or click LynxSwitch in the location bar, to go back to LynxSwitch configuration.
- Right-click ReceiveAlarmTrap in the SNMPIO resource in the Resource tree.
- Select Add.
- Change 'ReceiveAlarmTrap' under Name to 'LinkP1' in the ReceiveAlarmTraps table.
- Change value under OID_Set to '1.3.6.1.4.1.16177.1.2.7.4'.
- Change value under OID_Clear to '1.3.6.1.4.1.16177.1.2.7.3'.
- Change value under ValueToSetClearAlarm to 1.
- Add another 7 ReceiveAlarmTrap from the Resource tree.
- Let the Names be 'LinkP2' to 'LinkP8'.
- Let the OID_Set be '1.3.6.1.4.1.16177.1.2.7.4' and OID_Clear be '1.3.6.1.4.1.16177.1.2.7.3'.
- Let the ValueToSetClearAlarm get values 2-8.

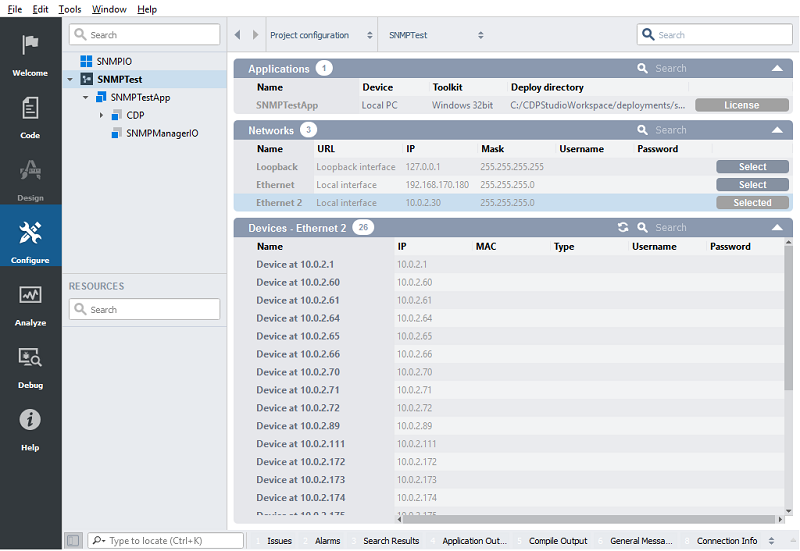
In the Editor Selector at the top, choose the 'Deploy Configuration' tab.
Note: Make sure that the physical interface that has access to the SNMP device is selected in the Networks table, or communication with the device will not function properly.
How to Run the Tutorial
To run the tutorial from CDP Studio, select Configure mode, right-click on the system project and select Run & Connect. See the Running and Connecting to the System tutorial for more information.
Verify That It Works
- Click into SNMPTest.SNMPTestApp.SNMPManagerIO
- Scroll down to Properties and set the Value for Debug to 2.
- Scroll up again and click into SNMPTest.SNMPTestApp.SNMPManagerIO.LynxSwitch
- Find the GetRequests table and observe the values in the GetValue column.
- The GetValues are empty at the beginning but should be updated after a while (10-30 seconds).
- The values for the two GetRequests 'trapHostAddr1' and 'trapHostAddr2' show which IP Addresses the LynxSwitch will send its traps to. If one of these matches the IP Address your application is using, the SNMPManagerIO should be able to receive traps. If there is no match, the LynxSwitch must be set up with another trap host address to be able to receive traps.
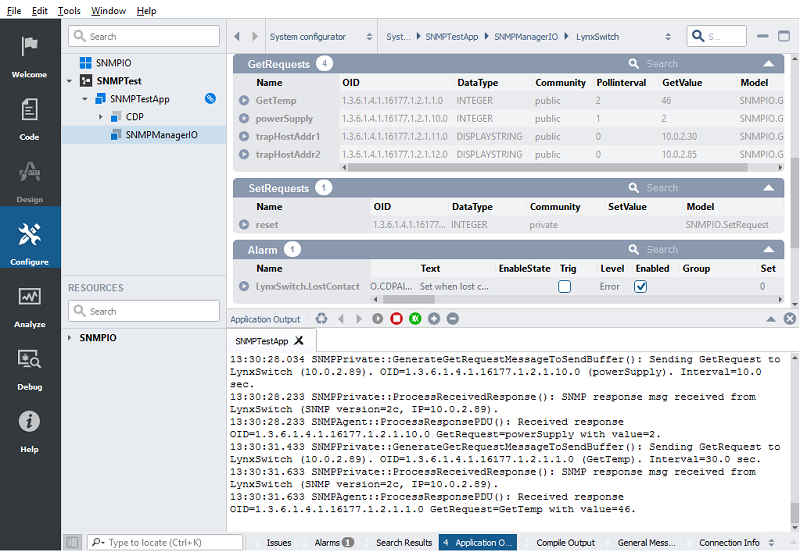
- Click into Application Output in the bottom.
- You should get some debug printouts, similar to these when the Debug level is 2:
13:35:23.246 SNMPPrivate::GenerateGetRequestMessageToSendBuffer(): Sending GetRequest to LynxSwitch (10.0.2.89). OID=1.3.6.1.4.1.16177.1.2.1.11.0 (trapHostAddr1). Interval: once (until reply).
13:35:23.446 SNMPManagerTestApp.SNMPManagerIO: Entering state:  Online
13:35:23.446 SNMPPrivate::ProcessReceivedResponse(): SNMP response msg received from LynxSwitch (SNMP version=2c, IP=10.0.2.89).
13:35:23.446 SNMPAgent::ProcessResponsePDU(): Received response OID=1.3.6.1.4.1.16177.1.2.1.11.0 GetRequest=trapHostAddr1 with value=10.0.2.30.
13:35:26.446 SNMPPrivate::GenerateGetRequestMessageToSendBuffer(): Sending GetRequest to LynxSwitch (10.0.2.89). OID=1.3.6.1.4.1.16177.1.2.1.10.0 (powerSupply). Interval=10.0 sec.
13:35:26.646 SNMPPrivate::ProcessReceivedResponse(): SNMP response msg received from LynxSwitch (SNMP version=2c, IP=10.0.2.89).
13:35:26.646 SNMPAgent::ProcessResponsePDU(): Received response OID=1.3.6.1.4.1.16177.1.2.1.10.0 GetRequest=powerSupply with value=2.
13:35:28.046 SNMPPrivate::GenerateGetRequestMessageToSendBuffer(): Sending GetRequest to LynxSwitch (10.0.2.89). OID=1.3.6.1.4.1.16177.1.2.1.12.0 (trapHostAddr2). Interval: once (until reply).
13:35:28.246 SNMPPrivate::ProcessReceivedResponse(): SNMP response msg received from LynxSwitch (SNMP version=2c, IP=10.0.2.89).
13:35:28.246 SNMPAgent::ProcessResponsePDU(): Received response OID=1.3.6.1.4.1.16177.1.2.1.12.0 GetRequest=trapHostAddr2 with value=10.0.2.85.
13:35:36.445 SNMPPrivate::GenerateGetRequestMessageToSendBuffer(): Sending GetRequest to LynxSwitch (10.0.2.89). OID=1.3.6.1.4.1.16177.1.2.1.10.0 (powerSupply). Interval=10.0 sec.
13:35:36.646 SNMPPrivate::ProcessReceivedResponse(): SNMP response msg received from LynxSwitch (SNMP version=2c, IP=10.0.2.89).
13:35:36.646 SNMPAgent::ProcessResponsePDU(): Received response OID=1.3.6.1.4.1.16177.1.2.1.10.0 GetRequest=powerSupply with value=2.
13:35:44.847 SNMPPrivate::GenerateGetRequestMessageToSendBuffer(): Sending GetRequest to LynxSwitch (10.0.2.89). OID=1.3.6.1.4.1.16177.1.2.1.1.0 (GetTemp). Interval=30.0 sec.
13:35:45.046 SNMPPrivate::ProcessReceivedResponse(): SNMP response msg received from LynxSwitch (SNMP version=2c, IP=10.0.2.89).
13:35:45.046 SNMPAgent::ProcessResponsePDU(): Received response OID=1.3.6.1.4.1.16177.1.2.1.1.0 GetRequest=GetTemp with value=46.
13:35:46.446 SNMPPrivate::GenerateGetRequestMessageToSendBuffer(): Sending GetRequest to LynxSwitch (10.0.2.89). OID=1.3.6.1.4.1.16177.1.2.1.10.0 (powerSupply). Interval=10.0 sec.
13:35:46.646 SNMPPrivate::ProcessReceivedResponse(): SNMP response msg received from LynxSwitch (SNMP version=2c, IP=10.0.2.89).
13:35:46.646 SNMPAgent::ProcessResponsePDU(): Received response OID=1.3.6.1.4.1.16177.1.2.1.10.0 GetRequest=powerSupply with value=2.
13:35:56.446 SNMPPrivate::GenerateGetRequestMessageToSendBuffer(): Sending GetRequest to LynxSwitch (10.0.2.89). OID=1.3.6.1.4.1.16177.1.2.1.10.0 (powerSupply). Interval=10.0 sec.
13:35:56.646 SNMPPrivate::ProcessReceivedResponse(): SNMP response msg received from LynxSwitch (SNMP version=2c, IP=10.0.2.89).
13:35:56.646 SNMPAgent::ProcessResponsePDU(): Received response OID=1.3.6.1.4.1.16177.1.2.1.10.0 GetRequest=powerSupply with value=2.
- If you have another ethernet cable connected into e.g. port3 of the LynxSwitch (with link), and then disconnect it, you should click into SNMPTest.SNMPTestApp.SNMPManagerIO.LynxSwitch.LinkP3 and verify that the TrapAlarm has been Set. You should also get a debug printout in the Application Output similar to "Received trap with OID=1.3.6.1.4.1.16177.1.2.7.4. Alarm set. Text updated to:LynxSwitch.LinkP3:3.".
- If you reconnect the ethernet cable again, verify that the TrapAlarm is Cleared, and you should get a debug printout similar to "Received trap with OID=1.3.6.1.4.1.16177.1.2.7.3. Alarm cleared. Text updated to:LynxSwitch.LinkP3:3.".
- Stop the system by right-clicking the SNMPTest in the Project tree and clicking Stop.
Get started with CDP Studio today
Let us help you take your great ideas and turn them into the products your customer will love.