CDP Ports
Overview
The CDPPort is used to gather related data values into a single data object similar to a struct in programming languages.
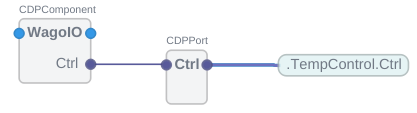
Connecting two CDPPorts via a single Routing creates a data bus – much like a single multicore cable carrying multiple wires, propagating the data in directions defined by the CDPPort Connections.
CDPPort should be thought of as an interface that defines values that belong together for interacting with other objects with the same API. For example:
- A temperature control unit might need to know the current Temp of a system and use this information to control the speed of a Fan to cool the system.
- A three-dimensional point object that has values for all 3 axes: X, Y, Z.
- A data value with its acquisition timestamp.
These are all possible use cases for a port, allowing data that belong together to be propagated and used together.
Input property on ports indicates whether the port should be input or output on the containing block.
CDPPorts can contain the data members as CDPProperties, as ValuedConnection objects with values, or refer to local data values near the port usage location via the Connection object's LocalName attribute.
The Connection objects in the port define the data member directions from the perspective of the Port with the Routing attribute set.
Why Use Ports
From an automation engineer’s perspective, ports simplify system integration. You can connect two complex components with one port-to-port link (like connecting two matching plug connectors) instead of hooking up numerous individual signals. This creates a kind of data bus between the components – once the ports are connected, all the data inside them flows through that one connection. It also helps with reusability: if a component exposes a port with a defined set of signals, any other component with a matching port can connect to it, and they will understand each other as long as the port “interface” matches.
Configuration Port Introduction
Configuration-ports are used when the data to be propagated with Ports already exists as control system values (signals, arguments, etc.) and just needs to be collated into a single interface.
These Ports connect nearby values via PullConnection, PushConnection, or ValuedConnection objects to the Port. ValuedConnection objects also contain a local copy of the value.
Configuration-ports are typically created in configuration by adding and connecting Connection objects in the default CDPPort model. The API of such ports is composed of the Connection object names. To reuse the same Port in multiple places, it can be copied to libraries.
Using PullConnection and PushConnection to Create a Configuration-port
PullConnection and PushConnection are used to collect values to CDPPort when copies of values are not desired in the port object. PullConnection is used as an input (pulling data into the port) and PushConnection as an output (pushing data out of the port).
The benefit of using these connections is that it facilitates a direct connection between the values the connections, at port chain endpoints, refer to.
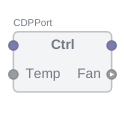
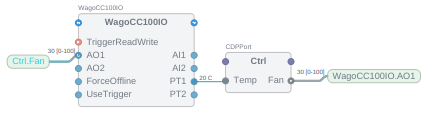
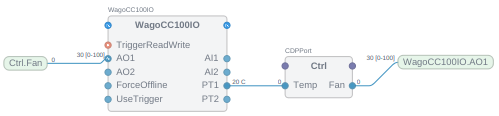
For example, creating an interface for temperature control using a fan speed regulation. The interface must read Temp from the IO block and write back a Fan speed control value. This can be done using the regular CDPPort model in CDPCore resource and adding PullConnection for Temp and PushConnection for Fan to bind the port to local data.
| WagoIO wrapper exposing configuration-port | Configuration-port inside WagoIO wrapper | Connecting port to local data in WagoIO wrapper |
|---|---|---|
|
|
|
Using ValuedConnections to Create a Configuration-port
ValuedConnection is used to collect values to CDPPort when copies of values are desired in the port object. This may be for many reasons, typically at port chain endpoints, like presenting the values in UI or to connect value to multiple targets.
Note: Avoid using ports with values in the middle of the port chain as it can lead to propagation delays for values propagated in the reverse direction (from right to left). For forward data propagation potential delay depends on the scheduling of blocks that the port chain passes through (no delay when the scheduling setup is identical for the blocks), but as values are copied to each port that may add small, but unnecessary overhead.
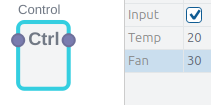
Similar to the previous example, we can add ValuedConnections to the CDPPort model to create the same interface for temperature control. This time, the Ctrl object will contain a local copy of the control values.
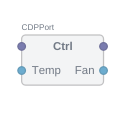
| WagoIO wrapper exposing configuration-port Ctrl | Configuration-port inside WagoIO wrapper | Connecting port to local data in WagoIO wrapper |
|---|---|---|
|
|
|
Code Port Introduction
Code-ports are used to access port data structure values directly from code.
Code-ports with data properties accessible from code are created in a user library via the CDPPort Model wizard and can then be used in CDPComponent code or during configuration. The API of such ports is composed of the user-added CDPProperty names referred by the LocalName attributes in the Connection objects that are auto-created by CDP Studio for each user-added property.
Input property on the auto-created Connection objects needs to be set to indicate if the data is considered input for code or not at the subscribing port, in the same way, a signal would be set Input for input data.
Note: To override the API names of the code-port, one can set the connections RemoteName property. RemoteName changes what data members must exist in the remote API and where the data referred by the LocalName is connected.
Code-ports use CDPProperties as values that are typically only accessed from code and are not shown on the Port object as connection points.
Note: Avoid using code-ports with values in the middle of the port chain as it can lead to propagation delays for values propagated in the reverse direction (from right to left). For forward data propagation potential delay depends on the scheduling of blocks that the port chain passes through (no delay when the scheduling setup is identical for the blocks), but as values are copied to each port that may add small, but unnecessary overhead.
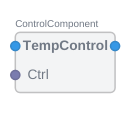
Expanding on the previous examples, it is possible to create a code port to access port data from some control component code to implement the control logic. Where output Fan speed is set based on the input Temp value the port has.
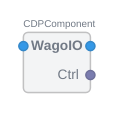
| ControlComponent using Ctrl port | Ctrl port inside ControlComponent | Accessing Ctrl port properties in ControlComponent code |
|---|---|---|
|
| void ControlComponent::ProcessNull() { if (Ctrl.Temp > 30.0) Ctrl.Fan = 100.0; // Full speed cooling else if (Ctrl.Temp > 25.0) Ctrl.Fan 70.0; else Ctrl.Fan = 30.0; // Minimal cooling } |
Proxy Port Introduction
A default CDPPort that contains no added connections is called a proxy-port. It forwards the incoming port requests to the port that is defined in its Routing attribute, allowing the creation of port chains and exposing internal ports on top-level containers as connectable interfaces.
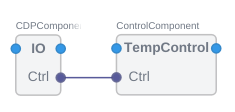
Connecting the two previous examples into a cohesive unit where WagoIO block's Ctrl interface is exposed on IO container as a Ctrl interface that then can be connected to the ControlComponent's Ctrl interface.
| IO block with proxy-port Ctrl | Proxy-port using CDPPort without connections | Proxy-port used inside IO block to forward Ctrl port |
|---|---|---|
|
|
|
Note: The port names in the examples do not have to match, but as they represent the same interface and data, the name Ctrl is used consistently throughout.
Usage
Configuration Port Usage Benefits
CDPPorts defined in the configuration, known as configuration-ports, can be used to bring separate but related values in a component into a single API.
CDPPorts can connect to other CDPPorts with a matching API or to CDPObject-based nodes containing values that match the expected API names.
Note: To override the API names of the configuration ports, one can set the connections RemoteName property. RemoteName changes what data members must exist in the remote API and where the data referred by the Connection name is connected.
Ports have the following important configuration options:
| Description | |
|---|---|
| Connections | List of connection objects in the port that are connected to values the port combines. Connection objects Name defines the expected API name. |
| Routing | Path to remote CDPPort or CDPNode-based object matching the mapping of values by port Connections. |
| DataConsistency | When enabled, values connected by this port are sent within the same data packet, meaning that a group of remote values always appear consistent. Otherwise, when multiple values change, they may appear for a remote application in the wrong order or one change might be delayed a little. This option can be enabled when the port only connects values with periodic routing (not event-based, see CDPPropertyBase::RouteMethod_e). For example, CDPSignals use periodic routing, CDPParameters use event-based and for CDPProperties it is configurable. |
| Input | Defines the side on which the port is presented on the parent object. |
| Connected | Displays the current cumulative status of all Mandatory connections. |
PushConnection and PullConnection have the following properties:
| Property | Description |
|---|---|
| Name | Unique identifier to this connection defining the API member. |
| Input | Inputs subscribe to the remote data values and outputs are subscribed by the remote object. In other words: Connections marked input provide input data to the port location and output connections collect output data from the port location. |
| LocalName | Routing to value where the port is located that is part of Port API. |
| RemoteName | Optionally override the remote value name if it differs from the API set by Connection name. For example: ".MyValue". |
| Connected | Displays the current status of the connection. |
| Connect | Internal property that controls allowed connection directions. By default, both Upstream and Downstream are allowed. Upstream - is the direction of the first subscribing port in the chain. Downstream - is the direction of the end of the chain (last port without set routing) |
| Mandatory | Internal property that indicates if this connection is Mandatory to be connected for the Port to report overall successful Connected status. |
Note that when modifying LocalName or RemoteName during runtime, a reconnect sequence will be triggered if the port was connected. For bulk modifications first, disconnect the port by sending CM_SUSPEND message, then do modifications and finally send CM_ACTIVATE message to reconnect.
ValuedConnection has the following properties:
| Property | Description |
|---|---|
| Name | Unique identifier to this connection defining the API member. |
| Input | Inputs subscribe to the remote data values and outputs are subscribed by the remote object. In other words: connections marked input provide input data to the port location and output connections collect output data from the port location. |
| Type | Type of the Value the Connection stores locally. |
| Value | Local copy of the routed value |
| Routing | Routing to value where the port is located that is part of Port API. |
| Connected | Displays the current status of the connection. |
| Connect | Internal property that controls allowed connection directions. By default, both Upstream and Downstream are allowed. Upstream - is the direction of the first subscribing port in the chain. Downstream - is the direction of the end of the chain (last port without set routing) |
| Mandatory | Internal property that indicates if this connection is Mandatory to be connected for the Port to report overall successful Connected status. |
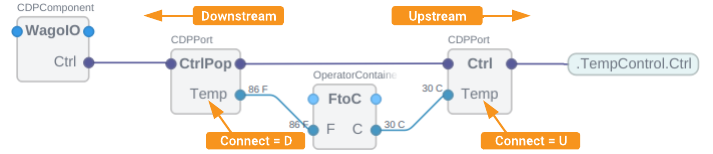
Using Upstream and Downstream on Connections
When connecting multiple ports in a chain there sometimes is a need to control the direction of the connection. For example, a value needs to be taken out changed and added back to the port chain. Under normal circumstances, this is not possible as it would create multiple sources for a value in the port chain. To allow this the Connect property on the connection can be set to allow Upstream or Downstream connections, essentially filtering the direction of the connection visibility. Connect property tells the Port in which direction the connection is visible. By default, connections are visible in both direction in the middle of the chain.
Code Port Usage Benefits
When creating CDPComponents code-ports are a great tool to simplify the component API and reduce the need to connect a large number of separate signals between components.
The code can become even easier to read and use if you implement data-related functions in the wizard created CDPPort derivate. If you need to control multiple data objects of this type then the benefit of using CDPPort is clear, as you can make an array of CDPPort derivatives and iterate them to do processing, instead of having a lot of seemingly unrelated signals and a lot of duplicate code.
Inheriting from CDPPort
Code-based CDPPorts are known as code-ports.
class MyPort : public CDPPort
{
public:
  void Create(const char* shortName, CDPComponent* parent) override;

  CDPProperty<double> Flow;
  CDPProperty<double> Pressure;
};

void MyPort::Create(const char* shortName, CDPComponent* parent)
{
  CDPPort::Create(shortName, parent); // Always call the base class.
  Flow.Create("Flow", this);
  Pressure.Create("Pressure", this);
}
The upside of inheriting from CDPPort is that it is easy to use such a variable in the code of your custom component.
class MyComponent : public CDPComponent
{
  ...
  MyPort Port;
};

void MyComponent::Create(const char* fullName)
{
  CDPComponent::Create(fullName); // Always call the base class.
  Port.Create("Port", this);
}

void MyComponent::ProcessNull()
{
  if (Port.IsConnected())
  {
    Port.Flow = CalculateFlow();
    if (Port.Pressure > 200)
      SetAlarms();
  }
}
Note: CDPPort also provides a generic API to iterate over values with a visitor pattern:
void ForEachConnection(const std::function<void(IPortConnection&)>& f);
That allows writing code that works with both code ports-and configuration-ports.
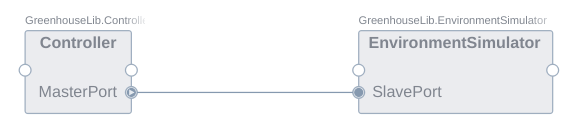
Using the Same CDPPort on Both Sides
It may be beneficial to use the same port object on both sides of the connection. In the previous example, MyPort contained Pressure and Flow. If one component measures Pressure and uses Flow, but another needs Pressure information to regulate Flow, then both could add MyPort as a member. To connect them, only one side must set the port Routing property and set the appropriate Input attribute in the connections table. The side that sets the Routing property is the master (dominant), and the other port becomes the slave concerning the input and output of the different signals/properties. If you always define ports from the user's/subscriber's perspective, no further configuration is needed when using the code-ports. This is why the DisplayHint is set to Internal for the Connection objects in code-port to hide implementation details.
To make connecting ports easier in the Block Diagram. Input property to define if the port is considered a block input or output.
Using Pull or Push Ports
All the port examples so far have talked about ports that use regular subscription routing also known as Pull routing where the dependency between ports goes from left to right. Input port on the right-hand side block has a routing that refers to the output port on some left-hand side block.
Push routing type is also available to be used with CDPPort. Push ports are used to invert the dependency direction of port routings. In the case of Push ports the output port on the left-hand side block will have a routing set that refers to the right-hand side input port.
Note: Push routing type changes where Block Diagram view sets the routing value when a connection is made to be the left-hand side output instead of input on the right.
For ports that are defined in Library as a model or as part of some model, it is possible to set port to use Push routing type. Set two properties:
- TypeHint="RoutingType"
- RoutingType="Push"
Note: The Hide Base Model Items filter needs to be disabled to make the RoutingType property visible.
For Push routing type the component containing the master (subscriber) port will be now on the left side. A special icon on the master port will hint that RoutingType hint "Push" is used:
Note: In Configure mode using configuration-port there are two alternative models of CDPPort available in Resource tree. For push ports, select model CDPPushPort and normal ports should use model CDPPort. Similarly, two alternatives of CDPPortConnection are available - for push connections select model PushConnection and for pull connections select model named PullConnection.
Note: Ports with Push and Pull routing types should not be mixed when connecting more than two ports in a chain as then both ends of the connected port chain think they are the subscriber causing connection conflicts.
Behavior
When attempting to connect to a remote object or port, the CDPPort behaves in the following way:
- Port with set Routing sends out value connect requests for all data members in its connection list either to get routing information for input values or provide routing information to the other side about its output values.
- Target object of the value connect requests sends back routing information about requested values it has or connects any values it has (or has references to in the connections list) using the routing information it received.
- Both sides set the Routing property of any value they connect to Read-Only status and refuse to connect it more than once.
For detailed CDPPort usage see How to Use Composite Interfaces
Get started with CDP Studio today
Let us help you take your great ideas and turn them into the products your customer will love.