Connecting to Azure IoT Hub
Connecting to Azure IoT Hub
Introduction
This tutorial describes how to set up CDP Studio to exchange data with Microsoft Azure IoT Hub cloud. It will give you guidelines how to set up MQTTClient to send and receive signal values to and from Azure IoT Hub using MQTT protocol. With Azure cloud you can manipulate, collect or visualize data received from CDP. For example you can send temperature and humidity sensor data from CDP to Azure and then visualize received data in Azure web application as described at Azure example https://docs.microsoft.com/en-us/azure/iot-hub/iot-hub-live-data-visualization-in-web-apps
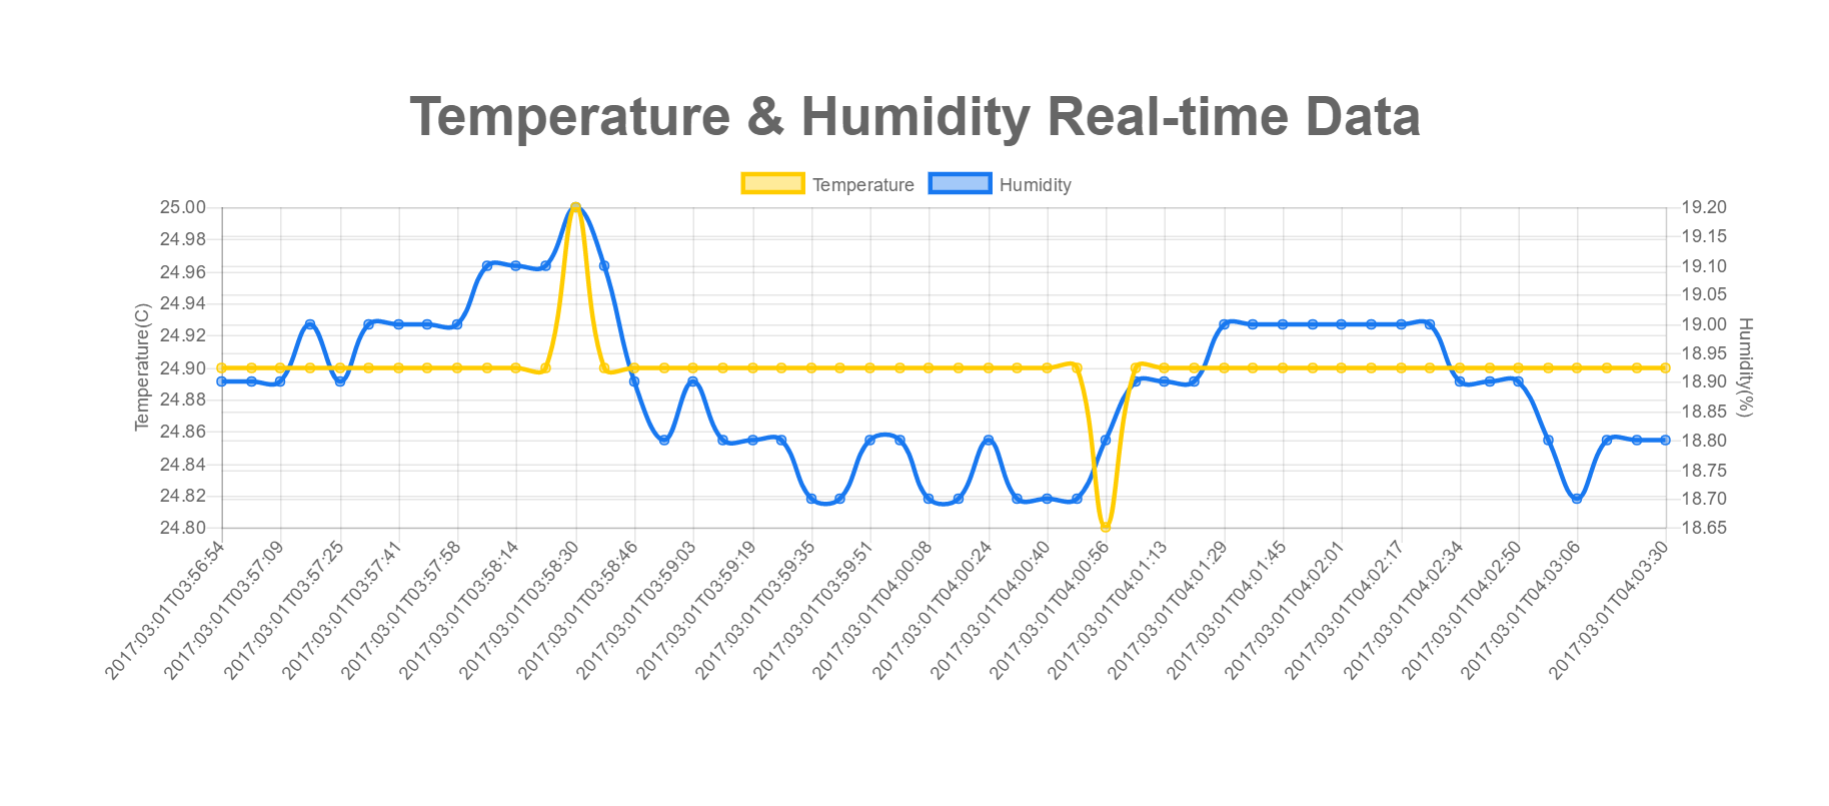
Prerequisite for this tutorial is that you have Azure IoT Hub service deployed and running. For guidelines how to do that please consult https://azure.microsoft.com/en-us/services/iot-hub/
Overview
To connect CDP to Azure you need to obtain the following information from Azure IoT Hub:
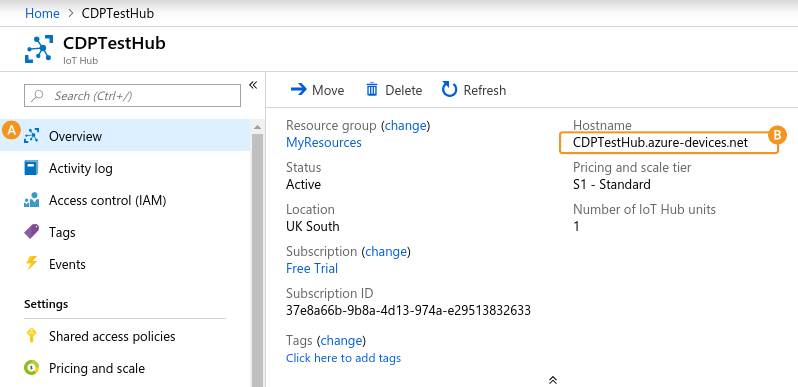
- Hostname - usually something like yourhubname.azure-devices.net
- Device ID - you have to register dedicated device in Azure for CDP connection.
- Shared Access Signature (SAS) - actually a password corresponding to the device to use on connection for authentication
- topics - different pre-configured topics exist in Azure IoT Hub depending of the communication type needed. You can also configure your own topics (called endpoints in Azure).
Following sections describe how to configure Azure and how to obtain this information.
Obtaining Azure IoT Hub Hostname and Creating Device ID
Log into Microsoft Azure Portal at https://portal.azure.com and locate your IoT Hub resource from portal home page. In the Overview page you can locate Hostname
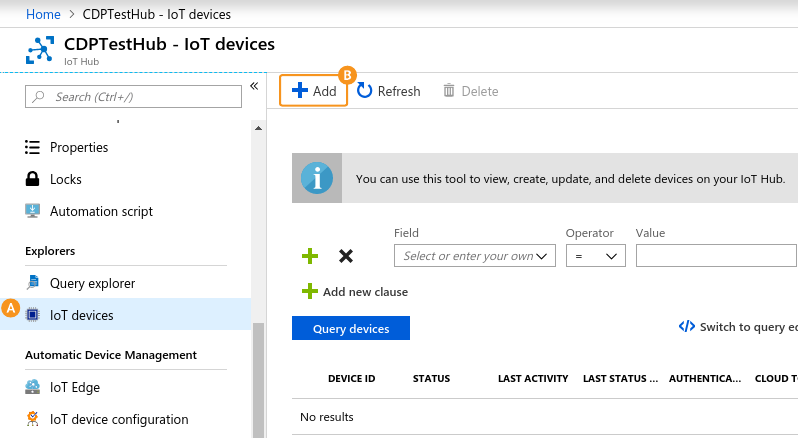
You have to create a dedicated device in Azure for CDP connection. To create device, open IoT devices page and click Add
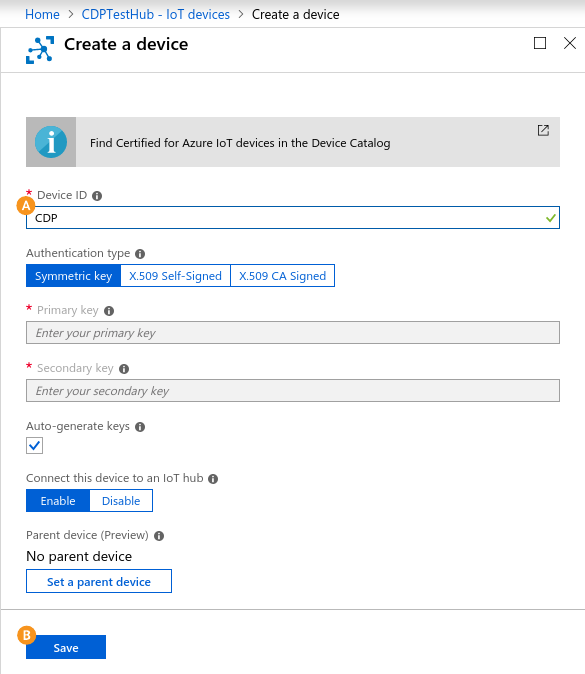
In opened Create a device page enter some Device ID for CDP connection , fe "CDP", and click Save
Creating Shared Access Signature for CDP Connection
Unfortunately, Shared Access Signatures (SAS) can not be created via Microsoft Azure Portal. You can use different tools provided by Microsoft for SAS creation like Device Explorer , Azure CLI etc. This tutorial will guide you how to create SAS with Visual Studio Code with Azure IoT Hub extension.
First, install Visual Studio Code from https://code.visualstudio.com/ unless you have it installed already. Now, install Azure IoT Hub to Visual Studio Code as described in https://marketplace.visualstudio.com/items?itemName=vsciot-vscode.azure-iot-toolkit
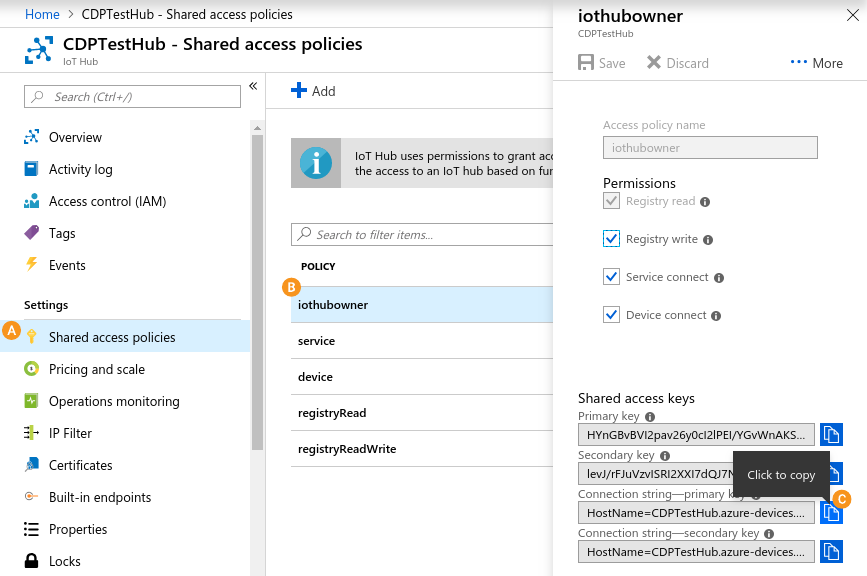
Go to Microsoft Azure Portal at https://portal.azure.com and obtain your IoT Hub Connection String. For that, open menu Shared Access policies, then click on policy named iothubowner and then on copy sign next to {Connection string - primary key}
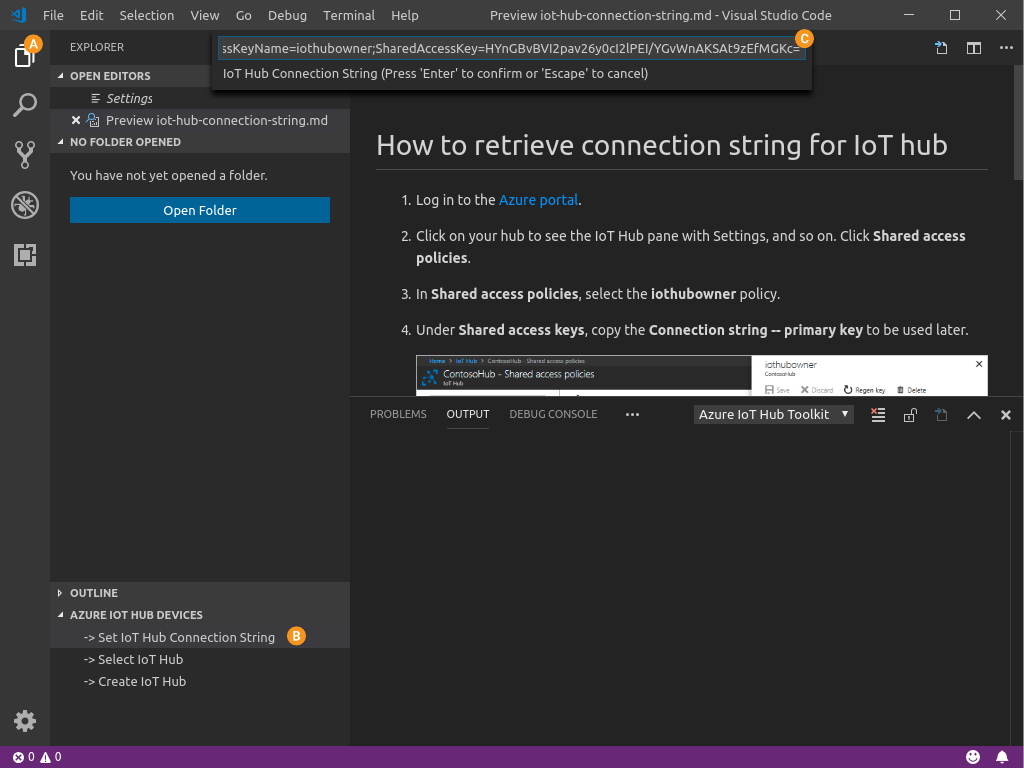
Now open Visual Studio Code, click on Explorer locate AZURE IOT HUB DEVICES at the bottom of the screen and click on Set IoT Hub Connection String. Then paste (f.e by pressing Ctrl+V) the connection string into the prompt opened on top of the window and press Enter key.
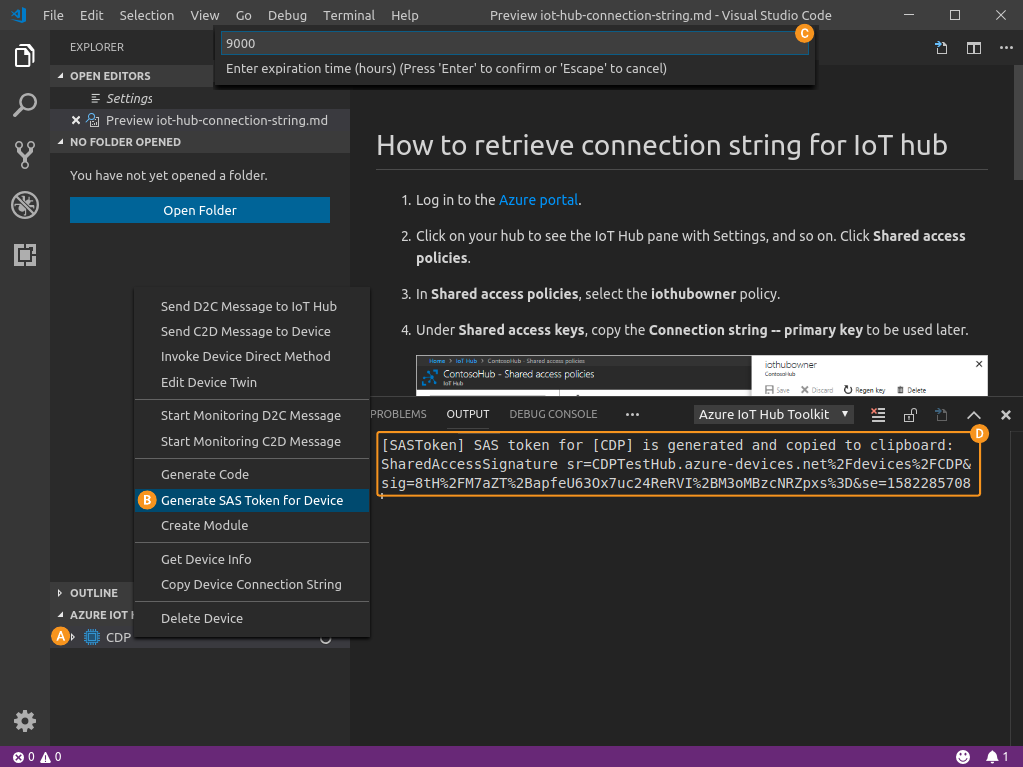
Device names under your IoT Hub will appear at the bottom of the screen. Right click on the device you created for CDP connection and choose Generate SAS Token for Device from the context menu. Then choose expiration period for the SAS (f.e 9000 hours for one year approximately) and press Enter key. After that, generated SAS will be put into clipboard and also shown on screen .
Configure MQTTClient
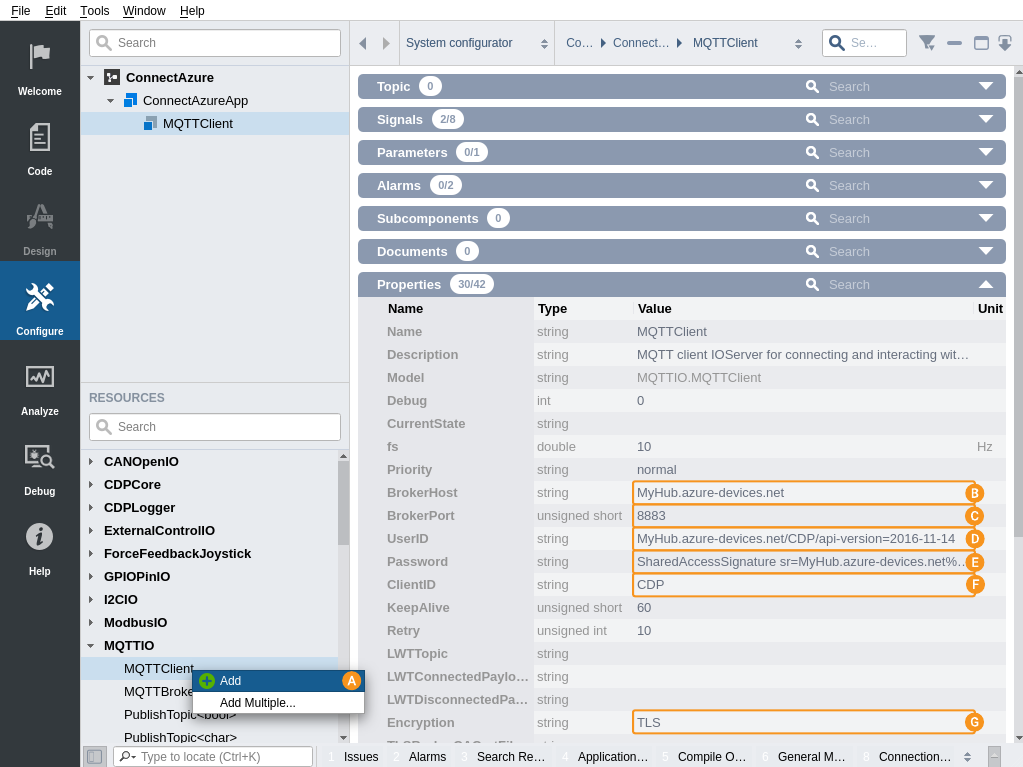
With that all preparations on Azure side are done and you can start configuring CDP. Open CDP Studio and add MQTTClient component to the system you need to connect to Azure. Then, click onto added MQTTClient component and configure following properties.
- BrokerHost - set to Azure Hostname you located earlier
- BrokerPort - set to 8883
- UserID - set to combination of strings {Hostname}/{Device ID}/api-version=2016-11-14
- Password - paste here the SAS token you generated earlier
- ClientID - set to Device ID you created earlier
- Encryption - set to TLS
- ProtocolVersion - set to 3.1.1
Note: Although Microsoft Azure IoT Hub supports MQTT, it is not a 100% general purpose MQTT broker. It has its own built in topic system that must be followed. In addition, messages sent to topics by devices(clients) can not be subscribed and listened by other devices(clients). Therefore only some Azure built-in topics that can be used for communication.
We give you some configuration examples for some data exchange scenarios below.
Sending Data as Azure IoT Hub Events
To send data to Azure IoT Hub as events you have to use Azure built-in topic
devices/{DeviceID}/messages/events/
where {DeviceID} is Device ID you created in Azure for communication with CDP.
For example, to send data as a sensor events as JSON values like temperature and humidity you have to:
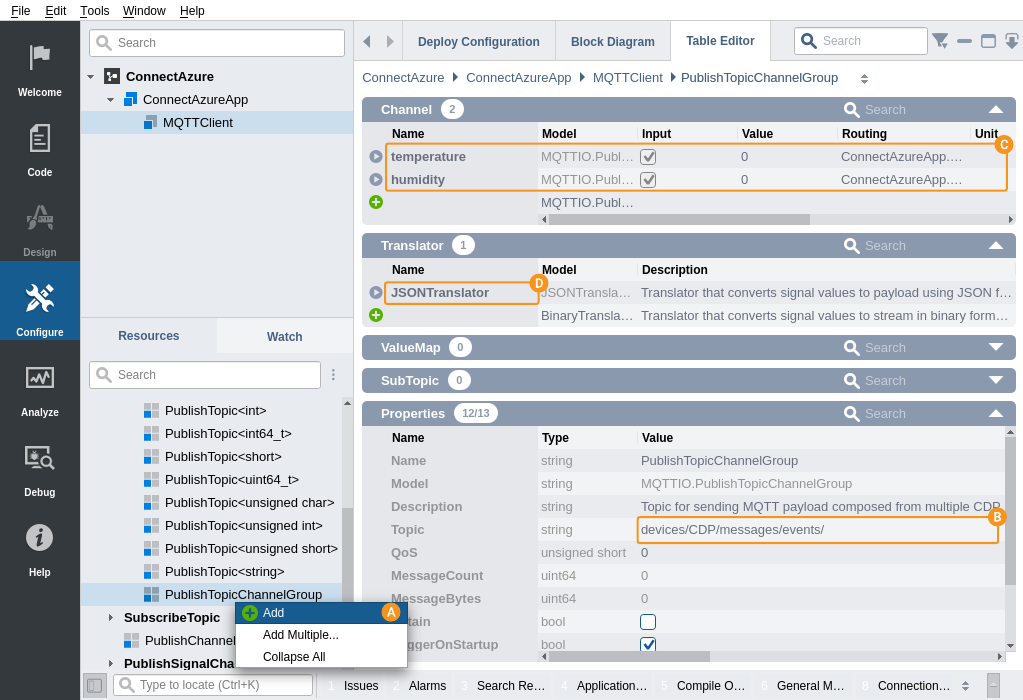
- create PublishTopicChannelGroup under MQTTClient by choosing Add from context menu in Resource tree and navigate into the topic configuration
- set Topic property to be devices/CDP/messages/events/
- add 2 signal channels under the topic, name them temperature and humidity. Route their values from actual sensor values
- Add Translator of the topic to be JSONTranslator<ostream>
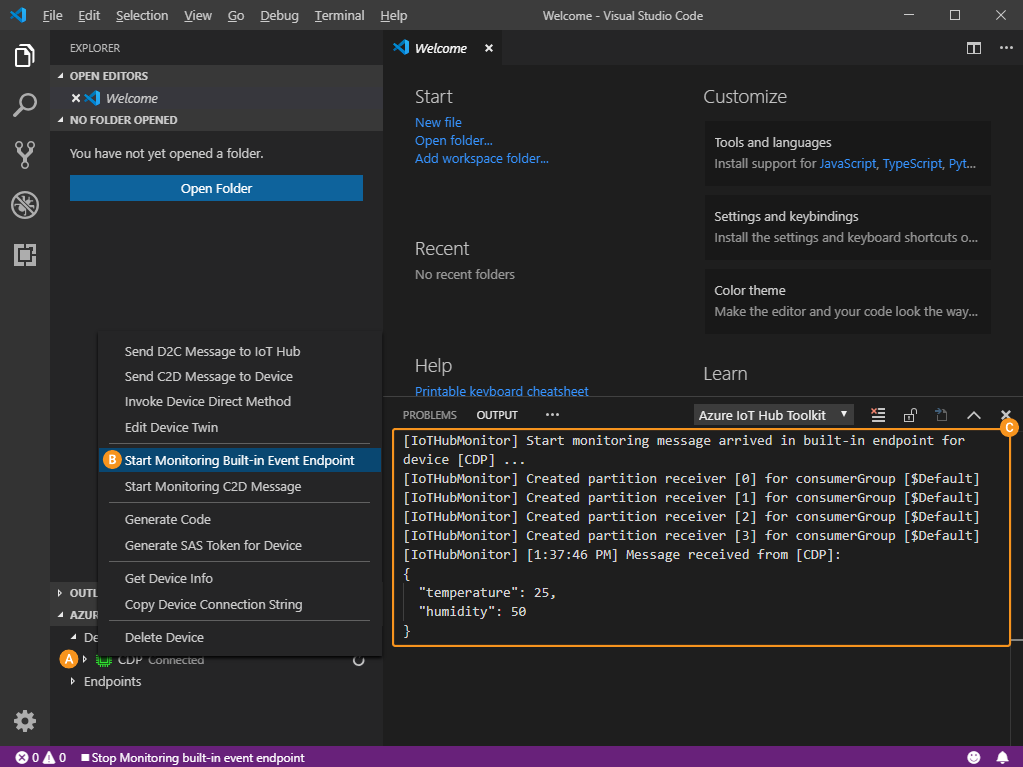
Note: You can monitor events received by Azure by using Visual Studio Code Azure IoT Hub by right clicking on the device and choosing Start Monitoring Built-in Event Endpoint from context menu (obtain the built-in endpoint connection string from Azure Portal by locating Hub settings -> Built-in endpoints -> Event Hub-compatible endpoint).
Then publish messages sent by CDP will appear on OUTPUT pane .
Sending Data as Azure IoT Hub Device Property Changes
To send data to Azure IoT Hub as device property values you have to use Azure built-in topic
$iothub/twin/PATCH/properties/reported/?$rid={some_rid}
where {some_rid} should be changed to any number of your choice (like 1).
For example, to send data as a sensor property values like temperature and humidity you have to set up PublishTopicChannelGroup exactly as described above, only set Topic property to string $iothub/twin/PATCH/properties/reported/?$rid=1 instead.
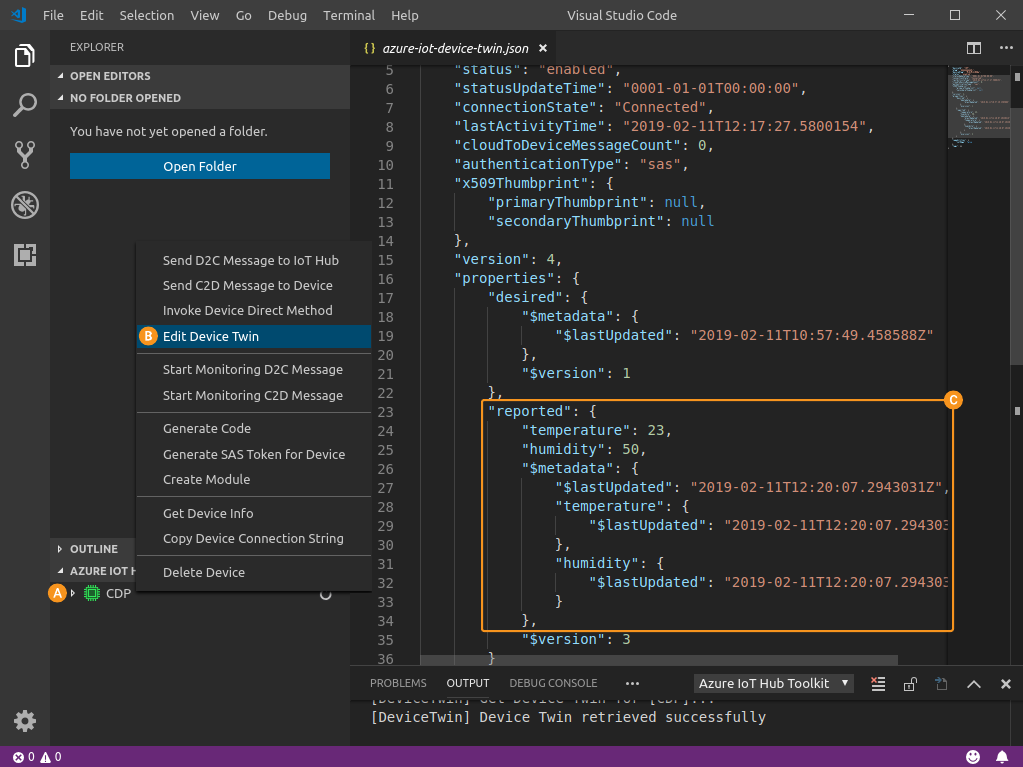
Note: You can monitor property change is received by Azure by using Visual Studio Code Azure IoT Hub by right clicking on the device and choosing Edit Device Twin from context menu and looking at the device configuration that will show all device properties and their values including the ones (temperature and humidity) that were sent by CDP .
Receiving Data Sent by Azure IoT Hub
To receive data from Azure IoT Hub as C2D messages you have to use Azure built-in topic
devices/{DeviceID}/messages/devicebound/#
, where {DeviceID} is Device ID you created in Azure for communication with CDP
For example, to receive numeric messages from Azure you have to:
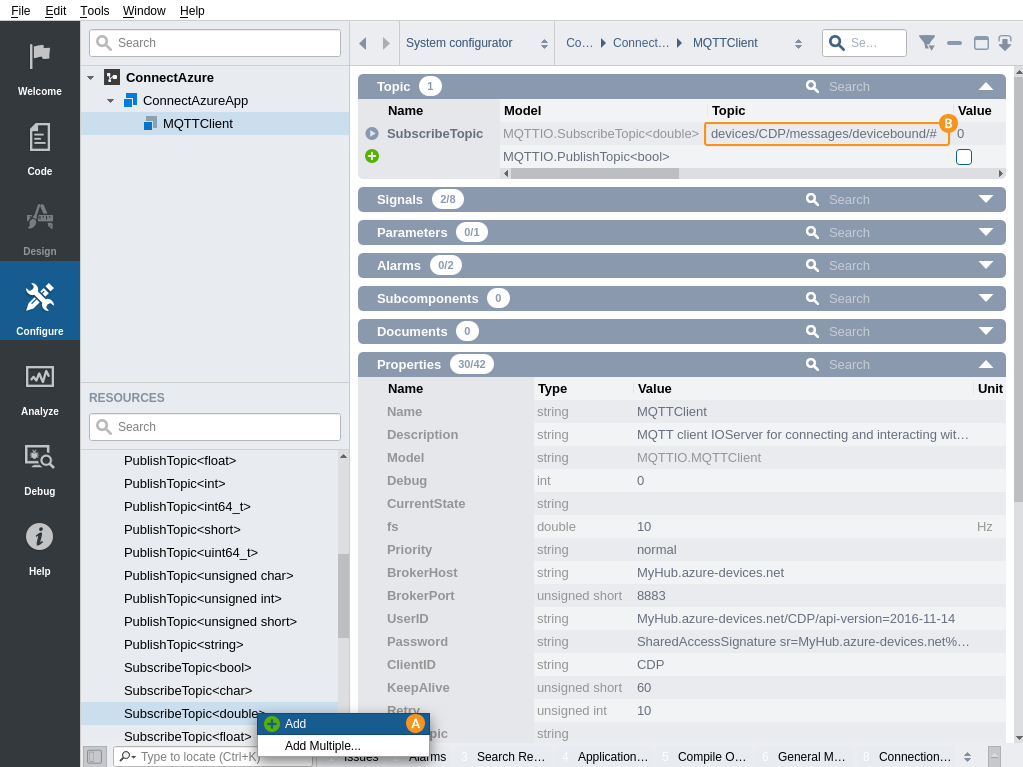
- create SubscribeTopic<double> under MQTTClient by choosing Add from context menu in Resource tree
- set Topic property to be devices/CDP/messages/devicebound/#
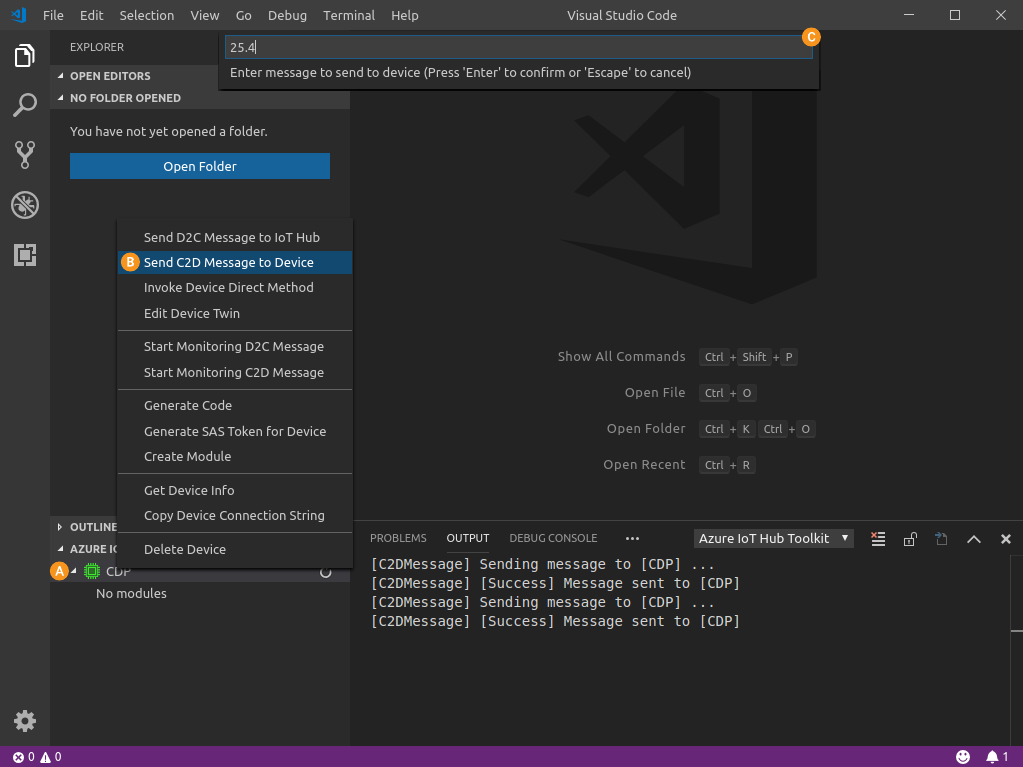
Note: You can test sending messages from Azure using Visual Studio Code Azure IoT Hub by right clicking on the device and choosing menu Send C2D Message to Device. This will prompt you for message content where you can enter desired value and press Enter key to send it to CDP.
Responding to Azure Method Calls
Microsoft Azure has a specific way to call methods in IoT devices - called direct method as described in https://docs.microsoft.com/en-us/azure/iot-hub/iot-hub-devguide-direct-methods.
Devices can serve direct method requests by subscribing to the Azure MQTT topic
$iothub/methods/POST/{MethodName}/#.
, where {MethodName} is any method that the device supports, or alternatively to the topic
$iothub/methods/POST/#.
, where device supports different methods via one subscribe.
On direct method call Azure will publish request to following MQTT topic
$iothub/methods/POST/{MethodName}/?$rid={RequestId}.
, where {MethodName} is the method and {RequestId} is per-request unique ID.
Devices have to respond to the method call to another MQTT topic
$iothub/methods/res/{Status}/?$rid={RequestId}
, where {Status} is the status code of method execution and {RequestId} is the request unique ID, that was provided with the method call.
To respond to the Azure direct method using CDP following structure has to be added under the MQTTIO server
- a wild-card SubscribeTopic, that listens the Azure direct method, setting Topic to either $iothub/methods/POST/# (to serve all possible methods using one SubscribeTopic) or for example to $iothub/methods/POST/SomeMethodName# (to serve only the SomeMethodName method)
- a PublishTopic, that will be triggered to respond to the Azure with the information requested. Every response must be sent to its unique response topic that includes the $rid, so the Topic parameter of the PublishTopic must be changed accordingly before every MQTT publish.
The most reliable and convenient way to configure the response sending is by using MQTTIO topics message triggering support (see information about MessageOnReceive and SendOnMessage arguments in the MQTTIO Topics) documentation.
The following describes how to configure a simple responder for the Azure direct method named GetTemp
- From the Resource tree add a SubscribeTopicChannelGroup to the MQTTClient
- Set the Topic property of the SubscribeTopicChannelGroup to be $iothub/methods/POST/GetTemp/#
- From the Resource tree add a Message to the SubscribeTopicChannelGroup to have a MessageOnReceive argument for the topic to be able to send messages on every topic receive happening.
- From the Resource tree add a PublishTopicChannelGroup to the MQTTClient
- Add 2 signal channels under the topic, named temperature and humidity. Route these channel values from the actual sensor values
- Add JSONTranslator to the topic to the PublishTopicChannelGroup
- From the Resource tree add a Message to the PublishTopicChannelGroup to have a SendOnMessage argument for the topic for message-based publish triggering.
- Unset TriggerOnStartup and TriggerOnChange properties of the PublishTopicChannelGroup
- From the Resource tree add a MessageTransform message operator to the MQTTClient and set its Search to value to .*Topic='\$iothub/methods/POST/GetTemp/\?\$rid=(\d+)'.* and Replace to value to Topic='\$iothub/methods/res/200/?\$rid=$1'
- Drag from SubscribeTopicChannelGroup.MessageOnReceive to MessageTransform.InMessage to set message push routing to MessageTransform operator
- Drag from MessageTransform.Target0 to PublishTopicChannelGroup.SendOnMessage to set message push routing for PublishTopicChannelGroup message-based publish triggering
The described configuration will look like this in the Block Diagram:
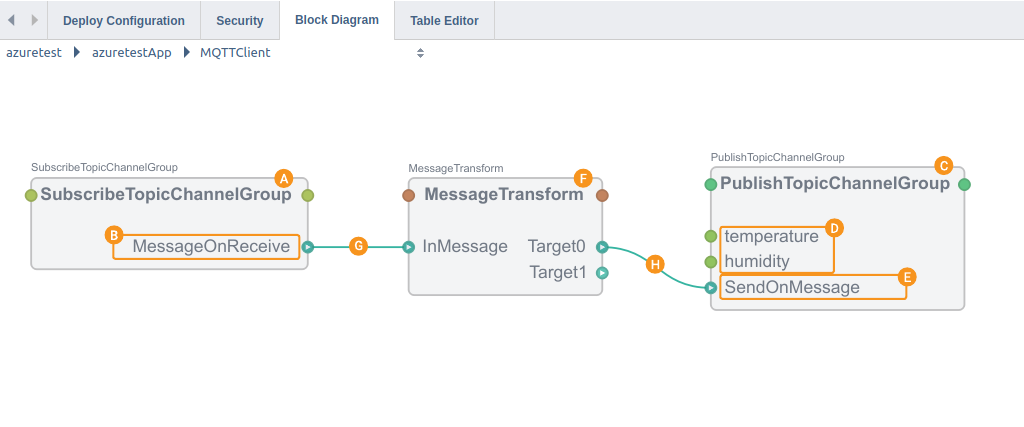
The configuration works as follows. For every receive happening in SubscribeTopicChannelGroup a message is sent to the MessageTransform operator, which modifies the message by changing the incoming packet name SubscribeTopicChannelGroup to output packet name PublishTopicChannelGroup and the Topic parameter to the needed format for the response, and then forwards the message to the PublishTopicChannelGroup.SendOnMessage argument that will trigger the response to be published.
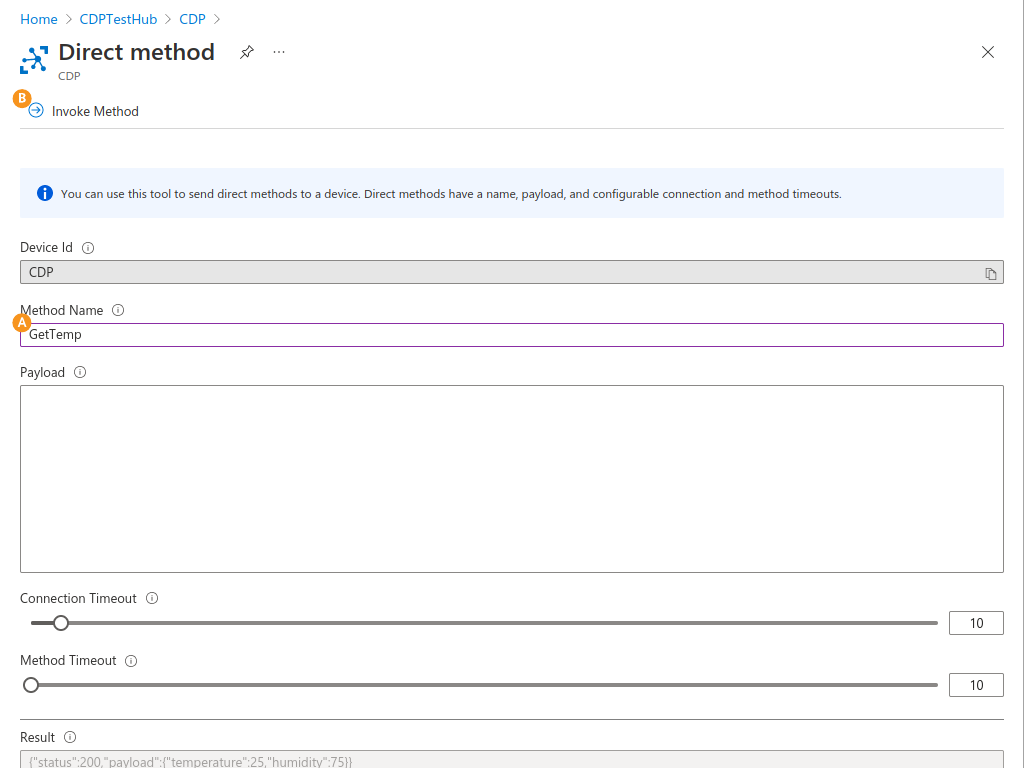
To test the Azure direct method run the application and try calling the methods using Azure portals Direct Method message test page (can by selecting menus Devices -> your device name -> Direct Method), by filling in the Method Name and by pressing Invoke Method:
About Security of This Tutorial
Controlling signals over public Internet using MQTT (as in the tutorial above) is secure as long as you follow these guidelines:
- Always use encrypted transmission - then data (including userid/password) can not be eye-spotted by third-parties.
- Always use authentication (userid/password or client certificate authentication).
- Always firewall your CDP installation using your Internet router or separate firewall.
- Set up firewall not to allow incoming connection to your network. MQTT clients always connect to broker (never vice versa).
Note: For more security, you should also set up broker host certificate verification in MQTTClient. Doing that ensures the broker CDP is interacting with is actually the one you initially intended to interact with.
To set up broker certificate verification:
- obtain broker CA (certificate authority) certificate (in PEM format) and put it into application folder
- copy downloaded certificate into CDP application folder
- add the certificate to application in CDP Studio in Code mode right-clicking on application name and choosing Add existing files...
- configure MQTTClient to use the certificate file (property TLSBrokerCACertFile)
Get started with CDP Studio today
Let us help you take your great ideas and turn them into the products your customer will love.