Interacting With a Phone via Cloud-Hosted MQTT Broker
Interacting With a Phone via Cloud-Hosted MQTT Broker
Introduction
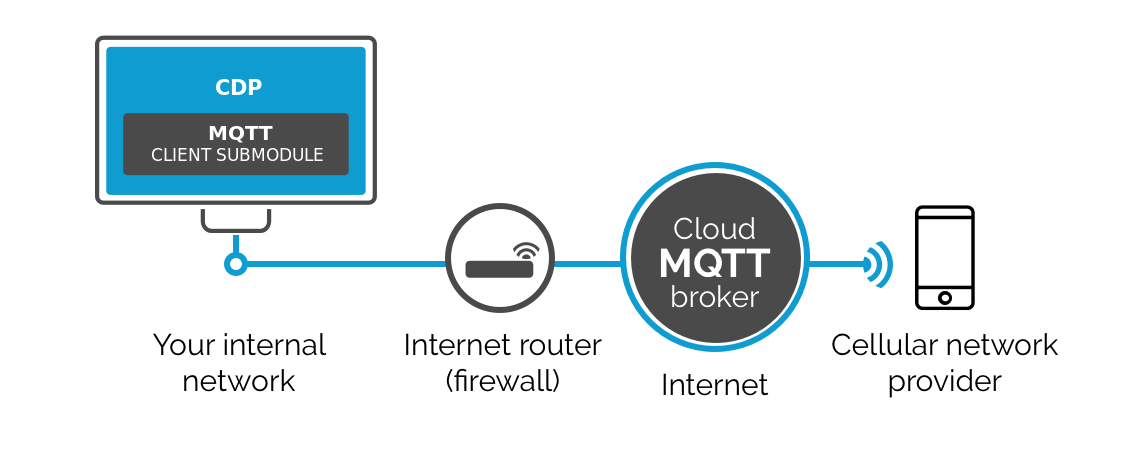
This tutorial describes how easy it is to control and monitor CDP signals remotely over the public Internet using a cloud MQTT broker and your phone's MQTT application.
Choose Cloud-Hosted MQTT Provider
First, you have to create an account at one of the cloud MQTT providers. Many cloud MQTT broker providers exist with different usage terms (many of them also offer free-of-charge services). For example, one of the easiest to set up MQTT brokers with a free plan available is at HiveMQ Cloud.
As a result you need to obtain broker server address, server port (some providers expose it as url, that is actually a server address concatenated with server port using semicolon), user name, password (some providers call they together as credentials).
Create MQTTClient System
Follow these steps to create the MQTT client system:
- Create a new CDP system, name it MQTTTest
- Click on the default application called MQTTTestApp.
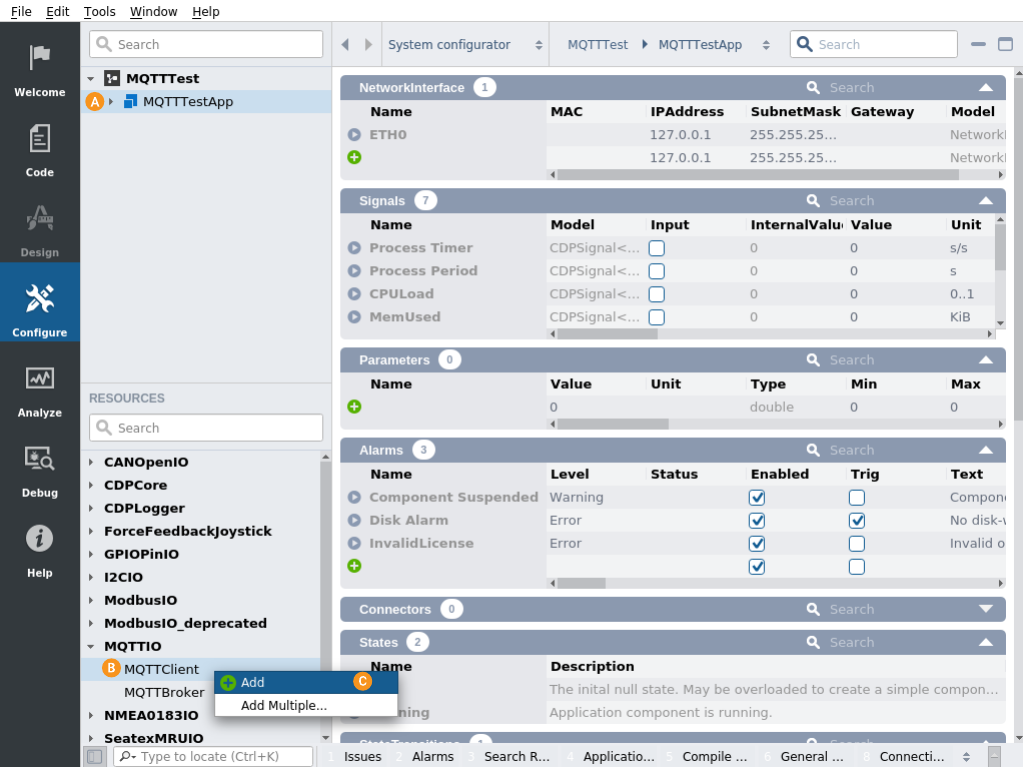
- Choose a MQTTClient from Resource tree and click Add to add MQTTClient to the application
Configure MQTTClient for Broker Connection
Follow these steps:
- Click on the added MQTTClient component
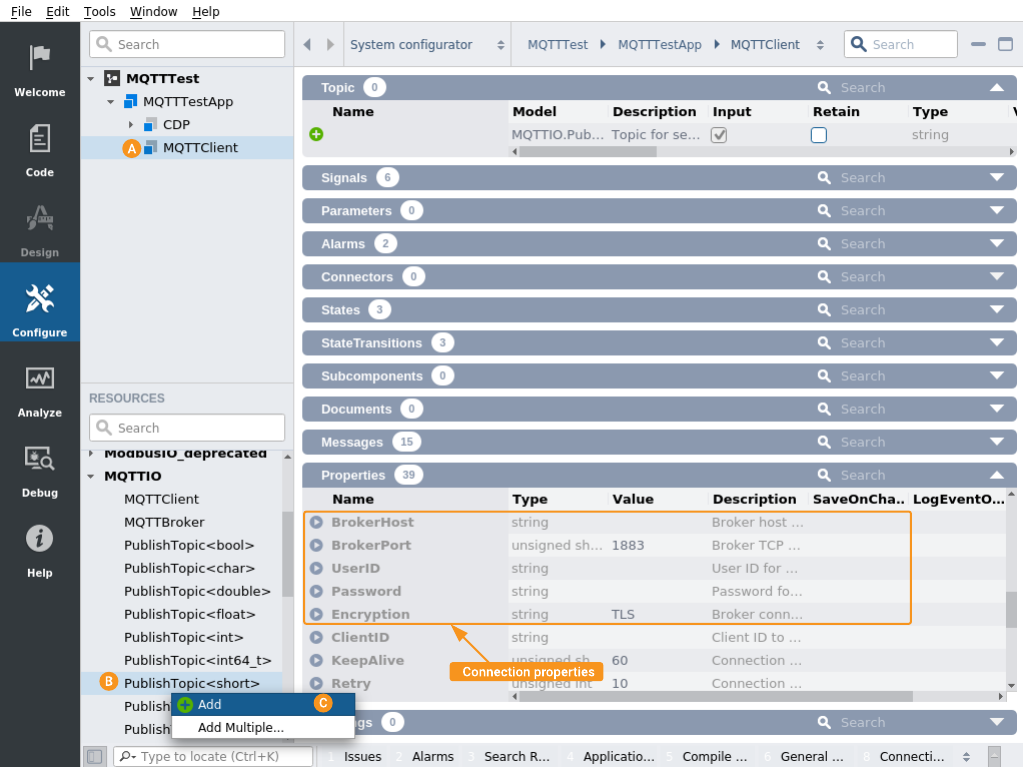
- Find and configure the following MQTTClient connection properties:
- BrokerHost - set to server address you were provied
- BrokerPort - set to server port number you were provided
- UserID - set to user name you were provided
- Password - set to password you were provided
- Encryption - set to TLS to use encrypted message transport (unless you are using a broker that does not support TLS encryption)
- Debug - set to 2 for MQTTClient to output diagnostic messages, and also incoming and outgoing MQTT payloads into the CDP application output
Add Topics
To be able to send values, we need to add a PublishTopic to our MQTTClient
To add PublishTopic, follow these steps:
- Choose a PublishTopic<int> from Resource tree
- Click Add to add PublishTopic<int> to MQTTClient
To be able to receive values, we also need to add a SubscribeTopic to our MQTTClient. To add SubscribeTopic, follow these steps (similar to adding PublishTopic):
- Choose SubscribeTopic<int> from Resource tree
- Click Add to add SubscribeTopic<int> to MQTTClient
Set Topic Strings
Every topic must have a topic string in MQTT.
To be able to send and receive messages, choose and set topic strings:
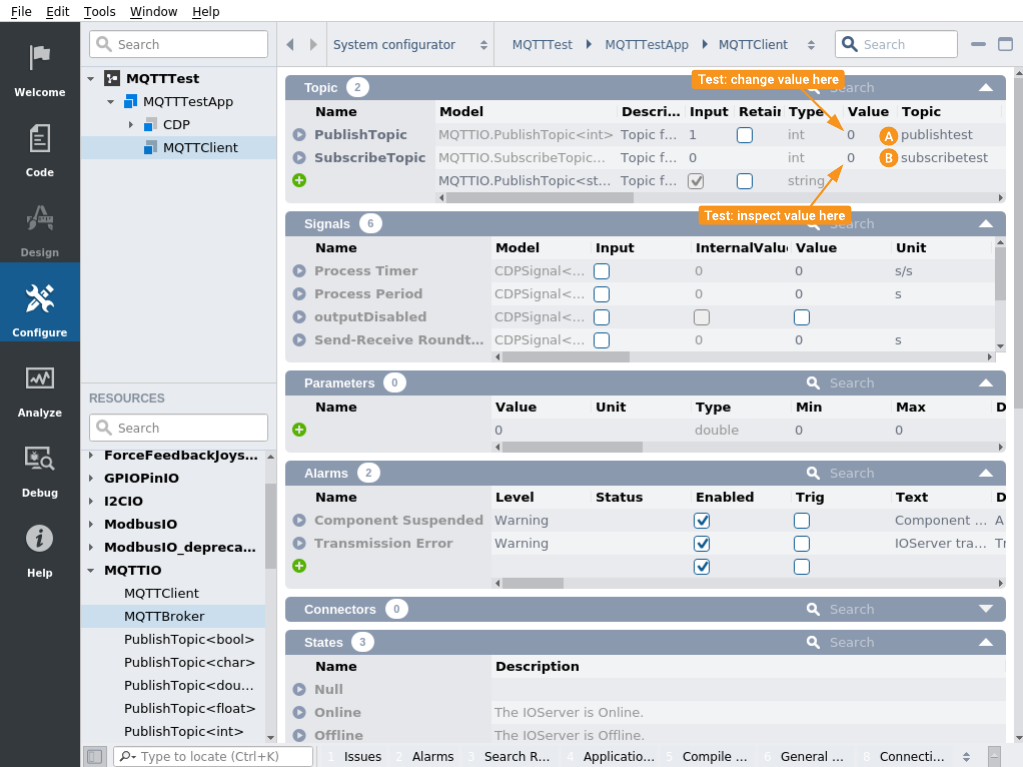
- Set PublishTopic<int> topic string to value publishtest
- Set SubscribeTopic<int> topic string to value subscribetest
Install and Set Up the MQTT Application on Your Phone
Follow these guidelines:
- Open your phone app center and search for applications using the MQTT keyword
- Install one of the found MQTT apps listed, f.e., MQTT Dash or IoT MQTT Panel, etc.
- Run the installed app on your phone and configure a new MQTT broker. Set the broker address and ports that you were provided by the chosen cloud-hosted broker
- Configure 2 topics (publish and subscribe) in the application and name them reversed:
- set the publish topic parameters as you were setting SubscribeTopic in CDP, for example, to subscribetest
- set the subscribe topic as you were setting PublishTopic in CDP, for example, to publishtest
Test MQTT Message Flow
Now you are ready to run and test this MQTT tutorial. For that:
- Run the system in CDP Studio and connect to it. Verify that Application Output pane shows a message similar to MQTTClient successfully connected to broker at '...'
- Run and connect your phone's MQTT app
Now you can send MQTT messages like this:
- Change the PublishTopic in CDP to some new and inspect that the value will appear on your phone subscribe topic
- Change the publish topic in your phone app to some new value and inspect that the value will appear in CDP application as SubscribeTopic value
About Security of This Tutorial
Controlling signals over public Internet using MQTT (as in the tutorial above) is secure as long as you follow these guidelines:
- Always use encrypted transmission - then data (including userid/password) can not be eye-spotted by third-parties.
- Always use authentication (userid/password or client certificate authentication).
- Always firewall your CDP installation using your Internet router or separate firewall.
- Set up firewall not to allow incoming connection to your network. MQTT clients always connect to broker (never vice versa).
Note: For more security, you should also set up broker host certificate verification in MQTTClient. Doing that ensures the broker CDP is interacting with is actually the one you initially intended to interact with.
To set up broker certificate verification:
- obtain broker CA (certificate authority) certificate (in PEM format) and put it into application folder
- copy downloaded certificate into CDP application folder
- add the certificate to application in CDP Studio in Code mode right-clicking on application name and choosing Add existing files...
- configure MQTTClient to use the certificate file (property TLSBrokerCACertFile)
Get started with CDP Studio today
Let us help you take your great ideas and turn them into the products your customer will love.