Revolution Pi Setup Guide
Introduction
This guide demonstrates usage of RevPi_Core I/O Server usage in CDP Studio, the independent automation software for open PC-based real-time distributed control systems. The RevPi_Core is able to read values from Revolution Pi I/O modules and update configured channels with these values. It can also write values from configured channels to the Revolution Pi I/O(s). To use RevPi_Core successfully in this example, an actual RevPi Core (any version) and a RevPiDIO module must be correctly connected together on your network.
Note: See Revolution Pi setup for how to set up the Revolution Pi to get access to its I/O system.
Set up a Test-system
First we set up a System that the component can be tested in:
Create a system named RevPiTest with a Console application named RevPiTestApp, then select Configure mode. See How to Create a system for more information.
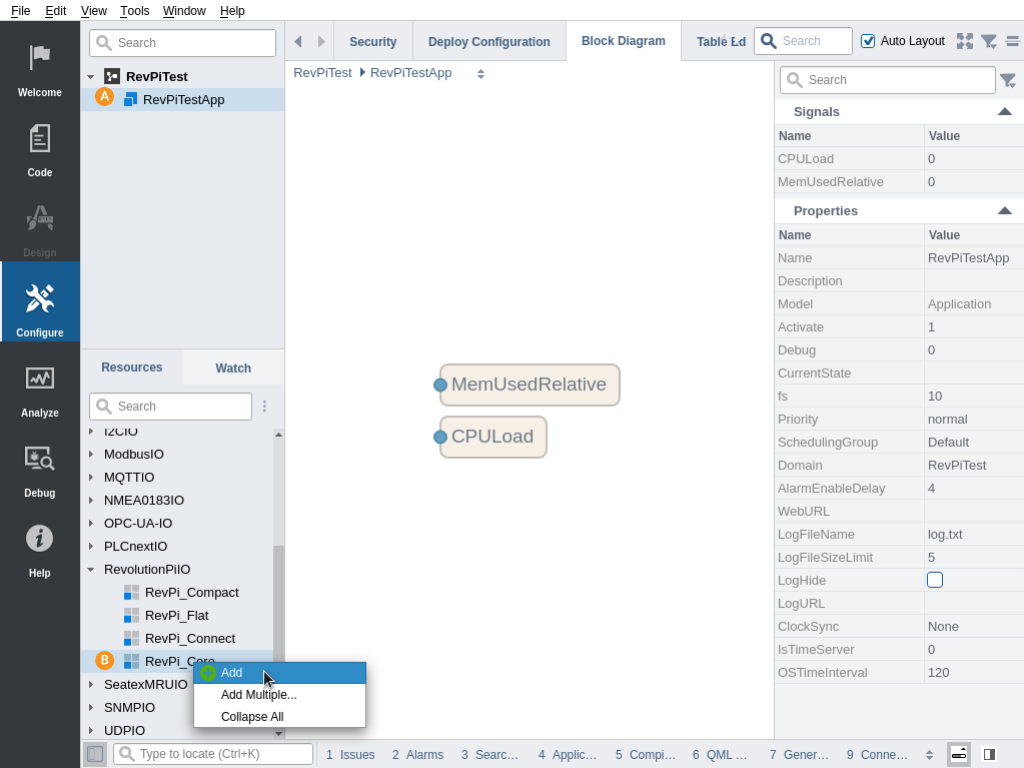
Adding a RevPi_Core component
- Select the RevPiTestApp that resides under RevPiTest in the Project tree.
- Select/expand the RevolutionPiIO in the Resource tree, right-click on the RevPi_Core and select Add.
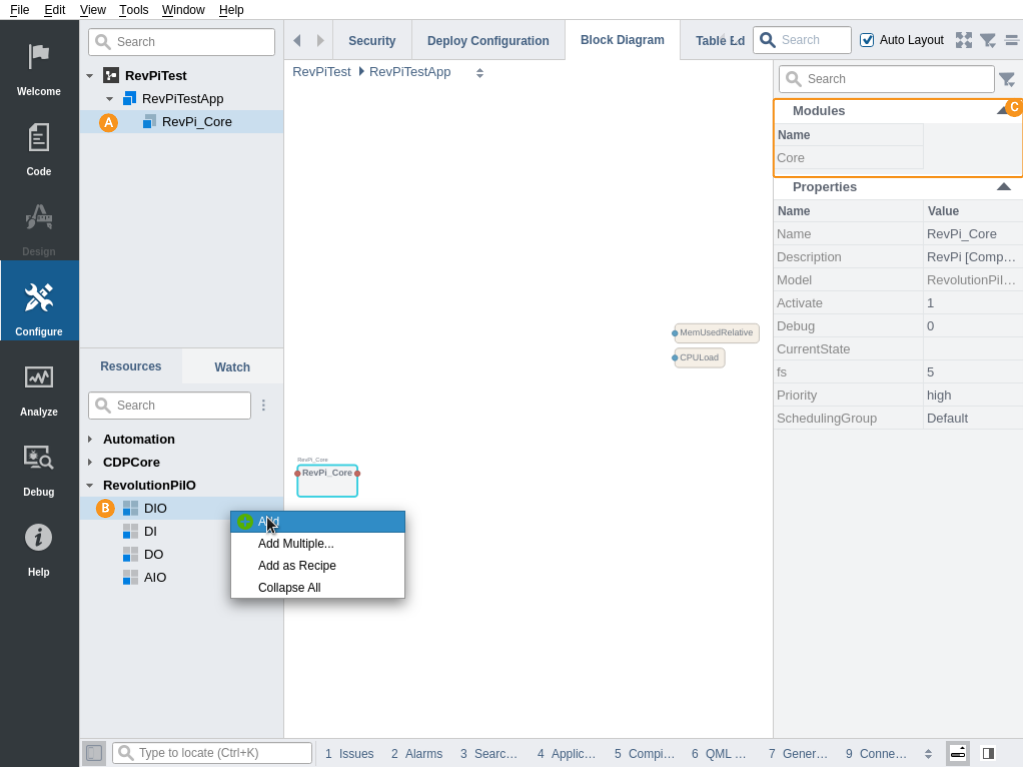
Adding DIO module
- Select the newly added RevPi_Core in the Project tree.
- Right-click and Add DIO in the RevolutionPiIO resource in the Resource tree to add it.
- If you have more I/O modules, add them in the same sequence as they are connected to RevPi Core.
Note: The sequence is shown in the Modules table
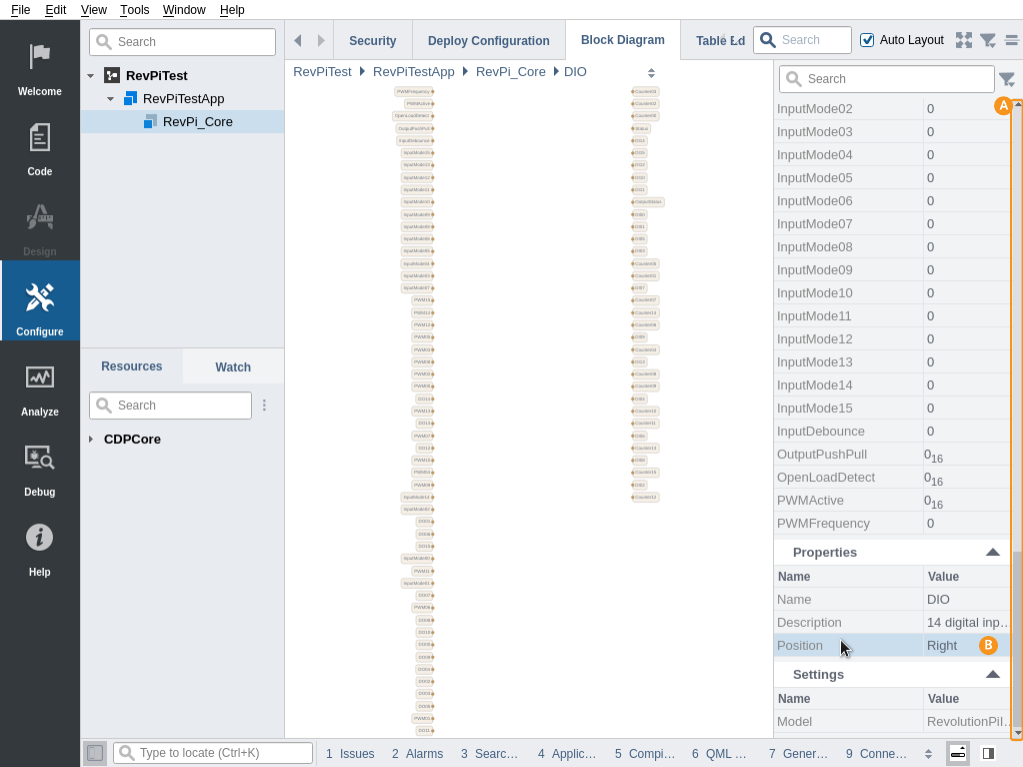
Configure DIO module
- Double-Click on RevPi_Core in the Block Diagram to see the DIO module that was added
- Select DIO to access the Module configuration.
- Scroll down to the Properties table.
- Find the Position property and select Right or Left, depending on the physical module position of RevPi DIO relative to RevPi Core
Select Toolkit and Pair
- Select RevPiTest in the Project tree.
- In the Networks table, select the network that the RevPi device is on.
- In the Devices table, find the IP-address of the RevPi Core.
- Double-click on the IP-address in Name-column to rename it to RevolutionPi, then type in the Username, and select 'Pair'. Enter the password for the Revolution Pi if a dialog pops up.
- In the Applications table, select Device 'RevolutionPi' and select Raspberry Pi ARMv6 32-bit (Debian 10) Toolkit
How to Run the Tutorial
To run the tutorial from CDP Studio, select Configure mode, right-click on the system project and select Run & Connect. See the Running and Connecting to the System tutorial for more information.
If the Application is running correctly, no errors should be printed in the Application Output pane.
Verify That It Works
- Click into RevPiTest.RevPiTestApp.RevPi_Core.
- Set the RevPiTest.RevPiTestApp.RevPi_Core.DIO.DO00 to 1, measure that the physical output turns on with e.g. a multimeter.
To verify correct functioning of digital input and output in CDP Studio, loop a wire from the first physical digital output to the first physical digital input.
- Add the RevPiTest.RevPiTestApp.RevPi_Core.DIO.DO00 and RevPiTest.RevPiTestApp.RevPi_Core.DIO.DI00 signals to the Plot by right-clicking and selecting 'Add to Plot...'->'Tab'->'Untitled' on each of the signals.
- Set the value of RevPiTest.RevPiTestApp.RevPi_Core.DIO.DO00 on and off a couple of times.
- Click on Analyze mode.
- Scroll left in the plot, and verify that RevPiTest.RevPiTestApp.RevPi_Core.DIO.DI00 follows the signal set into RevPiTest.RevPiTestApp.RevPi_Core.DIO.DO00.
Get started with CDP Studio today
Let us help you take your great ideas and turn them into the products your customer will love.