Revolution Pi I/O Configuration Manual
Introduction
This document describes how to set up an application to use the RevPi_Flat, RevPi_Compact,RevPi_Core, RevPi_CoreSE,RevPi_Connect,RevPi_Connect4 and RevPi_ConnectSE components, and how to set up the system to communicate correctly with the Revolution Pi hardware.
Set up the Revolution Pi
To be able to use a Revolution Pi device with CDP Studio, it must first be set up correctly. Make sure to create an initial configuration in piCtory:
- Set up the real-time configuration, as explained in Linux Realtime Configuration
- Using a Web browser, log into the IP-Address of the Revolution pi device (http) and start piCtory.
- Drag in the correct Revolution Pi device and any attached modules so that the configuration in piCtory matches the physical configuration.
- Save the configuration as 'Start-config.'.
Configuration
In the CDP Studio application, add a RevPi_Flat, RevPi_Compact,RevPi_Core,RevPi_CoreSE,RevPi_Connect, RevPi_Connect4 or a RevPi_ConnectSE, depending on the device at hand.
For the RevPi_Connect series or the RevPi_Core series, add any additional I/O modules to reflect the physical configuration.
Note: In CDP Studio, make sure to order the modules from top-to-bottom according to how they are physically stacked left-to-right.
Example
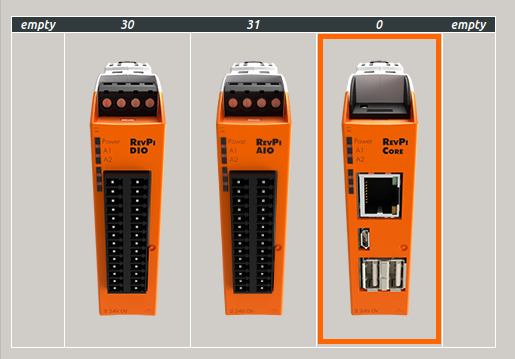
Assuming the module configuration in piCtory is like this:

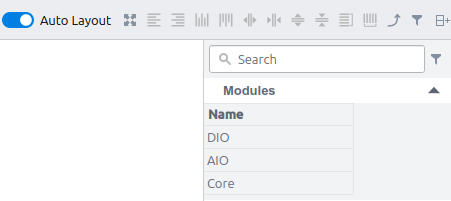
You must then make sure that the modules are ordered like this in the Modules table in Configure mode:

Make sure to set the correct Position setting for each module. Specify Position to:
- Right - for modules placed to the right of the base
- Left - for modules that are placed to the left)
If you have a configuration like shown above, the DIO and the AIO modules should both have Position set to Left.
If the configuration in CDP Studio does not match the stored physical configuration (from piCtory), then an error-message will be printed. See Principle of Operation below for more information.
Deploy to Device
To deploy the application to a device, see the Deploy Configuration documentation.
Note: See the Toolkit Detector documentation for how to find a matching toolkit for your device.
Principle of Operation
When the executable starts running on the target, the application reads the stored configuration in the xml-files (generated by CDP Studio), and compares this with the information in the target configuration-file ("/etc/revpi/config.rsc") that the system driver 'PiControl' uses to update the data.
If there is a module mismatch, or anything goes wrong, an error is printed and the I/O component will not perform any I/O. The steps in Set up the Revolution Pi must then be executed to attempt to resolve the problem.
About
The RevPi_Flat, RevPi_Compact,RevPi_Core or RevPi_Connect components must run on a compatible RevolutionPi variant. For RevPi_Core and RevPi_Connect series, one or more of the I/O modules RevPi DIO/RevPi DI/RevPi DO/RevPi AIO can be connected. See RevPi KUNBUS for more information.
Terms and Definitions
| RevPi Flat / Compact / Connect / Connect4 / ConnectSE / Core / Core 3 / Core 3+ / Core SE | Industrial arm-based controller based around the Raspberry Pi Compute module. |
| RevPi DIO | A physical Digital I/O module which can be connected to RevPi Core, 14 digital inputs and 14 digital outputs, 24VDC. |
| RevPi DI | A physical Digital Input module which can be connected to RevPi Core, 16 digital inputs, 24VDC. |
| RevPi DO | A physical Digital Output module which can be connected to RevPi Core, 16 digital outputs, 24VDC. |
| RevPi AIO | A physical Analog I/O module which can be connected to RevPi Core, 2 analog outputs, 4 analog inputs and 2 temperature inputs for RTDs. |
Configuration elements
| Name | Description |
|---|---|
| RevPi_Core, RevPiCoreSE, RevPi_Connect, RevPi_Connect4, RevPi_ConnectSE, RevPi_Flat, RevPi_Compact | The IOServers that convert CDP Signals into data written to RevPi outputs, and from RevPi inputs to CDP Signals. |
| DIO | A configuration module that can be dragged into the RevolutionPiIOServer component, automatically adding CDP channels corresponding to Inputs and Outputs found on the physical RevPi DIO module. |
| DI | A configuration module that can be dragged into the RevolutionPiIOServer component, automatically adding CDP channels corresponding to Inputs on the physical RevPi DI module. |
| DO | A configuration module that can be dragged into the RevolutionPiIOServer component, automatically adding CDP channels corresponding to Outputs found on the physical RevPi DO module. |
| AIO | A configuration module that can be dragged into the RevolutionPiIOServer component, automatically adding CDP channels corresponding to Inputs and Outputs found on the physical RevPi AIO module. |
Note: DIO/DI/DO/AIO should be dragged/added into RevPi_Core or RevPi_Connect in the same sequence as they are stacked together physically.
When clicking into IOModules (DIO/DI/DO/AIO), the following configurations are found:
The Channel table lists all CDP channels corresponding to values found in the physical module. Some of the channel attributes can be edited/configured, but most settings are already configured.
| Name | Description |
|---|---|
| Export | If set, the channel will be updated (values will be read/written). If not set, the channel's configuration is sent to the RevPi driver and used there, but not updated. Note: Channels with Export set to 0 are ignored / not updated! |
| Input | In I/O Servers, When Input=1, The input value is retrieved from the CDP side and then written to the physical output. When Input=0, the value is read from the physical input and written to the value on the CDP side. |
| Routing | Can be configured on channels which have Input=1. The Routing is a dot-separated name string, like applicationname.componentname...signalname. The value that the routing refers to is put into this Channel just before each run. |
The Properties table lists all properties for this physical module. Some of the channel attributes can be edited/configured, but most settings are already configured.
| Name | Description |
|---|---|
| Position | Physical module position, Right or Left, relative to the RevPi_Core or RevPi_Connect (Position should have same value for all IOModules) |
Get started with CDP Studio today
Let us help you take your great ideas and turn them into the products your customer will love.