Intro 2: Tutorial of Using REST IO
Intro 2: Tutorial of Using REST IO
This tutorial is to give you an introduction to how to connect to hardware/automation I/O or external services using IOServer function blocks, to build systems by connecting blocks together and to use mathematical functions, and all this can be done without any coding. The way we use the configuration is a key concept that is important to understand in CDP Studio, the independent automation software for open PC based real-time distributed control systems.
This tutorial shows:
- What is possible to do with configuration
- How to connect and configure/build a system
- How to connect external information or physical IO to a CDP project using IOServers
- Add pre-made mathematical functions
This projects gets weather data for Oslo (Norway) and displays the temperature in Celsius and Fahrenheit.
This is the step-by-step guide to creating the example Intro 2: Setting Up IO for REST. The project files are found in the Examples section in Welcome mode
By completing the tutorial, you will have been through the steps to use IOServers and pre-made mathematical functions.
Recommended: See first Intro 1: Connect Variables to HMI GUI.
Project Overview
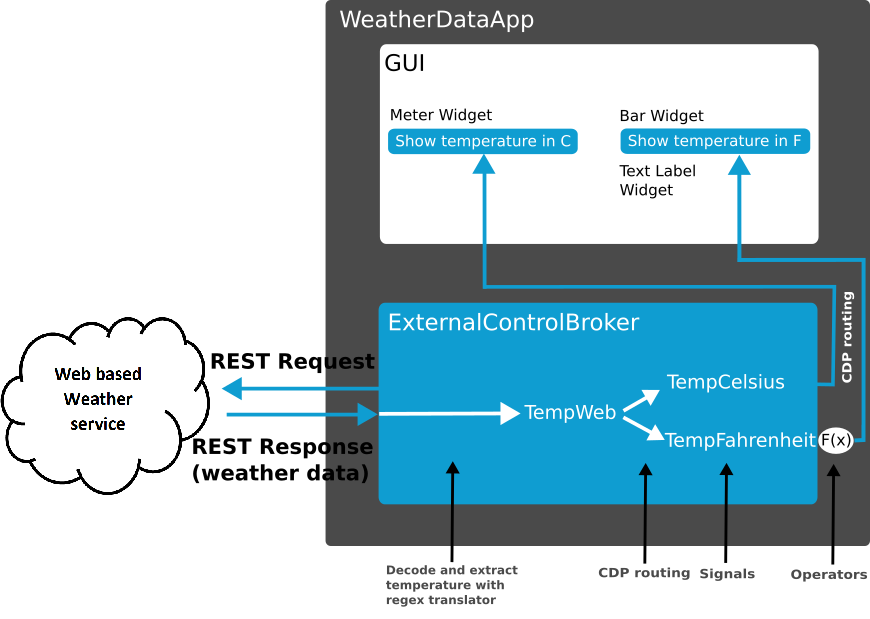
The project connects to an Internet weather service using the included REST protocol, collects weather information which is transformed into a CDPSignal, calculates Fahrenheit from the Celsius temperature using an operator and displays the values in a simple GUI.
The example uses REST as no physical hardware is required and will therefore work for all users. The same principle applies for industrial protocols as MQTT, MODBUS, CANopen etc. In this example, an ExternalControlBroker (a pre-made IOServer, see also Definitions)) has been added to the WeatherDataApp from the Resources section in Configure mode.
There are some concepts that are important to understand when developing with CDP Studio. Below is useful information related to this example.
The process to create a CDP system is:
- 1. Select the pre-made or existing resources/function blocks (items that exist in Resources section in Configure mode)
- 2. Develop any missing resources/function blocks
- 3. Design the GUI
- 4. Create the system by connecting the resources/function blocks together and to the GUI
This example covers step 1,3 and 4. Development of resources/function blocks/components is covered in the Intro 3 where libraries are introduced.
The development process shown above may differ from other tools. An important concept to understand is that CDP systems are created by connecting available components/function blocks/GUI together. By adding mathematical functions (operators) on CDPSignals, you may change the values how you want. This is done without any coding. Coding is only done when developing new function blocks.
When you have the required reusable components created, you may create advanced and comprehensive systems without any (or only a small amount) of coding.
Creating the System and Application
First step in making a CDP project is to create a system and an application.
Create a system named WeatherServiceTutorial using using the pre-selected recent toolkit version, and make sure to add a GUI application called WeatherDataApp. For details on creating a system, see How to Create a System.
Adding and Setting up the ExternalControlBroker
CDP Studio comes with many pre-made resources. Some of these are IOServers that are used to communicate with hardware and external system. This tutorial use the ExternalControlBroker to get information from a web service. To add the IOServer:
- In Configure mode select WeatherDataApp from the Project tree. The Resource tree is now populated with ready-made objects to choose from
- In the Resource tree, expand ExternalControlIO by clicking in front of it
- Locate ExternalControlBroker in the Resource tree and double-click it to add it to the WeatherDataApp
The pre-configured ExternalControlBroker is now added to the application.
This tutorial primarily uses the Table Editor as the steps in setting up the ExternalControlIO are mostly configuring values and settings. The Table Editor is efficient to use when changing many values. The Block Diagram is very good when it comes to creating systems with many components and routing (connecting) the components together. This tutorial can be made only using the Block Diagram, as properties and settings are available in the side panel, but it is more efficient to use the Table Editor.
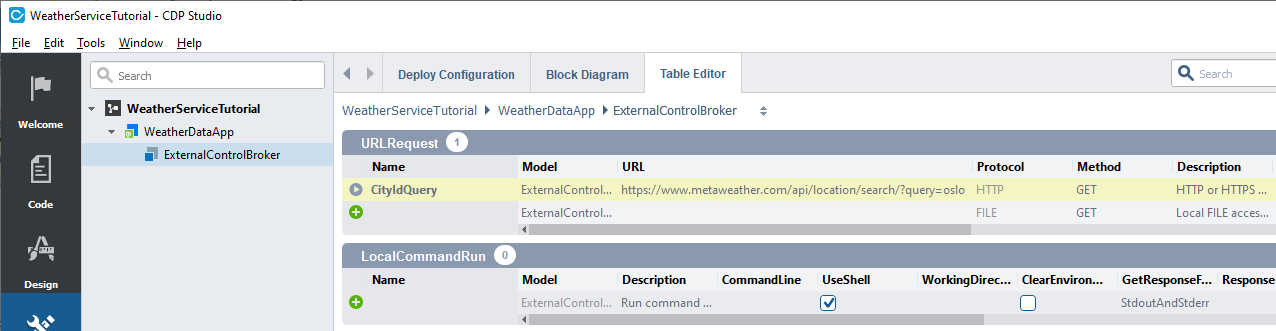
- Click on the Table Editor tab to select the Table Editor, see below picture.
The weather data is collected from https://www.metaweather.com/. First, we obtain the numeric ID for the city of Oslo, Norway (WOEID (Where On Earth IDentifier)) using a HTTP request and extract the ID using a JSON translator. Then a new HTTP request is made using the WOEID to get the actual forecast. The information is decoded using a Regex translator.
Get the World ID for Oslo
- In Configure mode click on ExternalControlBroker
- In the Resource tree, expand ExternalControlIO
- Locate HTTPRequest in the Resource tree and double-click it to add it to the URLRequest pane in the ExternalControlBroker
- Select the ExternalControlBroker in the Project tree by clicking on it
- Rename the HTTPRequest: double-click on it and type CityIdQuery
- Add the url "https://www.metaweather.com/api/location/search/?query=oslo" in the URL field and ensure that the Method is GET
The response of the HTTP request will be in JSON format. If you paste the entered URL into a web browser, you will see following:
[{"title":"Oslo","location_type":"City","woeid":862592,"latt_long":"59.912281,10.749980"}]
The CityIdQuery must extract the value of woeid from the first (and only) element of the array. The first element is at index 0.
- Navigate into CityIdQuery by clicking in front of it
- In the Resource tree, locate ResponseChannelGroup and add it by double-clicking to match result JSON array
- Rename the ResponseChannelGroup to 0 (zero). This marks the first element of the JSON array.
- Navigate into the ResponseChannelGroup named 0 by clicking in front of it
- In the Resource tree, double-click ResponseSignalChannel<unsigned int> for the query result
- Rename it to woeid - this is the parameter that will contain the ID for Oslo
- Navigate 1 level up by clicking on the back navigation button or click CityIdQuery on top of the window
- In the ResponseTranslator pane select JSONTranslator<istream> in the Model field and then click on the
- In the Properties pane, scroll down until you locate TLSAllowVerificationError and set the value to AllowAnyCertificate
As this is just an example, the property TLSAllowVerificationErrors is set to AllowAnyCertificate to avoid any complexity of generating certificates. This is not recommended due to security issues for a real system.
Get the Temperature in Celsius
We need to send another HTTP request using the woeid to get the temperature for Oslo as a response, extract the temperature from the response and store it in a response channel TempWeb. TempWeb is visible for other parts of the system and can be routed like a signal.
While this HTTP response is also in JSON format and could be parsed like the CityIdQuery response, in this case we will demo how to use the RegexTranslator which will find the temperature by matching a pattern.
- In Configure mode select ExternalControlBroker
- Add another HTTP request, in the Resource tree, double-click on HTTPRequest and rename it to WeatherQuery
- Add the url "https://www.metaweather.com/api/location/%d/" in the URL field and ensure that the Method is GET
- Navigate into WeatherQuery
- In the Resource tree, double-click RequestSignalChannel<unsigned int>
- Add the routing "WeatherDataApp.ExternalControlBroker.CityIdQuery.0.woeid" in the Routing field. The %d is replaced with woeid value when the request is sent
- Add a ResponseSignalChannel<double> for the query result and rename it to TempWeb
- On the ResponseTranslator pane select RegexTranslator<istream> in the Model field and then click on the - we will use a Regex translator to find the temperature in the response
- Navigate into the RegexTranslator
- For the property Pattern set the field Value to "the_temp":(.*) (including the quotes).
- Navigate 1 level up
- In the Properties pane, scroll down until you locate TLSAllowVerificationError and set the value to AllowAnyCertificate
Create the Signals and Add a CDP Operator
We will now create the CDP Signals that we will connect into the GUI and add pre-made mathematical function to transform Celsius to Fahrenheit.
Create the to signals:
- Navigate to the ExternalControlBroker by clicking on it
- In the Resource tree, expand CDPCore
- Add the CDP Signal CDPSignal<double> and rename it to TempCelsius
- Add the routing "WeatherDataApp.ExternalControlBroker.WeatherQuery.TempWeb" in the Routing field
- Add another double CDP Signal and rename it to TempFahrenheit
- Add the same routing "WeatherDataApp.ExternalControlBroker.WeatherQuery.TempWeb" in the Routing field
These signals will now pick up the Celsius temperature from the TempWeb variable.
There is a number of pre-made mathematical functions, called operators, available. These range from simple 'add'-functions to Kalman filters and PID regulators. An operator is added to a component input or output signal, and the signal value will be altered according to the selected function before or after processing the component. The operators may be chained, and it is possible to use dynamic values like CDPSignals or Parameters in the operators.

The temperature fetched from the weather service is in Celsius. The Fahrenheit temperature is calculated by the formula F=C*1.8+32.
In this example we convert to Fahrenheit by chaining the multiplication (MUL) and addition (ADD) operators to the output of the TempFahrenheit signal. The internal value of TempFahrenheit is in Celsius, but the value exposed to the outside is in Fahrenheit.
- Navigate to the ExternalControlBroker by clicking on it
- Navigate into TempFahrenheit
- In the Resource tree, expand Automation
- Add Multiply<double>
- Navigate into Multiply
- Find the In1 argument and set the Value field to 1.8
- Select TempFahrenheit again
- In the Resource tree, expand Automation
- Add Add<double>
- Navigate into Add
- In the Resource tree, expand CDPCore
- Find the In1 argument and set the Value field to 32
Creating the Graphical User Interface (GUI)
GUIs are made in the CDP Studio Design mode and CDP Studio comes with a large set of pre-made widgets. This tutorial use the Meter widget (classical gauge) showing the Celsius temperature and Vertical Bar widget to show the temperature in Fahrenheit. Both widgets can be extensively styled and customised, but in this example we only use some basic styling.
Follow the steps below to create the GUI:
- Go to Configure mode and select WeatherDataApp in the Project tree. The Design mode is now selectable.
- Click on Design mode to go into the GUI editor.
- In the resource-list to the left, find the widget named Meter and drag it into the form.
- Adjust the size and place it on the left hand side in the Form editor
- Select the Meter in the form by clicking on it.
- In the Properties window, set the following properties: minValue=-50; maxValue=50; textPrefix=Celsius; textSuffix=Temperature; numPrecision=0; cdpRouting=WeatherDataApp.ExternalControlBroker.TempCelsius
- Find the widget named Vertical Bar and drag it into the form, resize and place it to the right of the Meter.
- Select the Vertical Bar in the form by clicking on it
- In the Properties window, set the following properties: tickPos=TicksBelow; numPos=NumbersAutoLeft; minValue=-58; maxValue=136; cdpRouting=WeatherDataApp.ExternalControlBroker.TempFahrenheit
How to Run the Tutorial
To run the tutorial from CDP Studio, select Configure mode, right click on the system project and select Run & Connect. See the Running and Connecting to the System tutorial for more information.
Inspect Real-time Info and Plot Values
A very useful feature is the possibility to see, in real time, all values in the table format and to plot values changes in a graph. This is very useful when testing, analyzing, tuning and searching for possible issues in a system.
After selecting Run & Connect, you will be connected to the running system. Select a component in Configure mode and you will see that the values change in real-time.
Visualizing the values in a graphical plot is done in Analyze mode as is described in the Analyze Mode Manual.
Get started with CDP Studio today
Let us help you take your great ideas and turn them into the products your customer will love.