Intro 2: Setting Up IO for REST
Intro 2: Setting Up IO for REST
CDP Studio allows you to connect to hardware/automation I/O or external services using IOServers, to build systems by connecting components together and to use mathematical functions, and all this can be done without any coding. The way we use the configuration is a key concept that is important to understand. This example shows:
- What is possible to do with configuration
- How to connect and configure/build a system
- How to connect external information or physical IO to a CDP project using IOServers
- Add pre-made mathematical functions
Recommended: See first Intro 1: Connect Variables to HMI GUI. The project-files are found in the Examples section in Welcome mode.
See also the Intro 2: Tutorial of Using REST IO for a detailed description of how the project was made.
This example is the second in the series of Intro to CDP Studio.
Project Overview
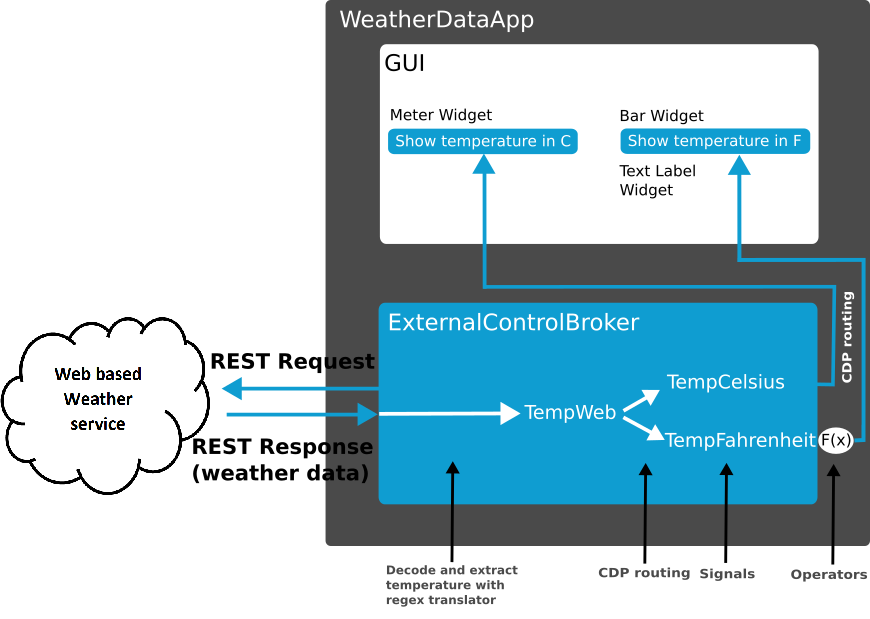
The project connects to an internet weather service using the included REST protocol, collects weather information which is transformed into a CDPSignal, calculates Fahrenheit from the Celsius temperature using an operator and displays the values in a simple GUI.
The example uses REST as no physical hardware is required and will therefore work for all users. The same principle applies for industrial protocols as MQTT, MODBUS, CANopen etc. In this example, an ExternalControlBroker (a pre-made IOServer, see also Definitions) has been added to the WeatherDataApp from the Resources section in Configure mode.
How to Run the Example
To run the example from CDP Studio, open Welcome mode and find it under Examples. Next, in Configure mode right click on the system project and select Run & Connect. See the Running the Example Project tutorial for more information.
Project Description
There are some concepts that are important to understand when developing with CDP Studio. Below is useful information related to this example.
The process to create a CDP system is:
- Select the pre-made or existing resources/function blocks (items that exist in Resources section in Configure mode)
- Develop any missing resources/function blocks
- Design the GUI
- Create the system by connecting the resources/function blocks together and to the GUI
This example covers step 1,3 and 4. Development of resources/function blocks/components is covered in the Intro 3 where libraries are introduced.
The development process shown above may differ from other tools. An important concept to understand is that CDP systems are created by connecting available components/function blocks/GUI together. By adding mathematical functions (operators) on CDPSignals, you may change the values how you want. This is done without any coding. Coding is only done when developing new function blocks.
When you have the required reusable components created, you may create advanced and comprehensive systems without any (or only a small amount) of coding.
In this example, only existing components are used. The system is built ('configured' in CDP terminology) by routing (connecting) the TempWeb signal to TempCelsius and TempFahrenheit, and then route these to the GUI and adding a mathematical function.
There is a number of premade mathematical functions, called operators, available. These range from simple 'add'-functions to Kalman filters and PID regulators. An operator is added to a component input or output signal, and the signal value will be altered according to the selected function before or after processing the component.

The operators may be chained, and it is possible to use dynamic values like CDPSignals or Parameters in the operators.
The temperature fetched from the weather service is in Celsius. The Fahrenheit temperature is calculated by the formula F=C*1.8+32.
In this example we convert to Fahrenheit by chaining the multiplication (MUL) and addition (ADD) operators to the output of the TempFahrenheit signal that we configured in the ExternalControlBroker. The internal value of TempFahrenheit is in Celsius, but the value exposed to the outside is in Fahrenheit.
To see the operators, go to WeatherDataApp.ExternalControlBroker.TempFahrenheit (Click on the to the left the signal TempFahrenheit in the ExternalControlBroker component).
Additional Info for the REST Query to the Weather Service
The weather data is collected from https://www.metaweather.com/. First, we obtain the numeric ID for the city of Oslo, Norway (WOEID (Where On Earth IDentifier)) using a HTTP request and extract the ID using a JSON translator. Then a new HTTP request is made using the WOEID to get the actual forecast. The information is decoded using a Regex translator.
As this is just an example, the property TLSAllowVerificationErrors is set to AllowAnyCertificate for CityIdQuery and WeatherQuery to avoid any complexity of generating certificates. This is not recommended due to security issues for a real system.
Get started with CDP Studio today
Let us help you take your great ideas and turn them into the products your customer will love.