Intro 3: Make Reusable Objects in C++
Intro 3: Make Reusable Objects in C++
CDP Studio, the independent automation software for open PC-based real-time distributed control systems allows you to write your own objects to create specific functional blocks similar PLC IEC 61131-3, replacing the Structured Text with C++, that you require in your projects. These objects are made and stored in Libraries.
This example explains
- What are Libraries and how to create them
- How to write your own Components (function blocks)
- How Components are executed (run) in parallel and in real-time
- How to use your Components in a project
Recommended: See first Intro 2: Setting Up IO for REST. The project-files are found in the Examples section in Welcome mode.
See also the Intro 3: Tutorial of Making Reusable Objects in C++ for a detailed description of how the project was made.
This example is the third in the series Intro to CDP Studio.
Project Overview
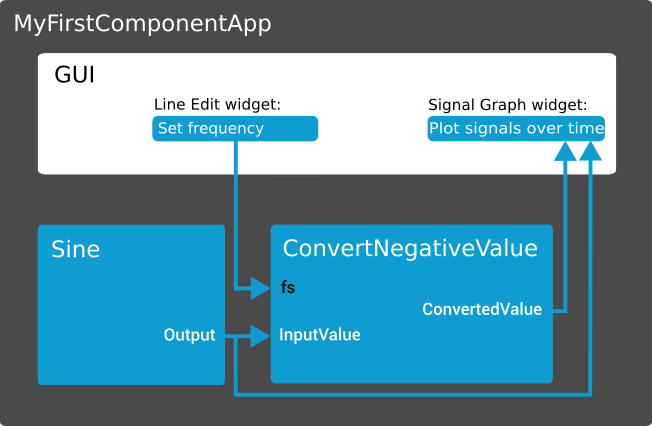
This project uses a Component (ConvertNegativeValue) that is specially developed and converts a negative number to a positive number. The Sine component is a pre-made component added to MyFirstComponentApp from the Resource tree (in CDPCore). ConvertNegativeValue is used in a system to convert the sine curve to only have positive values. The number of times the component is run per second is dynamically set in the GUI. The sine curve (MyFirstComponentApp.Sine.Output) and the converted sine curve (MyFirstComponentApp.ConvertNegativeValue.ConvertedValue) are plotted using the Signal Graph widget.
How to Run the Example
To run the example from CDP Studio, open Welcome mode and find it under Examples. Next, in Configure mode right-click on the library project and select Build, then right-click on the system project and select Run & Connect. See the Running the Example Project tutorial for more information.
Project Description
The real-time Component ConvertNegativeValue was created in a library (MyFirstLibrary) and has 2 CDPSignals: InputValue and ConvertedValue. The fs (frequency) property is automatically created for all components. The component acts like a rectifier, converts negative InputValue to a positive ConvertedValue (multiply with -1). When the library is built, the component will become available in the Resource tree in Configure mode.
Note: For simple function blocks like the one in this example, we recommend to do the implementation as a CDPOperator and not as a CDPComponent. General recommendation is to use CDPOperator for simple functions that only have input/output signals. CDPComponents are used when there is more complex behavior, require state machines or it makes sense for the component to have its own processing frequency.
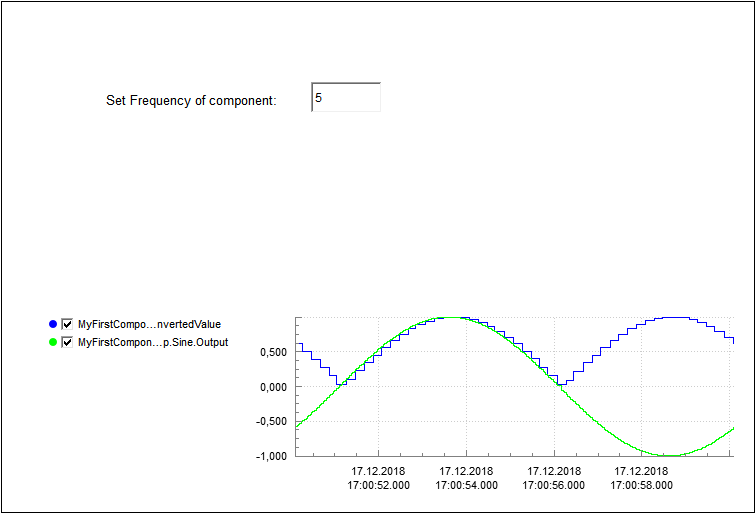
The Signal Graph widget plots the changing ConvertedValue over time, showing a rectified sine curve.
The ConvertNegativeValue component is by default set to run with the frequency (fs) of 5 times a second, i.e. every 200ms. The sine is in parallel running with fs=100, i.e. the sine Output is updated every 10ms, but the ConvertNegativeValue is only converting the value every 200ms. This is visible in the plotted sine curve as a stepped line (staircase). Note that the GUI is by default running on fs=30 and increasing the fs any higher for ConvertNegativeValue will not have a visible effect.
Important Concepts to Understand: Components and How These are Built and Executed
CDP comes with the complete Framework for running systems. This means that you focus on creating function blocks (CDP Components) (see Basics: Architecture) and not the overall system when you develop new functionality and logic. You develop the components in Libraries using Code mode. Creating the actual system, i.e. the interaction between Components and a GUI is done in Configure mode without any coding. You may have many components in a library and many libraries.
The Components
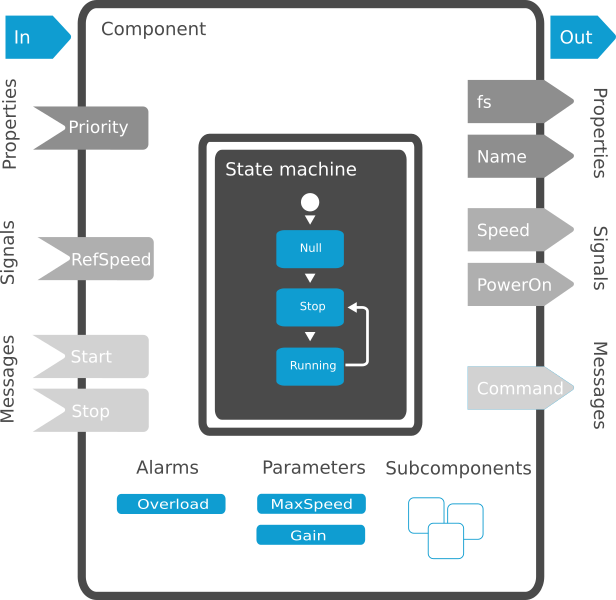
A component contains the code you write, and you may add CDP objects such as signals, messages, parameters, alarms, properties and state machine, see CDP Component.
There are 2 types of components:
- For Real-time tasks: CDP Component
- For Asynchronous (lengthy) tasks: Threaded Component
A component is a self-contained, independent function block that is truly reusable in projects. They become part of your company toolbox. When the library is built successfully, all the components in the library becomes available as Resources for all projects in Configure mode for the toolchains the library is built for.
How Components are Executed (Run)
All components in a CDP System are executed (run) in parallel at a specified frequency and priority. The frequency specifies how many times the component is run per second and the frequency is set for each instance of the component. See also CDPComponent Description and Best Practice of System Design.
How to Write Your Own Components
See Library and Code Mode Manual. Components are developed in Code mode. When adding CDP Component, CDP Studio automatically generates code for the functions, include files, initializations (simplifying the process of writing the code).
Components are written using C++, and since the functions shell is auto-generated, only the logic has to be added. CDP objects like Signals/Parameters/Alarms are added from menus/wizards, and all required C++ code is again auto-generated.
A Component is always created with a ProcessNull function, and if you do not wish to use a state machine, this is where you write your code (the ProcessNull function will be called regularly at specified fs). Remember not to do blocking operations/length tasks in the Process-function(s), see paragraph Overview - Control Design Platform.
Get started with CDP Studio today
Let us help you take your great ideas and turn them into the products your customer will love.