Creating a Multi-HMI Command Control GUI
Introduction
This example demonstrates how to implement command control between multiple HMIs in a GUI application.
Only one HMI can have command at a time. The active HMI is allowed to control inputs, while other HMIs are disabled or restricted according to configuration. Users can take, release, or request command through a dedicated Command Dialog, with command handling managed by a Command Server component.
The example is based on design principles defined in the Open Bridge Guidelines.
The example also utilizes the clone functionality in CDP Studio. A single HMI application is cloned into multiple instances, each configured with application-specific values. This allows the HMI to be developed and maintained in one place, while keeping all deployed instances synchronized using "Update From Source".
The following topics are covered by the example:
- Cloning to create read-only re-syncable HMI applications.
- Using the RDSynchronizer to enable app-specific-values in the cloned HMIs.
- Adding a command server and client to enable command control.
- Adding a top menu button and dialog in the HMI for controlling in-command.
- Configuring routing on input widget containers to disable or hide when not in command.
- Implementing all logic using standard CDP blocks, demonstrating the power of visual programming.
Application Overview
The example consists of four applications:
- ControlApp – A control application containing a CommandServer for command handling, and a ControlLogic component for simulating wind, current, and rotation provided to the HMIs.
- BridgeUI – The main HMI application where all design decisions are made. It contains a CommandClient component for communication with the CommandServer, and an RDSynchronizer providing the application-specific StationName for each HMI application. This name is used as a unique ID when communicating with the CommandServer and will be shown in the Command HMI dialog. The Activate property of the RDSynchronizer MUST be set to zero, as there is no redundancy in the example.
- PortUI – A read-only clone of BridgeUI that must be updated from the source if BridgeUI is changed.
- AuxUI – A read-only clone of BridgeUI that must be updated from the source if BridgeUI is changed.
The Command Server
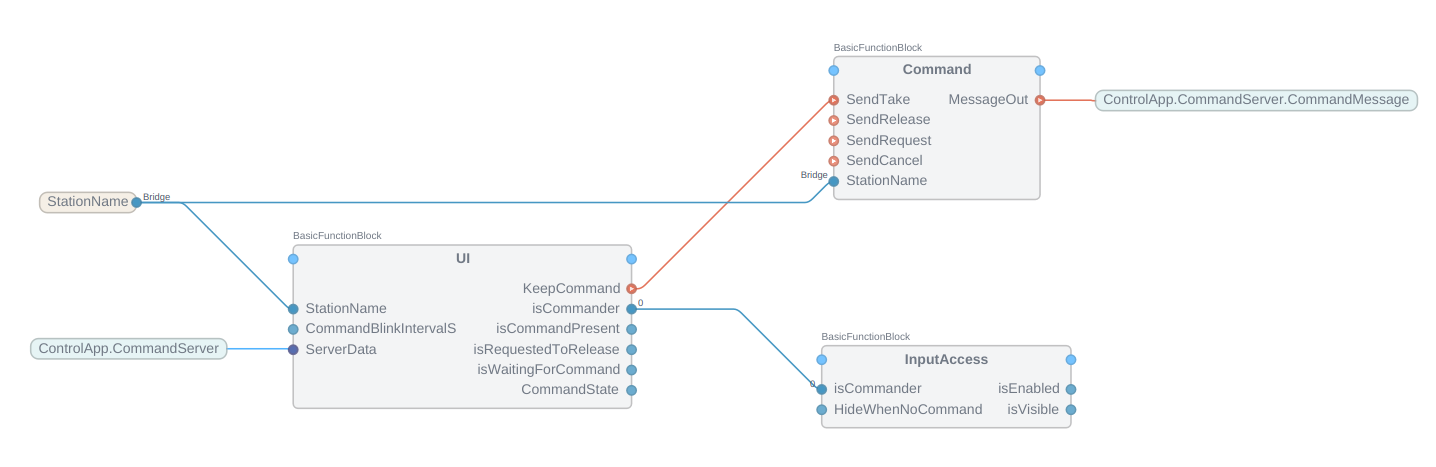
The CommandServer receives command messages from clients and takes appropriate action based on the command type. It handles the main operations in separate blocks: CommandConverter for receiving and converting client messages into events; CommandHandler for taking and releasing commands; RequestHandler for transferring commands or cancelling an active request; and finally the KeepCommand block, which receives keep-alive messages from the HMI in command and ensures release if it goes down.

The Command Client
The CommandClient forwards command messages from the UI to the CommandServer, and provides signals to the UI for displaying the current command name, and controlling whether or not input elements in the UI should be visible or just disabled when not in command.
There are two blocks within the CommandClient that contain routing to the CommandServer: Command, which has a MessageOut object for sending command messages to the server, and the UI block, which routes data from the CommandServer through its ServerData input. These two routings must be updated if the path to the CommandServer is changed. The UI block contains signals that are routed by the command dialog in the HMI, while the InputAccess block contains signals for disabling or hiding its input widgets. The HideWhenNoCommand input toggles between the two.
HMI Overview
The main page of the UI displays a conning meter showing heading, speed, and wind and current direction. Input widgets for controlling rotation and adjusting the wind and current indicators are only enabled when the HMI has command. The user can also navigate to the Settings page and choose to display these widgets only while command is active.
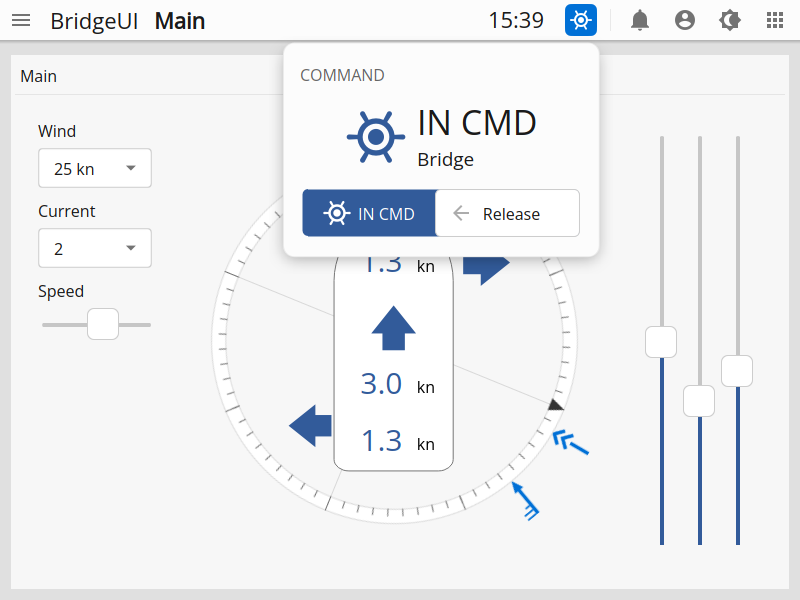
The Command Dialog
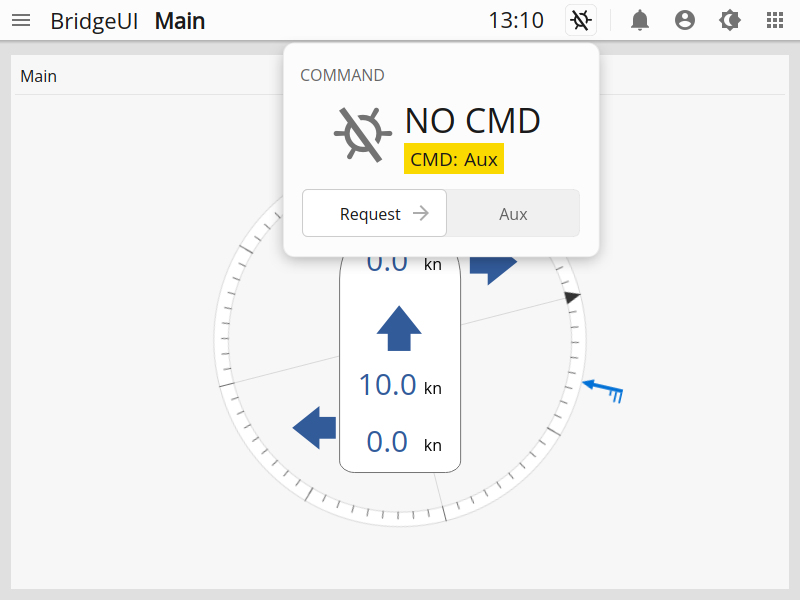
The command dialog in the HMI is routed to the local CommandClient. It has two main states: in command and not in command. When one HMI is in command, the dialog in the other HMIs indicates this with text on a yellow background and provides the option to request command. Sending such a request transitions the UI to a waiting for command state, with the option to cancel the request. The UI of the commanding HMI will start blinking the command button and display the request on a yellow background in the command dialog. Releasing the command at this point transfers it to the requesting HMI.
The Settings Page
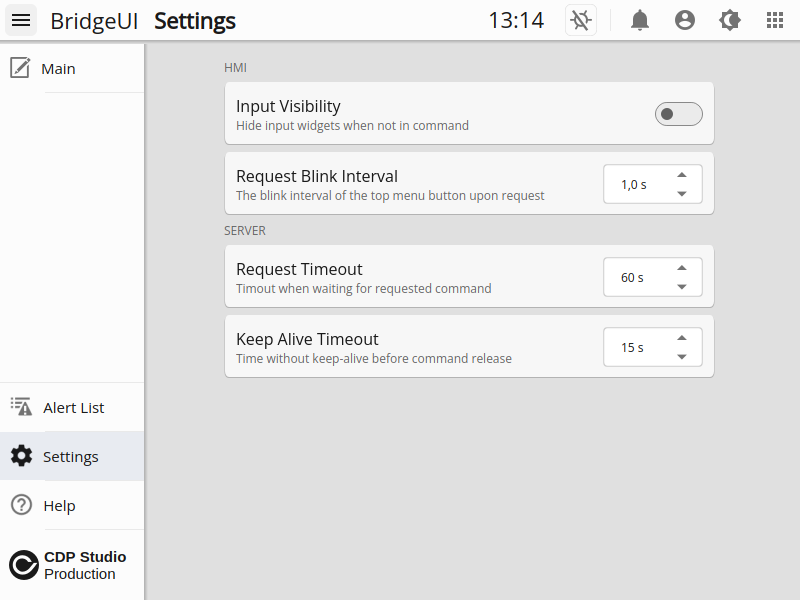
The Settings page contains settings for the local HMI, such as toggling input widget visibility when not in command or changing the blink interval of the command button when a request is received.
In addition, it is possible to change both the request and keep-alive timeouts of the server.
How to Run the Example
To run the example from CDP Studio, open Welcome mode and find it under Examples. Next, in Configure mode right-click on the system project and select Run & Connect. See the Running the Example Project tutorial for more information.
Get started with CDP Studio today
Let us help you take your great ideas and turn them into the products your customer will love.