Creating an Animated SCADA GUI
Introduction
This example demonstrates how to create a SCADA GUI that shows the operation of a bottle-filling machine. The progress and states of the bottle-filling process are visualized using moving pictures, rotations, and animations. In addition, the application contains pages in the GUI explaining widgets and features commonly used in SCADA systems.
The example includes buttons and logic for triggering alarms like conveyor failure, empty filling fluid, out of button corks, and no bottles left. Alarm states will show both in the alarm list and in the bottle machine visualization.
The bottle machine control components are written in C++.
The example shows the following GUI features:
- How to rotate and move pictures from the control system.
- How to switch pictures to show different control states.
- How to use a fixed-sized picture to move multiple stacked widgets.
- How to disable and enable widgets from the control system.
- How to show bubbles/markers on buttons.
- How to run a slideshow using a stacked widget.
- How to use picture sequence as a container.
- How to create none rectangular bar fill by placing a picture on top of a bar.
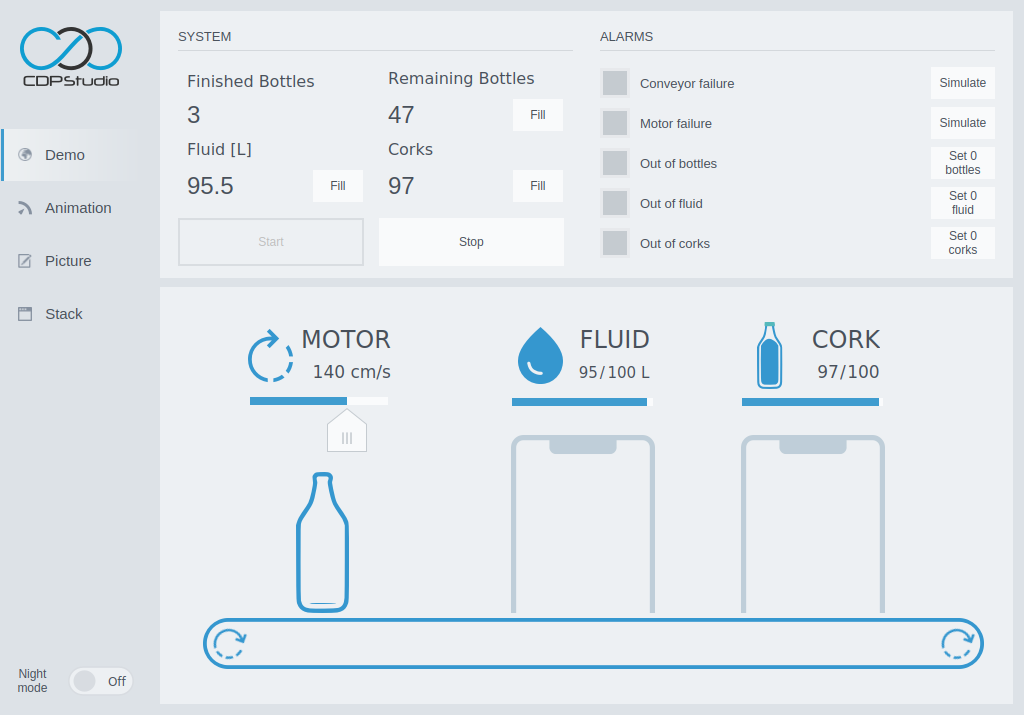
The following screenshot shows the Demo page of the GUI when the conveyor is running and no alarms are set.

How to Run the Example
To run the example from CDP Studio, open Welcome mode and find it under Examples. Next, in Configure mode right-click on the library project and select Build, then right-click on the system project and select Run & Connect. See the Running the Example Project tutorial for more information.
The first page in the GUI visualizes a bottle-filling machine. Press the Start-button to run the conveyor and watch the bottle getting filled when it reaches the fluid machine. From there, it will get transported to the corking machine to get corked, and then continue to the end of the conveyor. A new empty bottle will be placed on the conveyor and the process will be repeated.
The machine will stop the process and set alarms if it gets out of corks, fluid, bottles or if there is a problem with the conveyor belt or motor. The latter two are not set automatically, but can be simulated using the buttons in the alarm section in the upper right of the GUI. In this section, there are also buttons that can set the number of corks, bottles, and remaining fluid to zero. Use the buttons for testing how the GUI behaves in the event of an error and notice how the different elements change color. To make the alarms go away, we need to fill the machine with fluid, corks, or bottles using the buttons in the upper left.
The other pages in the GUI contain widgets configured to show typical SCADA features. The Animation-page contains widgets where you can turn animations on and off, and adjust movement and rotation. In the page named Picture, we see the picture and picture sequence widgets in different configurations. The spin boxes are used to change the style and picture in the different widgets. Finally, the page named Stack shows the stacked widget in different configurations.
Logic
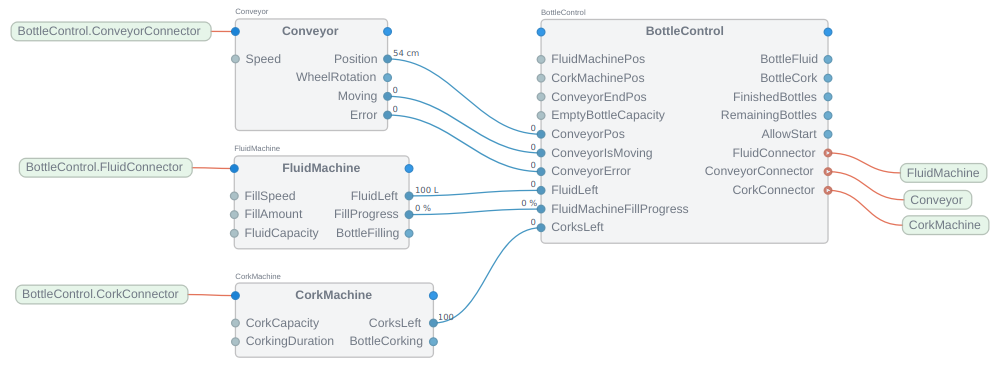
The different components of the bottle machine demo were made in C++ and connected in the CDP Studio block diagram as shown in the below overview.

The conveyor, cork, and fluid machine are all simple components with only two states; running/filling and stopped. The BottleControl-component controls the different machines using messages that are sent based on the conveyor position and machine feedback. It has the following states:
- Start where the bottle is moved to the fluid machine.
- Fluid where the bottle is filled by the fluid machine.
- MoveToCork where the bottle is moved to the corking machine.
- Cork where the bottle is corked by the corking machine.
- End where the bottle is moved to the end of the conveyor.
The different machine components have parameters for settings like fluid capacity, fill amount, fill speed, cork capacity, and duration. These are not configurable in the GUI. Perhaps a fun exercise for a new CDP Studio user?
To enable smooth movement on the widgets that are controlled from control components, the fs of the CDP2Qt component has been increased to 100 Hz. This means that the widgets can receive new positions every 10 ms.
GUI
To see how the different widgets are configured, select them in the CDP Studio Design mode by clicking in the form or in the object inspector.
Some widgets, like the moving bottle on the demo page, have widgets stacked on top of each other. The bottom picture is covered first by a bar widget and then a picture on top of that. Trying to select the bar or the bottom picture by clicking in the form will only select the top picture, named pictureBottleOutline. To select and configure the bar or the bottom picture, we first click pictureBottleOutline and then select barBottleFill or pictureMovableBottle using the object inspector.
The SVG files that show the SCADA-specific elements, like bottles, conveyors, and machines, are added as library resources along with the standard theme files. To copy and modify the images for other themes, have a look at the details in How to Create a Custom Theme. The SCADA images are located in the themes/flat_gray_light/scada with an additional dark version of the bottle in themes/flat_gray/scada. The additional dark picture was required as the one in the light theme did not look good in night mode.
To extend the example with custom images, have a look at How to Extend an Existing Theme.
Get started with CDP Studio today
Let us help you take your great ideas and turn them into the products your customer will love.