Using OpenCV Camera View in HMI GUI
Introduction
This purpose of this example is to show how CDP Studio integrates with OpenCV and how an image from a webcam can be integrated into a CDP GUI application.
The widget containing the webcam picture can be used together with the other widgets and the GUI is edited in CDP Studio, the independent automation software for open PC-based real-time distributed control systems.
Prerequisites
This project depends on OpenCV. Follow the Importing OpenCV to CDP Studio guide. Make sure to download the OpenCV binaries and complete the File -> Import Library... step.
How to Run the Example
To run the example from CDP Studio, open Welcome mode and find it under Examples. Next, in Configure mode right-click on the library project and select Build, then right-click on the system project and select Run & Connect. See the Running the Example Project tutorial for more information.
Project Overview
This example includes:
- A library project containing:
- CameraWidgetDependencies - empty component that is not activated, but ensures deployment of required dependencies.
- CameraWidget - a custom widget using OpenCV to display camera image. The selection of the camera is handled by
m_capture.open(0)in camerawidget.cpp, which opens the feed of the first camera (edit the index in case multiple cameras are connected). The widget is not visible as a resource, but is made available to the dynamic loader at run-time.
- A system project containing a pre-configured CDP Application that is ready to run.
Implementation
Users who are familiar with CDP Studio and curious about custom widgets should note the following:
- The CameraWidget class is created as shown in camerawidget.h and camerawidget.cpp
- The widget is made available to the ui loader by making the CameraWidgetLibBuilder inherit CDP2QtBuilder and implement CreateNewWidget.
- The widget is added in the ui file by promoting a QWidget to CameraWidget (promoted widgets are often referred to as placeholders).
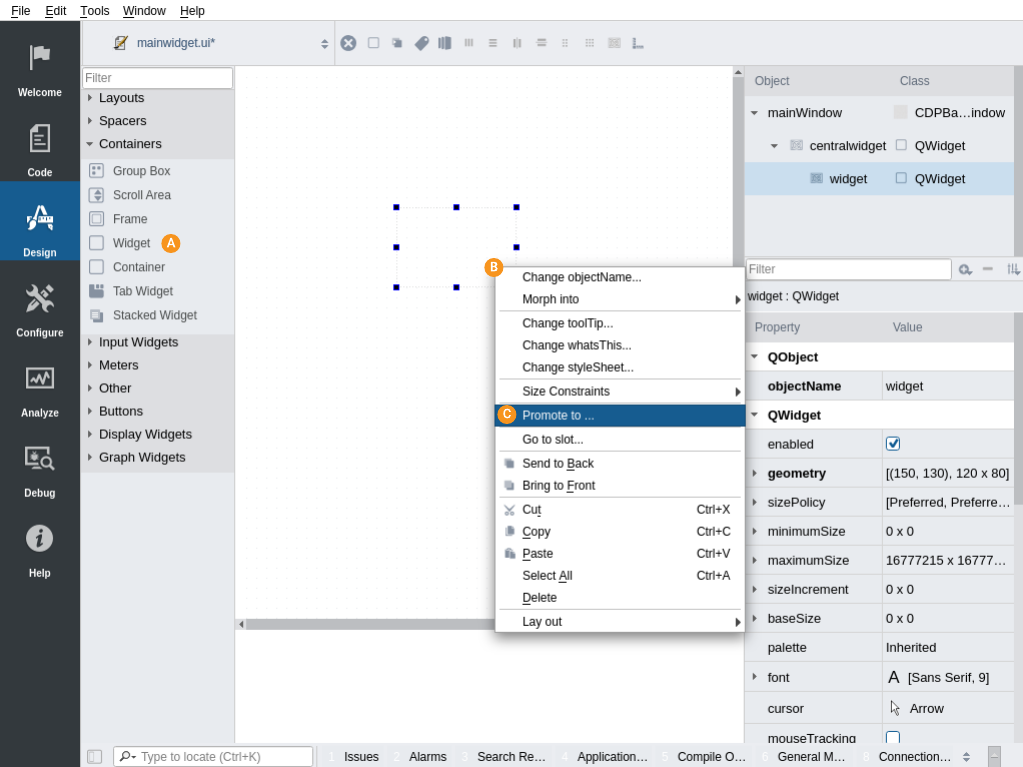
- In Design mode drag a Widget to your form
- Right click on the added Widget
- Select Promote to...
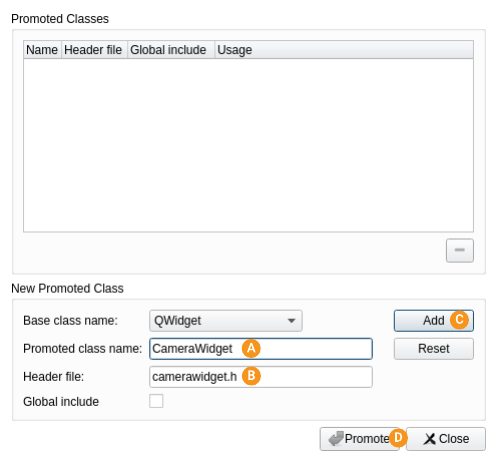
Next a dialog appears:
- Set class name to CameraWidget
- Set header file name to camerawidget.h
- Click Add
- Finally click Promote
Read more about this method in How to add promoted widgets in design mode manual.
- Properties that are added to the CameraWidget must also be added to the promoted widget as dynamic properties to enable editing.
- The GUI application contains a dummy component, CameraWidgetDependencies, to ensure that CDP Studio deploys the required dependencies.
Get started with CDP Studio today
Let us help you take your great ideas and turn them into the products your customer will love.