Adding a Drag and Drop Web UI to Automation System
Introduction
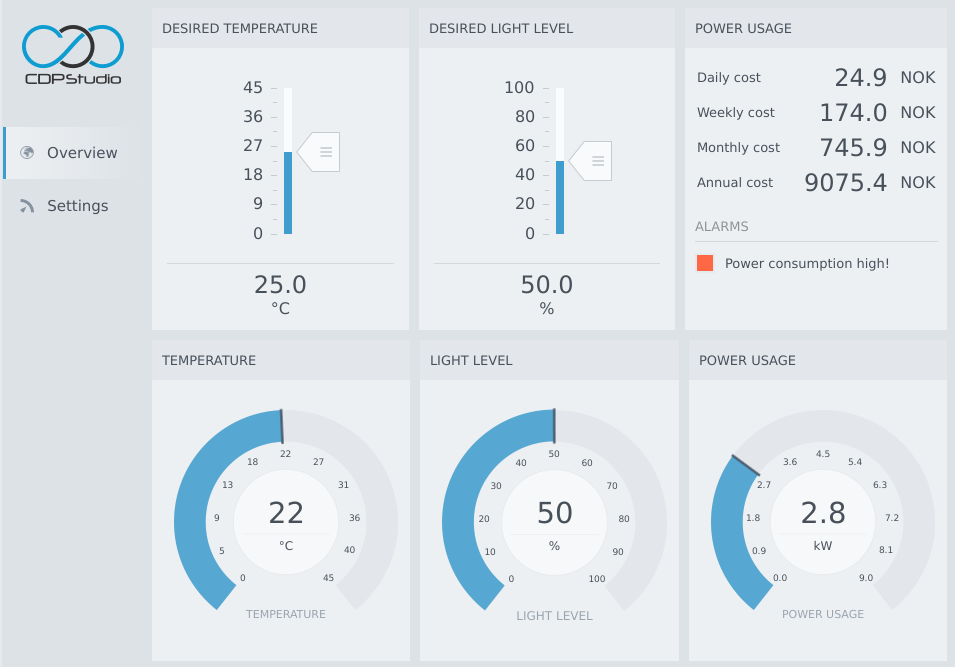
The purpose of this example is to show how a WebAssembly user interface can be integrated with a CDP Studio application using the same tools and widgets as a native GUI.
The WebAssembly user interface is a home control dashboard similar to the HTML5/Vue based example in Adding a Vue.js Web GUI to Automation System. In fact, everything is identical in the two examples except for the web frameworks, their graphical elements and the way the UI was created. While the HTML5/Vue UI was coded in a text editor, the current example was created in CDP Studio Design mode using standard drag and drop. The main difference when making the current web UI in Design mode, compared to the usual native GUI examples, is the use of CDPRow widgets and the hide/show features in CDPBaseContainer to ensure that the GUI scales nicely also on mobile phone devices.
The example consists of a small CDP Application that contains some components for simulating temperature, light and power usage. There is also a component named Settings, that include logic for calculating power usage cost, store the kWh price and so on. There is no code for this logic other than configuration in CDP operators. The HTML5/Vue based GUI added this logic in the model script file.
Some key features used in the WebAssembly GUI:
- Includes configuration in CDPBaseContainer for hiding and showing different page navigation systems based on width.
- Includes CDPRow widgets to switch content layout from horizontal to vertical at a configurable width.
- In the first GUI row in the overview, CDPRow widgets are placed inside each other to better support different screen resolutions.
- Includes a QScrollView on each page to ensure that the GUI is scrollable when switching to vertical layout.
- Adjust the form width in CDP Studio Design mode to see how the CDPRow layouts and widgets are configured to look good in all resolutions.
- Also, when doing the previous step, note the minimumSize set on the CDPBaseContainer widgets to ensure that the contents look good in vertical layout.
- Includes a setting for adjusting bottom window margin. This is to adjust GUI on mobile devices that have navigation bars that might cover the bottom of the GUI.
- Includes a setting for switching between dark and light themes.
For more information about how to use web user interfaces with CDP Studio, see the GUI - Web UI documentation.

How to Run the Example
To run the example from CDP Studio, open Welcome mode and find it under Examples. Next, in Configure mode right-click on the library project and select Build, then right-click on the system project and select Run & Connect. See the Running the Example Project tutorial for more information.
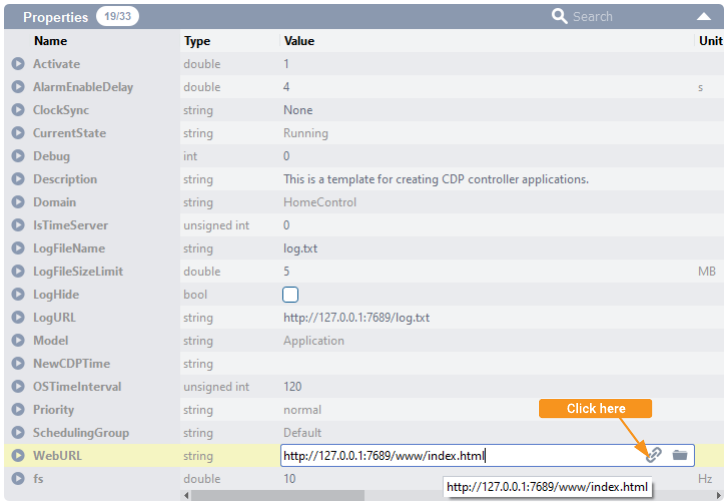
When the application is running and connected, click on the application in Configure mode Project tree and choose the Table Editor tab. Go to the Properties section, find the property called WebURL. This is the link for the web browser. You can also open the browser directly by clicking the icon next to the url. Note that there is a WebFilesToServe property in the application configuration that must list all files and folders that should be accessible in the web browser. If the WebFilesToServe is not set up correctly, then the web browser might not show the content correctly, or it might not function correctly. Then the web-page displayed above should open in your web browser.

Get started with CDP Studio today
Let us help you take your great ideas and turn them into the products your customer will love.