IntelligentEdge Configuration Manual
IntelligentEdge Overview
CDP IntelligentEdge is a set of ready-for-use building blocks for creating a secure data communication pipeline between CDP controller systems (e.g. Edge device) and central data processing service (e.g. Cloud service). This communication pipeline can be used for collecting and consolidating different Edge device sensors and operational data to the central Cloud database, for further analysis and inspection.
The IntelligentEdge library consists of ready-for-use Edge and Cloud components that can be added to any CDP application.
Edge
The IntelligentEdge Edge component can be added to any CDP controller system. It depends on the local CDP Logger, which acts as the data source for the value changes and event data. CDP Logger logs values and events into the local controller first and the Edge component uploads from there to the Cloud using the configured upload frequency and resolution.
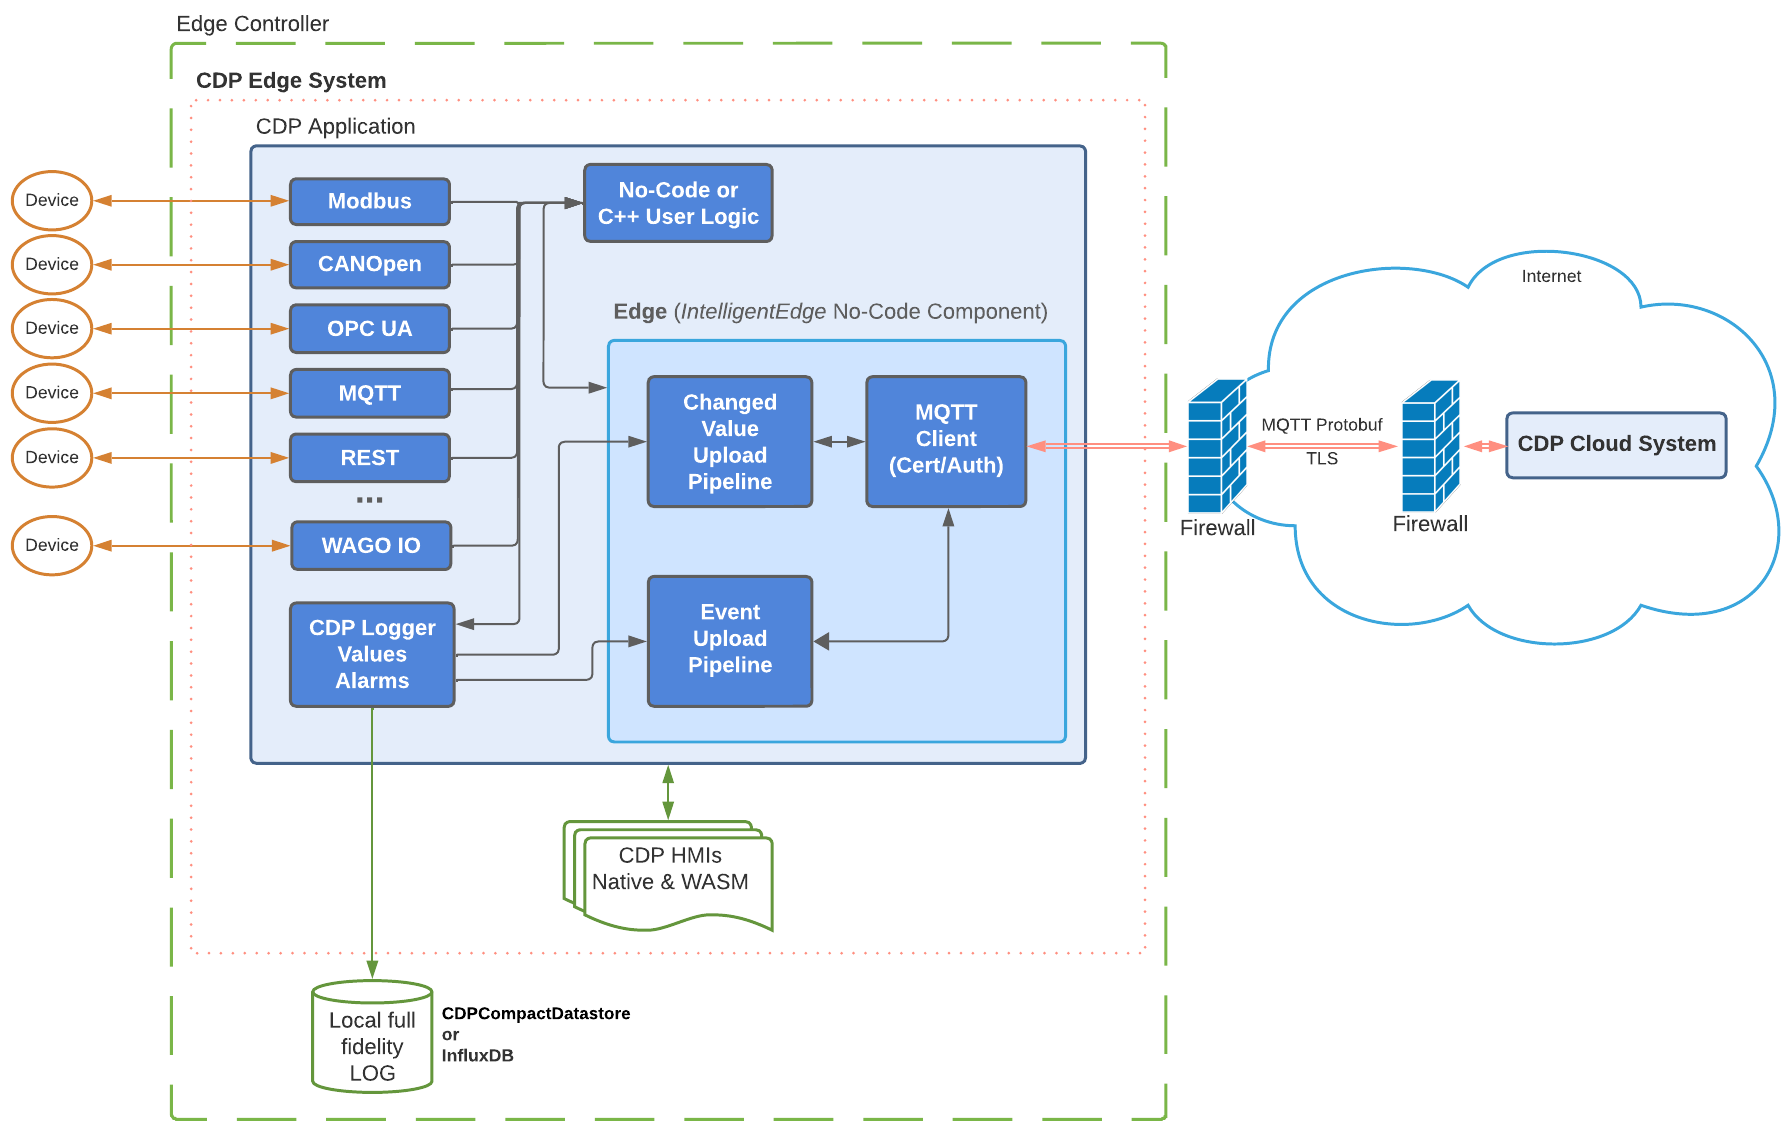
Having all uploadable values logged locally ensures that all data will be sent to the Cloud regardless of the communication line quality or uptime. The Cloud service will keep track of the timestamps of the data received from each Edge so the sending will be resumed exactly from that moment whenever communication between Edge and Cloud is re-established again. This system ensures that all data will be continuously uploaded regardless of possible communication disruptions.
The data is sent over communication lines using MQTT transport protocol. To reduce the communication bandwidth the MQTT payloads are compacted using Protobuf serialization. The communication also uses the MQTT version 5 Topic Alias feature to further reduce the communication bandwidth needed.
Cloud
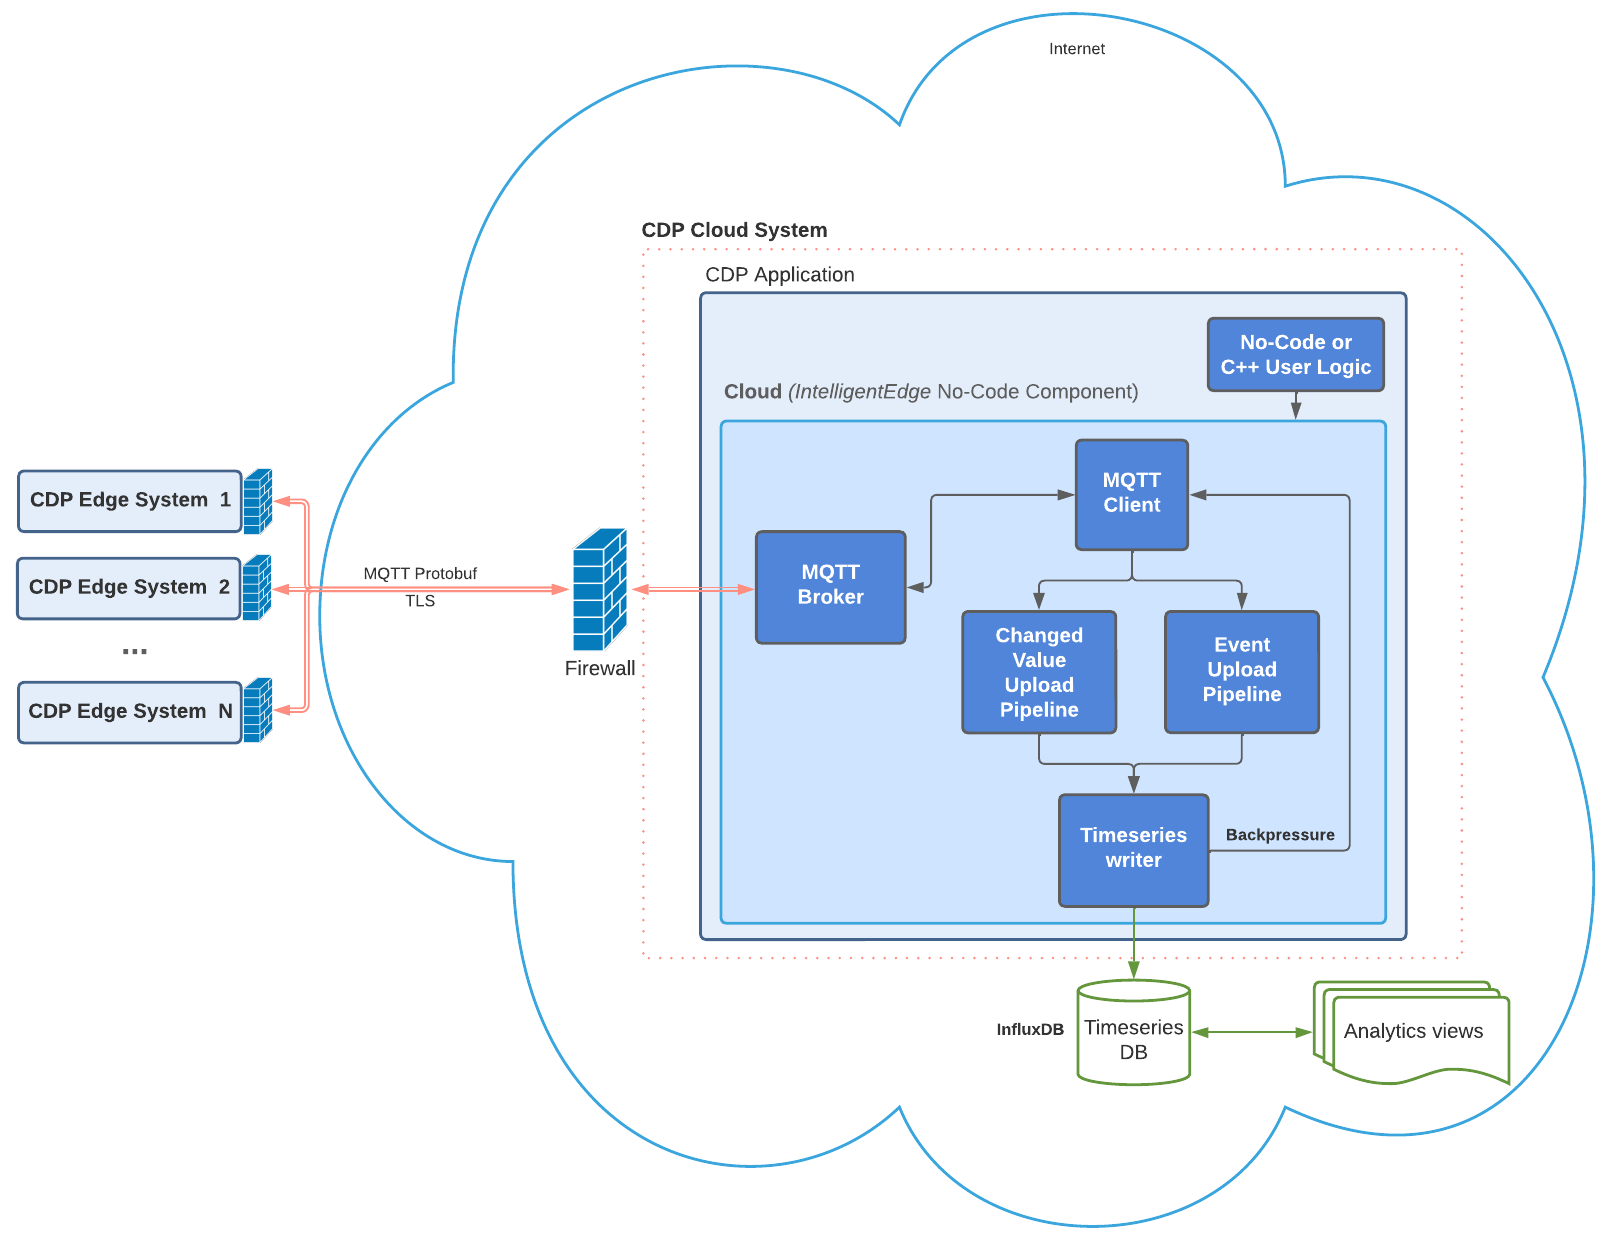
The IntelligentEdge Cloud component can be added to any CDP system, which will act as the central data processing service for all Edge systems as shown in the diagram below:
The Cloud component has a subcomponent that acts as a central MQTT broker for all the Edge devices. All data that Edge devices send to the broker will be decoded by Cloud and uploaded to the time series database, for example, InfluxDB. The data can then be analyzed using any data mining tool or data visualization software, for example, Grafana.
How to Use IntelligentEdge Library
How to Prepare Cloud
To utilize the IntelligentEdge, start by preparing a system that functions as a Cloud. This involves creating a Cloud CDP system and incorporating the IntelligentEdge Cloud component-tree recipe from the Resource tree. This can be done, for instance, by dragging it to the Block Diagram pane. By doing so, the complete structure comprising the Cloud component and sequencer blocks will be integrated into the application.
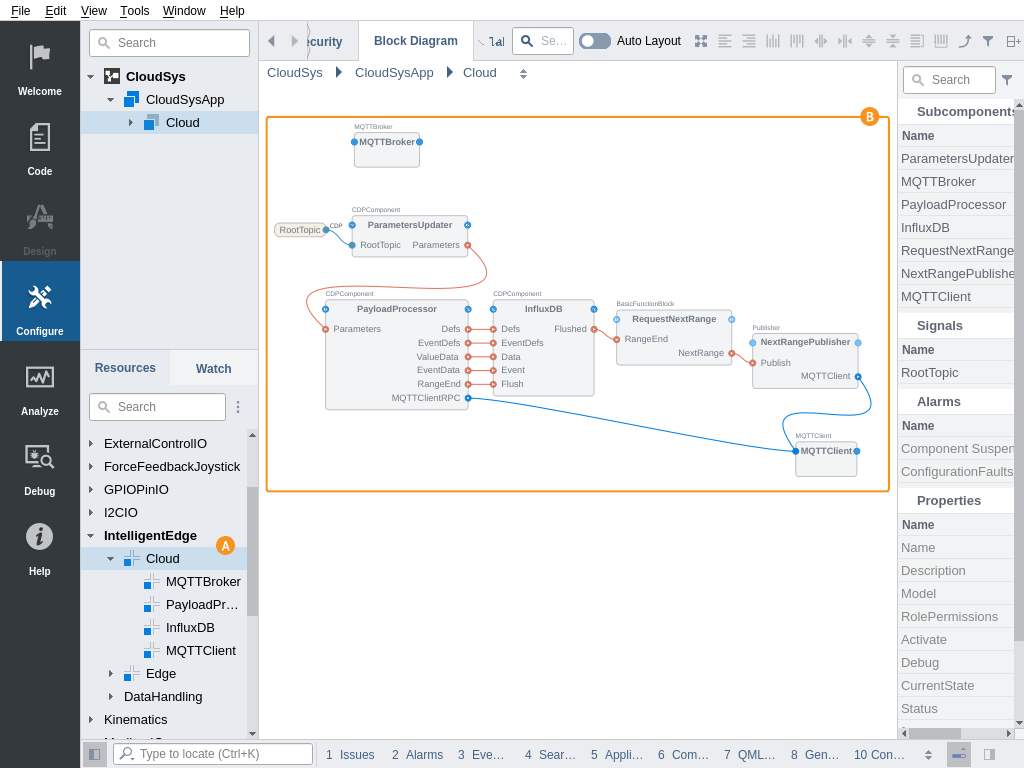
In addition, a time series database like InfluxDB must be installed according to its documentation. Then the Datastore section in Cloud.InfluxDB.LogWriter block should be configured to give the LogWriter block write access to the database. For that, an API Token should be acquired from the InfluxDB database and entered into the APIToken property. When the database is not residing on the same server as the Cloud itself the URL property should be adjusted accordingly. For more information on how to prepare and use InfluxDB with CDP see Configuring the InfluxDB Datastore.
The Cloud system should be deployed to any server, that is accessible by Edges via the MQTT network protocol. Also the remote network address of the Cloud MQTT broker needs to be acquired from the network configuration of the Cloud server.
How to Configure Edge
Next, prepare and deploy CDP systems functioning as Edges. To do this, incorporate an Edge component-tree recipe from the Resource tree into these systems (for example, by dragging it to the Block Diagram pane). By doing so, you'll integrate the complete structure of Edge components and sequencer blocks into the application.
The Edge component has 2 pipelines added by default: one for value changes and one for event uploading . Both pipelines are optional so one of them can be deleted and added back later from the Resource tree separately, when needed.
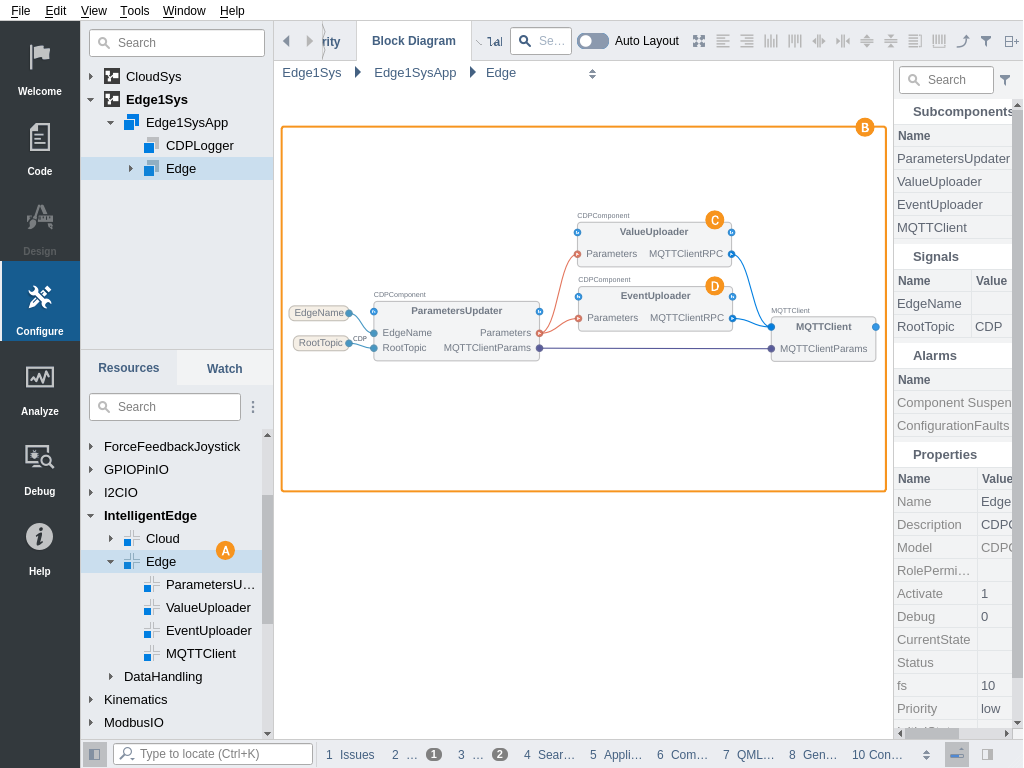
The Edge fetches data from a local CDP Logger for upload so a CDP Logger component should also be added to the Edge system (if not existing already) and values that need to be uploaded should be added to the logging configuration. See How to Setup Logging in Automation System for more information.
Note: For the event uploading pipeline to work correctly, make sure that the CDP Logger has Event Logging property turned on.
By default, the Edge is configured to fetch data from the CDPLogger of the same application. In cases when the CDPLogger is located in other applications of the Edge system the Edge.ValueLogReader and Edge.EventLogReader block ServerAddress argument should be adjusted to the CDPLogger application IP address.
The Edge.MQTTClient sub-component connection parameter BrokerHost has to be set to the Cloud MQTT broker external address.
After these preparations, the Edge can be deployed and it should start uploading the logged data to the Cloud.
Data Tagging and MQTT Path Customization
The Edge component is pre-configured to upload value changes and events to the MQTT topics and cloud database structure based on the logged value node path, like these:
| MQTT Topic | Description |
|---|---|
| CDP/DATA/{NodePathSeparatedBySlash}/DEFS | Value node definition upload topic. Definitions are uploaded after the MQTT connection is established, once, using JSON format. |
| CDP/DATA/{NodePathSeparatedBySlash}/HIST | Value change upload topic. Value changes are compacted using LogDataAggregator. |
| CDP/DATA/{NodePathSeparatedBySlash}/EVENTDEFS | Event node definition upload topic. Definitions are uploaded after the MQTT connection is established, once, using JSON format. |
| CDP/DATA/{NodePathSeparatedBySlash}/HIST | Event upload topic. Event data is uploaded using JSON format and multiple events are compacted using LogDataAggregator. |
For example, when the Edge application named Edge1 uploads a value IO.Sensors.Motor1.Speed then the MQTT topic of value upload would become CDP/DATA/Edge1/IO/Sensors/Motor1/Speed/HIST
As said, this is the default behavior. But the MQTT topic and database structure the IntelligentEdge is using is highly configurable. First, these parameters can altered:
| Configuration Entry | Description |
|---|---|
| Edge.RootTopic | MQTT topic root element used for communication. Defaults to CDP. Must match the value set in the Cloud system Cloud.PayloadProcessor.RootTopic signal. |
| Edge.EdgeName | Defaults to the Edge application name, but can be set to any unique value or can be routed from some signal or property. This value is not used in the default topic structure (as the node Path already contains the application name). But this value can then be used in advanced topic re-write configurations as will be described below. |
Secondly, when there are many different Edge systems, the Edges may have different internal structures or very complex internal structures, that should not be exposed to the MQTT topic tree level. Then some sort of unified and/or simplified upload topic structure is needed across all Edges. With IntelligentEdge this can be achieved easily by utilizing a tagging feature of the CDP Logger. The ValueUploader and EventUploader pipelines have Retagger blocks included that can re-write the MQTT topics, based on the tags that were added to different logged nodes.
Properties that need to be set for MQTT topic customization:
| MQTT Topic Customization Property | Description |
|---|---|
| Edge.ValueUploader.DefsRetag.PathFormat | Value node definition retagged topic format |
| Edge.ValueUploader.DataRetag.PathFormat | Value changes retagged topic format |
| Edge.EventUploader.EventDefsRetag.PathFormat | Event node definition retagged topic format |
| Edge.EventUploader.EventRetag.PathFormat | Event data retagged topic format |
By default, these PathFormats are left empty and only the CollisionPathFormats are set to RootTopic;CollisionSubTopic;Path;Suffix to provide the default topic structure described earlier. But these PathFormats can be set to re-write topic structure from any number of tags instead of using node Path. See Retagger documentation for more information and examples of how to configure these PathFormats to get the needed topic structure.
Note: For the Cloud to receive the uploads correctly the PathFormats listed above should always start with RootTopic;DataSubTopic and end with ;Suffix. The tag format you need to use must always be placed between these prefixes and suffix.
Further Configuration
The Edge component has many pre-configured but adjustable upload parameters, like these:
| Property Location | Description |
|---|---|
| Edge.ValueUploader.ValueLogReader.Resolution | Sampling rate for the ValueUploader. Value changes faster than this will be uploaded as one consolidated value change. Defaults to 1 Hz. When set to 0, then full-resolution data will be uploaded. |
| Edge.ValueUploader.ValueLogReader.Limit | Maximum number of value changes that will be packed into one MQTT publish. Defaults to 10000. Increasing this will increase upload performance and also increase the controller memory requirements and increase the risk of retries in case of communication failure. |
| Edge.ValueUploader.RangeScanner.MinTimeSpan | Minimum delay for new value change fetch from CDP Logger, in cases when the previous fetch did not contain any value changes. Defaults to 5 seconds. Affects the speed at which the value changes will be uploaded to the Cloud. A very low number can increase the Edge controller CPU load. |
| Edge.EventUploader.RangeScanner.MinTimeSpan | Minimum delay for new event fetch from CDP Logger, when the previous fetch did not contain any events. Defaults to 5 seconds. Affects the speed at which the events will be uploaded to the Cloud. A very low number can increase the Edge controller CPU load. |
As the Edge and Cloud component trees are CDP recipes they can be altered and reconfigured in many ways, after adding to the CDP application. Also, differently configured subcomponents of these recipes can be added. For example, many differently configured ValueUploader pipelines can be added to one Edge, one for lower-fidelity continuous value upload, and the other for full-fidelity value upload for some range, based on some external request or alarm event.
How to Secure the Communication
The IntelligentEdge Edge and Cloud components are by default configured to send data over unsecured MQTT communication. This setup fits well for getting started and testing out the upload pipeline. But for production Edge and Cloud setups, the MQTT communication should be set to TLS encrypted and Edge MQTTClient connections should be authenticated, to prevent data from misuse or corruption by third parties.
For that, a TLS CA key and certificate should be created and based on that a key and TLS certificate for Cloud MQTTBroker and every Edge MQTTClient should be created, as is described in TLS Certificate Setup. Note that a separate TLS key and certificate are needed to be created and configured for Edge itself, as it has also a MQTTClient included.
Also, make sure that the Cloud MQTTBroker is set to allow only encrypted and certified connections by setting the Cloud.MQTTBroker.Encryption property to TLS and Cloud.MQTTBroker.TLSRequireClientCert property to 1 (True).
In addition, firewalls should be used to protect both Edge and Cloud systems network access and disable all other traffic except MQTT (i.e. the TCP port specified in Cloud.MQTTBroker.ListenPort) from the Edge to Cloud.
See also LogDataAggregator, LogDataDisaggregator, and Retagger.
Get started with CDP Studio today
Let us help you take your great ideas and turn them into the products your customer will love.