Framework - Security
Security Configuration
By default, a running CDP system can be accessed (connected, inspected and administrated) by anyone who has access to the network where the system is running. For mission-critical systems, access should be limited to authorized personnel only - this can be done via the Security configuration editor.
The Security configuration editor allows configuring users and their authentication and authorization and also configuring the communication encryption, CDP system-wide.
The Security configuration can be found in Configure mode by clicking on the Security configuration tab .
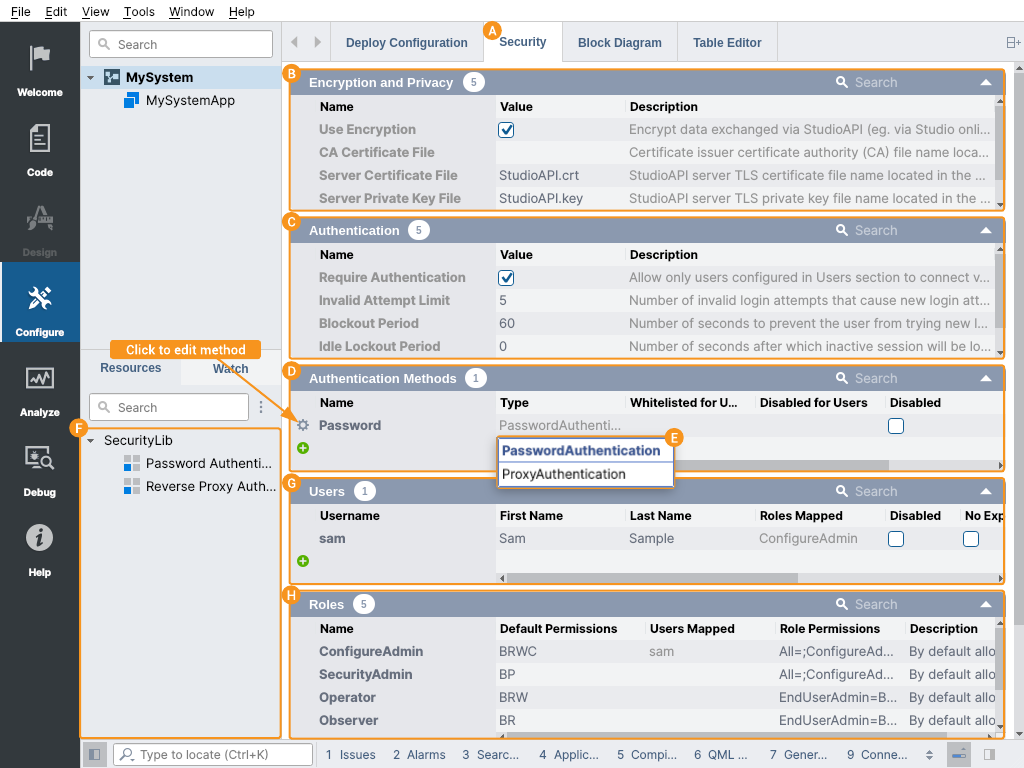
Encryption and Privacy
In the Encryption and Privacy settings table , communication encryption can be configured.
| Setting | Description |
|---|---|
| Use Encryption | Check this option to make CDP encrypt data exchanged via StudioAPI (e.g. via CDP Studio online connect). Encryption ensures that the communication can not be revealed by eavesdroppers. |
| Server Certificate File and Server Private Key File | StudioAPI server TLS certificate and corresponding private key file name. Key-pair and corresponding self-signed certificate will be auto-generated at application startup if they are missing from the application folder. In the multi-application system, every application has its own unique private key and certificate. StudioAPI clients (like CDP Studio) will remember the application certificate at first connect and will warn users later on in the case when the certificate fingerprint has been changed, for security. |
| CA Certificate File | Certificate issuer TLS certificate authority (CA) file name. This setting can be used by organizations that have separate key and certificate management systems and a certificate authority in place. When the CA Certificate File is set then the CDP application TLS certificate will be verified at every connection to be signed by that CA certificate. |
| System Use Notification | When configured, a confirmation prompt with this text will be displayed to all users at the connect. Subset of HTML can be used to format the text, like:
|
Note: All certificate files have to be in PEM format.
Certificate Deploy
If CA Certificate File and/or custom Server Certificate File and Server Private Key File is used, these files have to be deployed to the application folder. The files can be set up for automatic deployment by CDP Studio like this:
- copy the certificate and key files into the corresponding CDP application folder (using any file management tool)
- add the files to the application project in CDP Studio by right-clicking in Code mode onto the application name and then choosing Add Existing Files...
Authentication
In the Authentication settings table , user authentication properties can be configured.
| Setting | Description |
|---|---|
| Require Authentication | Check this option to make CDP allow only users configured in the Users table to connect via StudioAPI (e.g. CDP Studio online connect). When authentication is set to be required, then connection attempts without user authentication will be denied. |
| Invalid Attempt Limit | Number of invalid login attempts after the user's new login attempts will be blocked. Set to 0 to allow users to endlessly try to login in. |
| Blockout Period | Number of seconds to prevent the user from trying new logins, after the invalid login attempt count has been reached. |
| Idle Lockout Period | Number of seconds after which a session (connection) will be locked out and will need re-authentication. Set to 0 for the session to never lock out while idle. Enabling the session lockout period also disables the possibility of temporarily remembering the password in client applications (like CDP Studio). |
| Audit Log | Specify what type of events need to be logged. On Linux, logs are posted to Syslog (auth facility more specifically). On Windows, logs are posted to Event Log (the "CDPTech" under "Application and Services Logs" more specifically). When using Windows Event Log, CDP applications must be started once with administrator privileges, to allow writing to Event Log. |
Note: The Require Authentication can not be set when there are no valid users nor authentication methods configured as this would make the system inaccessible. Note, that the user will become valid only after at least one authentication method is configured and enabled for her/him.
Authentication Methods
In the Authentication Methods table , possible authentication methods for users can be configured.
| Setting | Description |
|---|---|
| Name | Unique name for the method. Needed only for administrative purposes to identify the method. The chosen name does not affect the authentication process. |
| Type | Determines the authentication method type. |
| WhiteListed for Users | Semicolon separated list of Usernames that are explicitly allowed to use the authentication method. The method is allowed for all users (except users listed in the Disabled for Users property) when the list is empty. |
| Disabled for Users | Semicolon-separated list of Usernames that are not allowed to use the authentication method. |
| Disabled | Can be used by the administrator to temporarily disable the method. |
By default, a Password Authentication Method is enabled. Other methods can be added by selecting the Type at the bottom row of the table and clicking on the in front of the row. Password Authentication Method can also be removed, when not needed. In CDP Studio, the method can also be added by dragging a method from the Resource tree .
To edit the method-specific properties, click the settings button in front of the method name and the editing window opens up.
Password Authentication Method
With this method, the users are authenticated using locally set (in the CDP system) personal passwords.
This method has the following configurable properties:
| Setting | Description |
|---|---|
| Minimum Length | Minimum password length. Passwords having fewer symbols than this minimum can not be set. |
| Expiry Time | Number of days after a password will expire and needs to be changed. Set to 0 for passwords to never expire. |
| Warn Time | Number of days before the password change deadline, when the system will start warning users about the need to change the password. |
| Complexity Check | Do not allow to set too simple passwords that are too easily crackable (are too simplistic, too commonly used or are based on a dictionary word). |
| History Length | Number or recently used passwords that the user cannot re-use. |
Users
The Users table can be used to administrate (i.e. add, remove or change) an unlimited number of users who can log in to the running CDP system.
| Setting | Description |
|---|---|
| Username | Unique Username of the user. This Username together with other credentials (like the password) is used to identify the user at login time. |
| First Name and Last Name | Set given names of the user. |
| Disabled | Set this flag to temporarily disable user access. |
| No Expiry for Password | Use this flag to override the default password expiry rule set (so that this user password will never expire). |
| Set Password | Use this button to set the user password. |
Note: When administrating other people's accounts and setting their passwords the Temporary flag should be set - this will force the other user to change the password at first login, therefore making it known only by him/her.
Roles
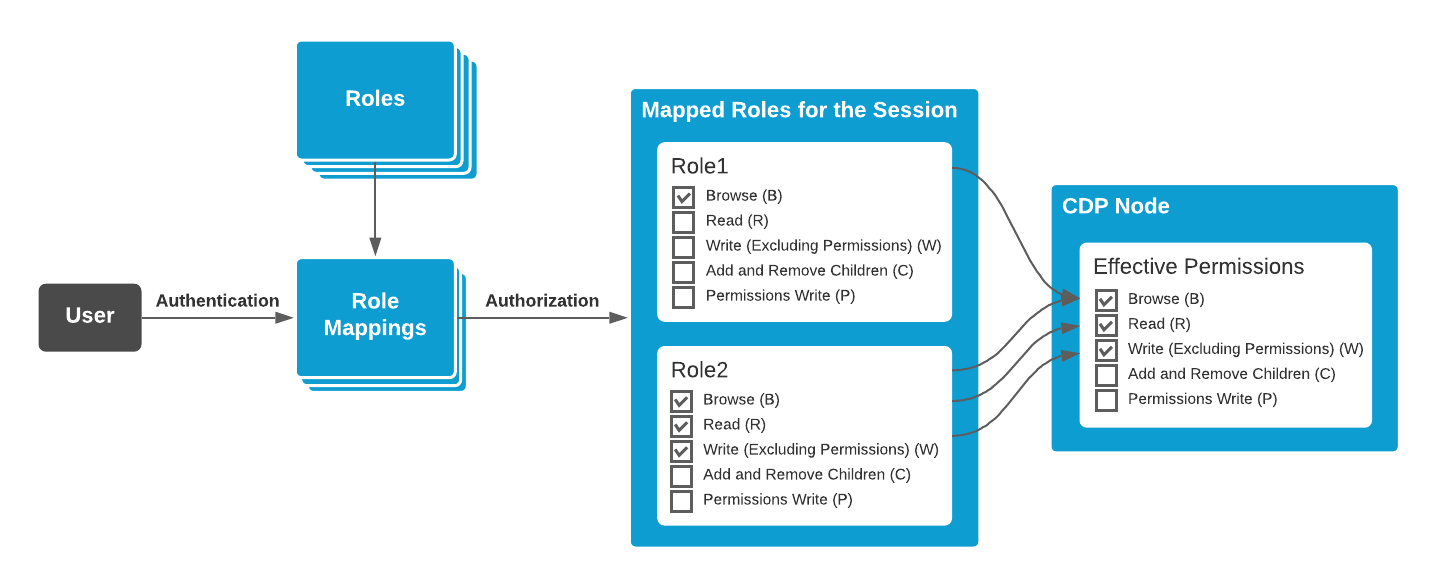
User roles are used to separate two different security aspects - the authentication (i.e. determining who a user is) from the authorization (i.e. determining what the user is allowed to do in the system).
In the Roles table , different roles that users can be assigned to in the CDP system can be configured. Each role has some default permissions for all CDP nodes. In addition to the default permissions, it is possible to assign different permissions for different roles for every CDP node (e.g. every component, signal, operator etc.) (see also RolePermissions).
| Setting | Description |
|---|---|
| Name | Unique name of the Role. This name is used to refer to the role in the Role Mappings table and also while adjusting role permissions by RolePermissions field. |
| Default Permissions | Default permissions for the role. These permissions apply for nodes that have no specific permission configuration for this role. |
| Description | Text field, that can be used by an administrator to describe the purpose of the role |
The following default permissions can be enabled for every role:
| Permission | Description |
|---|---|
| B - Browse | Allows seeing node children list |
| R - Read | Allows reading node value |
| W - Write (Excluding Permissions) | Allows writing node value. This permission does not allow to change of node permissions in running CDP system (see permission P). |
| C - Add and Remove Children | Allows to add or remove children (for nodes that have the add or remove support in running CDP system) |
| P - Permission Write | Allows changing permissions in running CDP system |
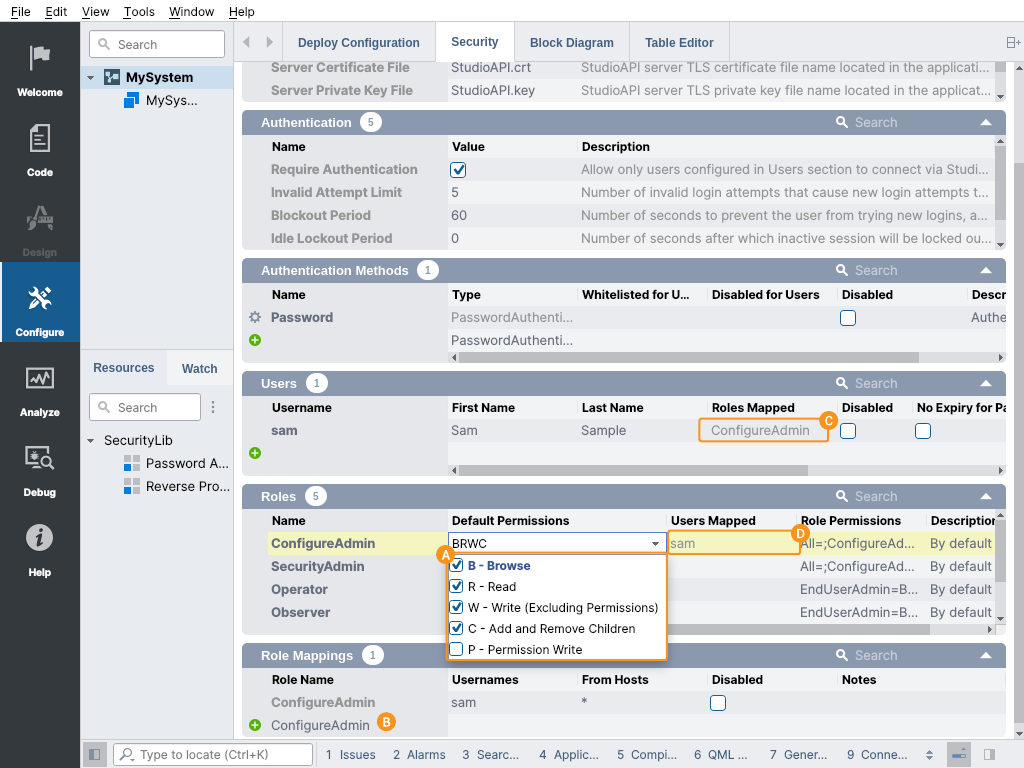
The Default Permissions field can be edited by toggling checkboxes - then the permission letters in the field are altered accordingly.
Every fresh CDP System has 5 roles predefined:
| Role | Description |
|---|---|
| ConfigureAdmin | By default allows viewing, changing and adding/removing everything but permissions |
| SecurityAdmin | By default allows changing only permissions |
| EndUserAdmin | Intended to manage (including adding/removing) all users except system users (those having ConfigureAdmin or SecurityAdmin role) |
| Operator | By default allows viewing and changing everything (but no adding/removing) |
| Observer | By default allows viewing everything |
Note: Note, that these predefined roles can be changed (or even removed) in any way for your specific needs.
Role Mappings
One or multiple roles can be assigned to the user depending on what host the user is logging in from. Every user must have at least one role assigned to be able to log in.
Role Mappings table can be used to add role assignment rules to users.
| Setting | Description |
|---|---|
| Role Name | Role name assigned to the user (or multiple users) |
| Usernames | One username or semicolon-separated list of usernames that apply via this mapping |
| From Hosts | Host IP address, semicolon-separated list of IP addresses or IP address match pattern. Defaults to asterisk sign (*), which maps the role regardless of the host that the user is logged in from. Host-specific role mapping can be used to map some mission-critical role (e.g. SecurityAdmin) to the user only when he/she logs in from some specific host. |
| Disabled | Can be used by the administrator to temporarily disable this role mapping |
| Description | Text field, that can be used by the administrator do add notes to the role mapping |
To assign a new role to the user, first choose one from existing role names from the selection box , then press to add the mapping and then edit the added empty mapping - type in the username (or semicolon-separated list of usernames), and modify from the host match pattern if needed.
Note: Note, that for easy role mapping rules verification currently mapped roles can be inspected in the Users table column Roles Mapped and in Role table column Users Mapped .
RolePermissions
Different CDP nodes (e.g. components, signals, operator etc.) can be configured to have different permissions for different roles. For example, the system can be configured so that some signals (or components or operators) are read-only for some less privileged user roles and totally hidden for even less privileged roles.
To accomplish that, a granular permissions node-level RolePermissions field has to be configured.
RolePermissions field is a semicolon-separated list of expressions in the form:
rolename=permission-setting ...
where
permission-setting=-optional-add-remove-operator permissions-abbreviation-letters
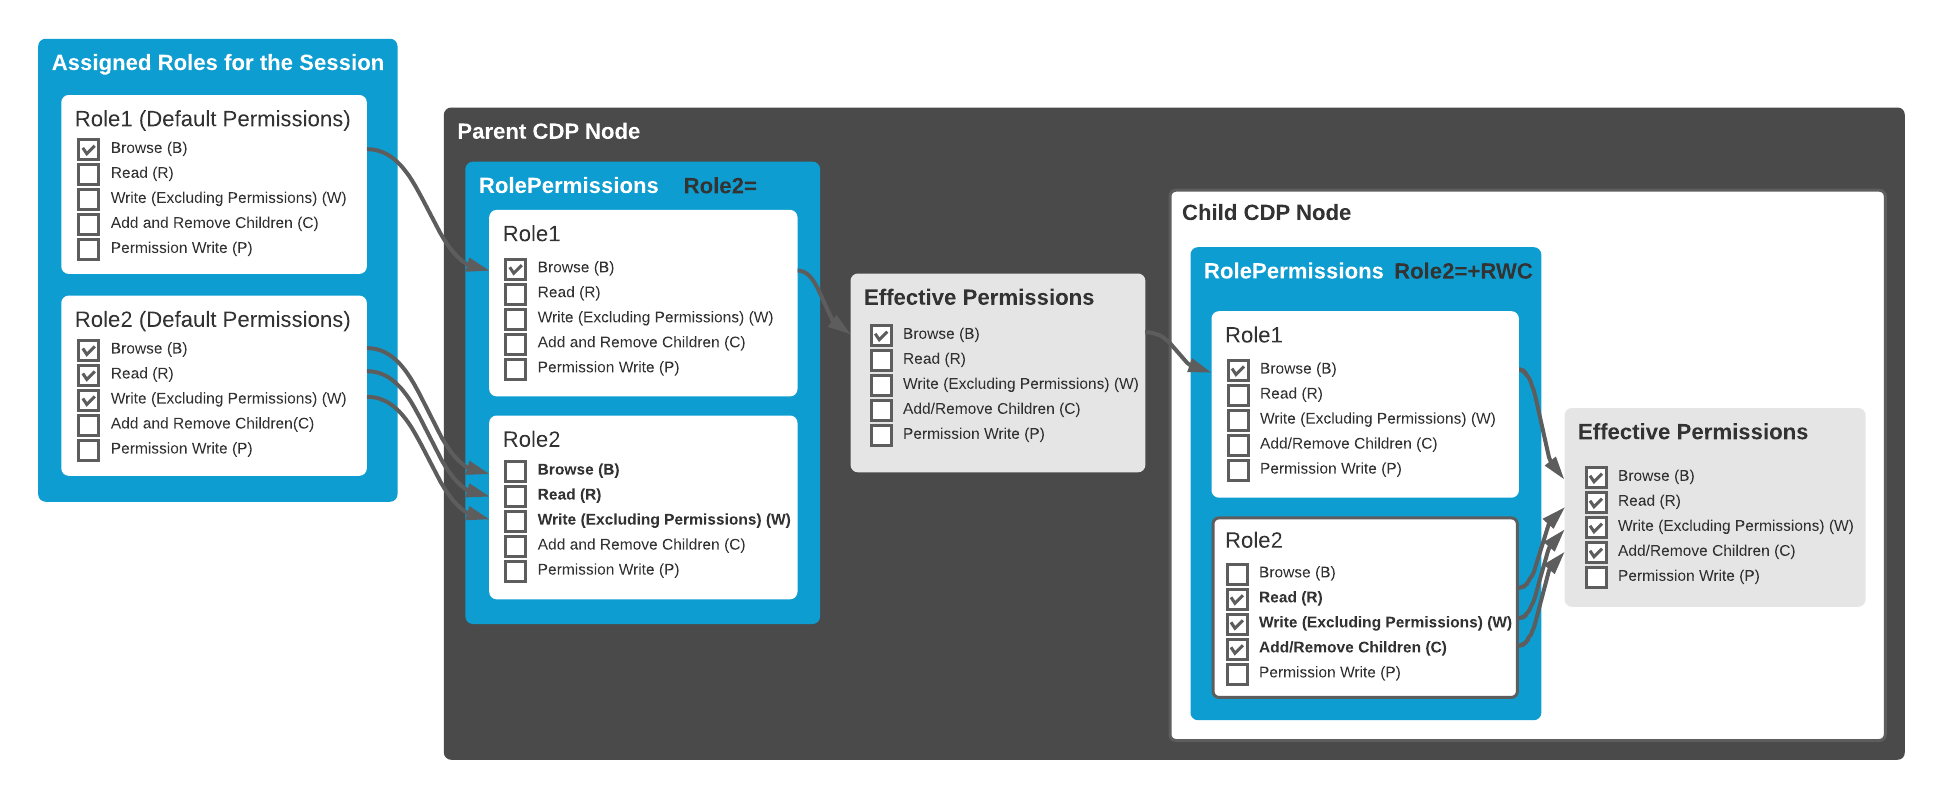
When the user logs into the CDP system, effective permissions for every role mapped for him/her are calculated as follows:
- When the RolePermissions field is not set then its parent node permissions apply
- When no parent has RolePermissions field set, then the role default permissions apply
- RolePermissions field sets the permissions only for the roles implicitly mentioned. For example, the expression Permissions="Operator=R" does not change the permissions for other roles than Operator - they will be the same that the parent node. If permissions for all roles are to be changed, then special All notation can be used (for example, to remove permissions from all roles except for ConfigureAdmin use expression RolePermissions="ConfigureAdmin=*,All=").
- The operator + in front of permission letters causes the following permissions to be added to the existing permissions
- The operator - in front of permission letters causes the following permissions to be removed from the existing permissions
This effective permission calculation is illustrated in the following diagram.
In CDP Studio the RolePermissions expression can be edited conveniently just by checking permission checkboxes. In this editor, the permissions effective at the current node level via inheriting are shown. These inherited but unchanged permissions are shown as greyed-out checkboxes. Any permission checkboxes can be toggled thereby making it to be different from the inherited state - then RolePermissions expression is altered accordingly and the checkbox turns to be not greyed out anymore. There is also a separate column to toggle all permissions for roles and also a row to change the permissions for all roles. Finally, there is also a checkbox to toggle all permissions for all roles.
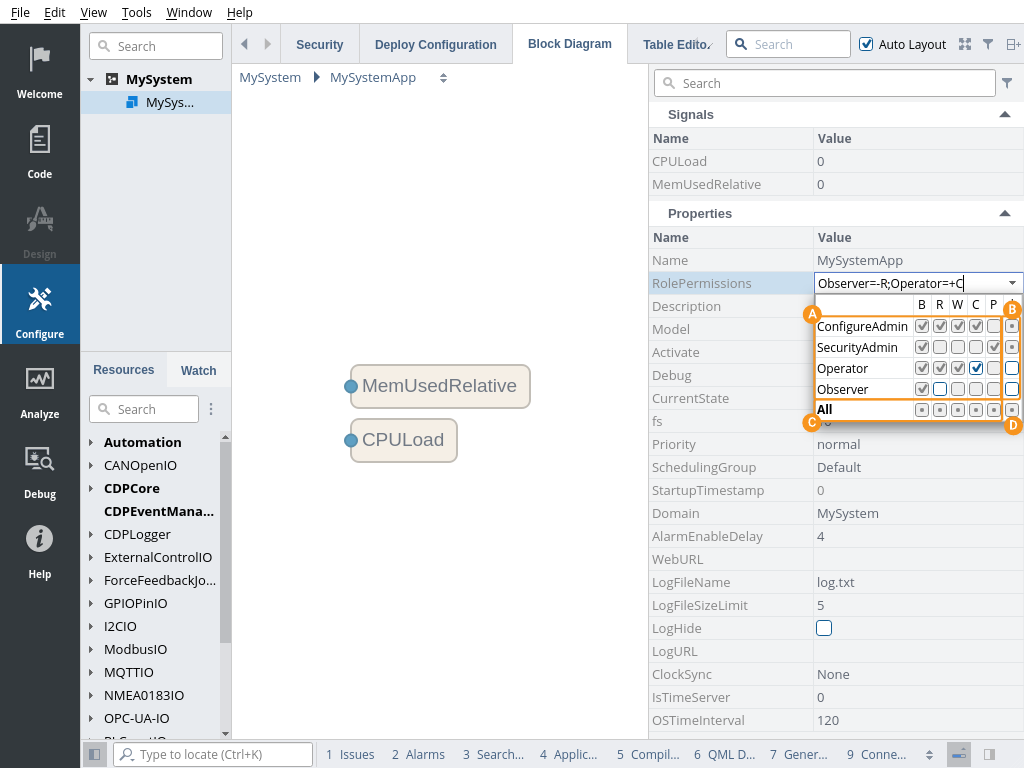
Note: The state of the inherited permissions can be seen even without opening the editor - from the tooltip that pops up when hovering the field with the mouse.
See Also
Get started with CDP Studio today
Let us help you take your great ideas and turn them into the products your customer will love.