WagoCC100IO Configuration Manual
WagoCC100IO Configuration Manual
The WagoCC100 is a fixed physical configuration module. To use it with CDP Studio, a first-time setup as outlined below is needed.
WagoCC100IO First-time Setup
- Install and set up the correct image for the WAGO CC100 as explained in Toolkit 1.4 - WAGO ARMv7 32-bit.
- To make sure that the I/O calibration file is present and correct, right-click the paired Wago CC100 device in the Deploy Configuration Devices table, and select 'Open Remote Shell'.
- Type or 'copy and paste' in the following into the window that opened:
mv /etc/calib /etc/calib.old && /etc/init.d/calib start
The calibration file is then regenerated. If you now type
cat /etc/calib
then the file content should look something like this (the numbers may differ):
PT1 PT2 AI1 AI2 AO1 AO2
9642 1000 40742 3000
9611 1000 40700 3000
14144 2506 41896 7494
14126 2506 41880 7494
1053 350 8915 3000
1050 350 8913 3000
The window can then be closed.
WagoCC100IO Principle of Operation
When the WagoCC100IO starts up, it reads the calibration data for the physical I/Os from the file in '/etc/calib' and maps those scalings to the inputs and outputs. The calibrations are applied when the analog inputs or outputs are read or written. The Analog inputs and outputs scale between 0 volts and 10 volts, and the RTD sensors scale to degrees Celsius.
The WagoCC100IO supports both periodic and event-driven running. By default, the WagoCC100IO runs periodically at 20Hz, as configured by the fs property.
Note: Setting the WagoCC100IO fs to a too high value may result in an unresponsive/unusable system. To make sure you don't overload the controller, monitor the Application CPULoad whenever you adjust this value and when you change or add components to the system
If you want to use the WagoCC100IO in event-triggered mode instead of a periodic mode, you can set UseTrigger to 1. Every time TriggerReadWrite is triggered, the WagoCC100IO will read all inputs and write all outputs. You can force the I/O to not update periodically by setting ForceOffline. Since the check for UseTrigger is tested when leaving the Offline state, it is possible to switch between event-driven and periodic running during run-time by manipulating ForceOffline and UseTrigger.
WagoCC100IO Usage
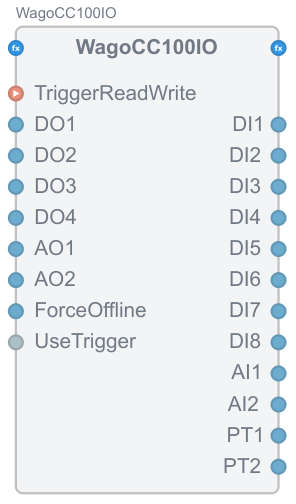
Channel overview
| Name | Type | Description |
|---|---|---|
| DI1 | Digital input | 0V / 24V digital input |
| DI2 | Digital input | 0V / 24V digital input |
| DI3 | Digital input | 0V / 24V digital input |
| DI4 | Digital input | 0V / 24V digital input |
| DI5 | Digital input | 0V / 24V digital input |
| DI6 | Digital input | 0V / 24V digital input |
| DI7 | Digital input | 0V / 24V digital input |
| DI8 | Digital input | 0V / 24V digital input |
| DO1 | Digital output | 0V / 24V digital output |
| DO2 | Digital output | 0V / 24V digital output |
| DO3 | Digital output | 0V / 24V digital output |
| DO4 | Digital output | 0V / 24V digital output |
| AI1 | Analog input | 0V - 10V analog input |
| AI2 | Analog input | 0V - 10V analog input |
| AO1 | Analog output | 0V - 10V analog output |
| AO2 | Analog output | 0V - 10V analog output |
| PT1 | Temperature input | -60 to 350 Degrees Celsius |
| PT2 | Temperature input | -60 to 350 Degrees Celsius |
| ForceOffline | bool | When set to 1, force I/O server offline |
| UseTrigger | bool | When set to 1, use TriggerReadWrite to read and write the I/O. When set to 0, periodic fs triggers read and write. The fs property can be set in the WagoCC100IO Properties table. |
To use the wagoCC100IO, locate the WagoCC100IO resource in the Resource tree, expand it, and add a WagoCC100IO to your application. Set up UseTrigger to your preferred setting, and connect the block into your system.
Note: Make sure you deploy the application containing the WagoCC100IO to a physical Wago CC100 controller, and that you only have one instance of the WagoCC100IO per controller.
Get started with CDP Studio today
Let us help you take your great ideas and turn them into the products your customer will love.