Intro 4: Using a Sequencer
Intro 4: Using a Sequencer
This example shows how to use the no-code sequencer blocks to implement a traffic light. This is an introduction to using the sequencer and event-based logic. The next example, Intro 5, shows how the same traffic light can be implemented using a state machine and messages in C++ code.
This example explains
- How to use the sequencer to create an event-based logic
- HMI, use of layouts and the lamp widget
- Some tips and recommendations
This example is the fourth in the series Intro to CDP Studio.
Project Overview
This project is creating traffic lights at a road junction. The system has 2 identical components, each containing the logic to control one traffic light. The internal logic in the traffic light is made using a sequencer and operators to set the correct lamp colors. The HMI demonstrates the use of layouts and how to use the lamp widget.
How to Run the Example
To run the example from CDP Studio, open Welcome mode and find it under Examples. Next, in Configure mode right-click on the system project and select Run & Connect. See the Running the Example Project tutorial for more information.
Project Description
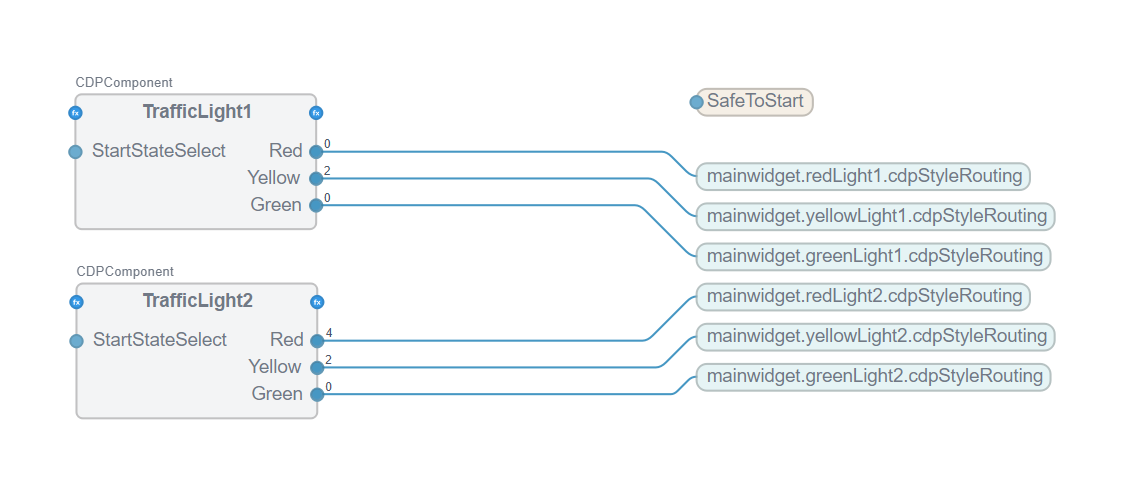
The TrafficLight controls the operation of a single traffic light. The component controls the light changes. The initial start-up state, e.g., green or red, is set by the StartStateSelect signal and is set as a static value in Configure mode.
TrafficLight1 and TrafficLight2 are identical except for the StartStateSelect value, which makes traffic light 1 start in Red and traffic light 2 in Green.
In a real project, we would have created a library and added the TrafficLight component to make it a reusable function for this and other projects. As this is a small example demonstrating the sequencer logic, we created 1 instance and did a simple copy-paste.
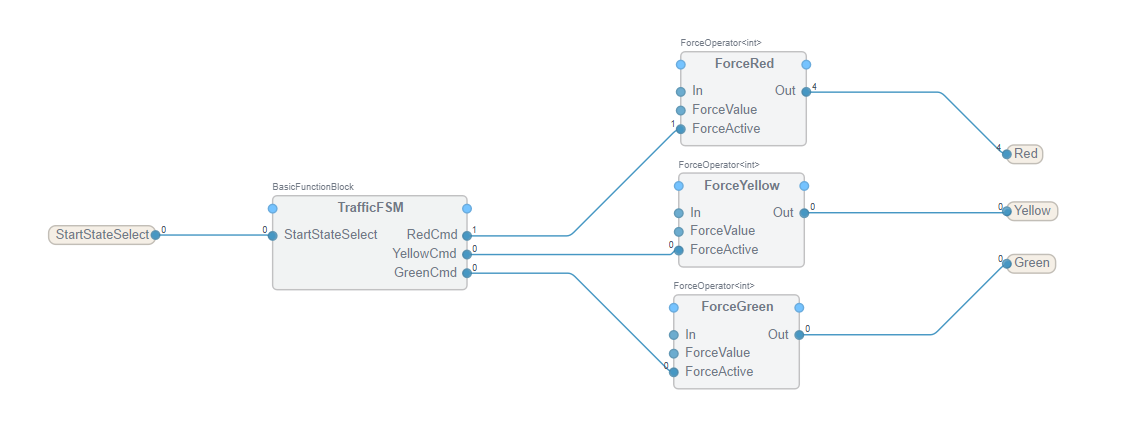
TrafficLight has a BasicFunction containing the sequencer steps and Force operators to set the correct color on the traffic light lamps. For this HMI theme, value 4 = Red, 2 = Yellow, 1 = Green and 0 = Grey/off. Below, the RedCmd = True, which overrides the ForceRed.Out to be the ForceActive value (4) instead of the In, which is 0.
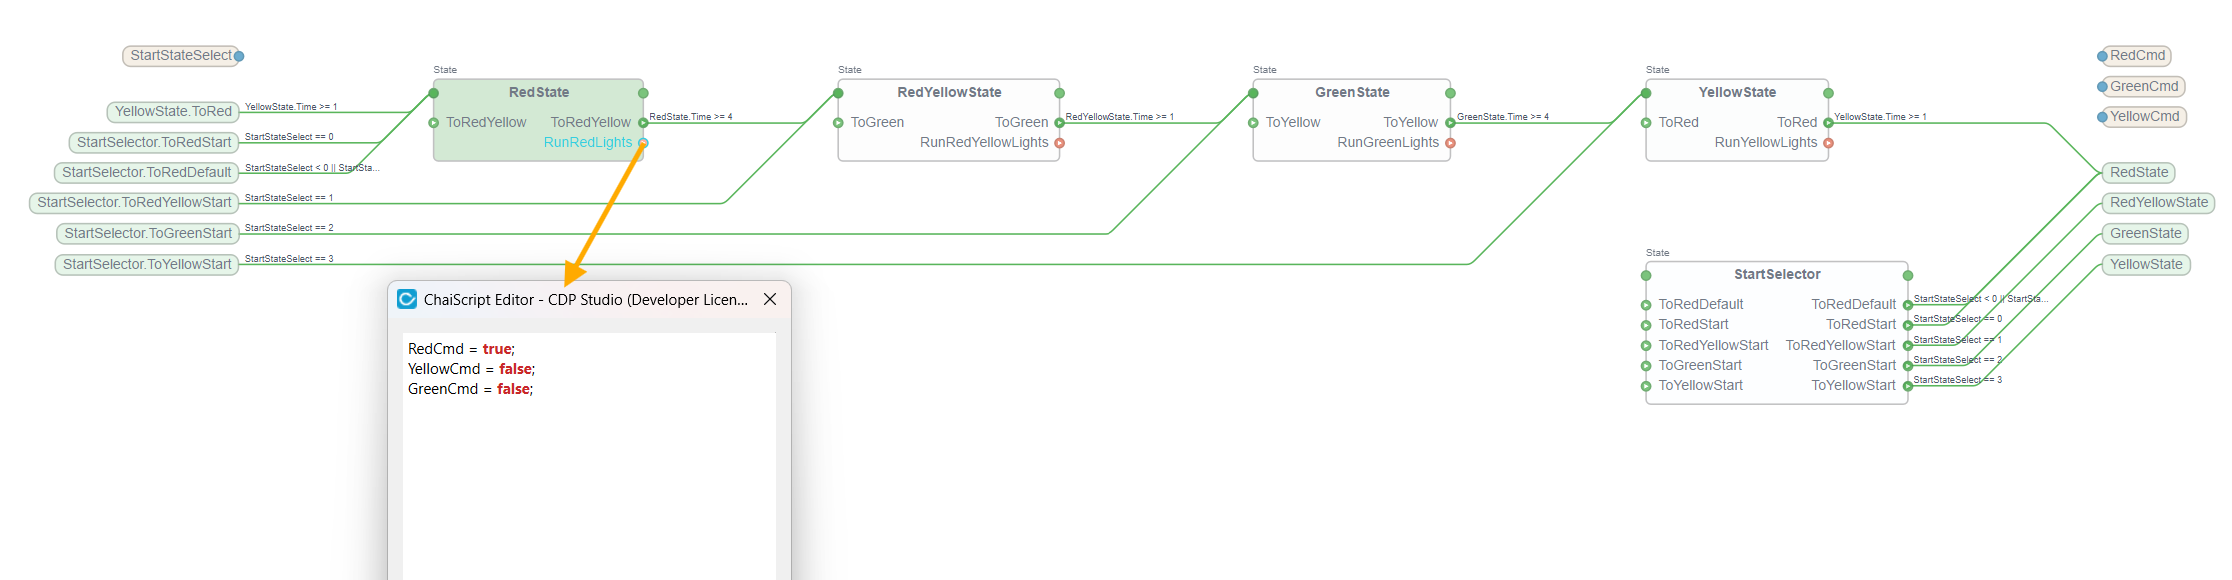
The sequencer contains 4 running states and a start state that selects which traffic light state to start in. The TrafficFSM property InitialState determines which state it will start in. Here, InitialState = StartSelector.
In the StartSelector, the state transition is determined by the value of the StartStateSelect argument (0=RedState, 1=RedYellowState, 2=GreenState, 3=YellowState). E.g., if it is 2, then it transitions to the GreenState.
Then the condition to move to the next state, in this example, is just a timer, 4 seconds for Red and Green, and 1 second for RedYellow and Yellow. When entering the state, the ChaiScript in the RunCommand is executed. Below the RedState.RunRedLights script is to set the Red = True and the other arguments to False.
Note: Important! The default behaviour on system run is to start each object's execution as quickly as possible. In this project, we require a safe system startup to allow ALL routings and objects to be created before execution begins. This will allow the StartStateSelect value to propagate to the sequencer BEFORE the sequencer starts executing.
To ensure this, the application property StartupChecks must be True, and the parameter StartupOverrideTime must be >= 1. For a small project, waiting up to 1 second is OK; for large projects, this may be adjusted up to, e.g., 10 seconds.
GUI Layouts and Button with Lamp Widget
Layouts are very useful for grouping widgets and aligning them horizontally or vertically. E.g., just drag a Vertical Layout to the Form editor and then drag in the widgets you wish to group and align. You may adjust the size of the layout box by simply dragging.
Tip: One traffic light was completed first with layout and all properties set. To create the second, the first traffic light was selected (in the same way as selecting an object in PowerPoint) and then copy and paste to create the second traffic light. Just remember to update the properties that are dependent on the instance, e.g., cdpStyleRouting for the lamp widgets.
Get started with CDP Studio today
Let us help you take your great ideas and turn them into the products your customer will love.