Custom Widgets
Custom Widgets
Custom widgets need to be available both in the design mode, to place and configure the widget in the form, and to the application for it to create an instance of the widget in runtime. This can be solved in multiple ways.
To make a widget available in the Design mode widget panel it must be compiled as a plugin using the same toolkit as the other Design mode widgets. This toolkit is not available for download and the solution is thus to create a placeholder as explained in How to Add Promoted Widgets in Design Mode.
To make a widget available to the application it can be compiled as a plugin, added in a library that is linked with the application, or added directly into the GUI application along with a custom builder class. The builder class, described in How to Add Custom Widgets in GUI Applications is the simplest way to add new or extend existing widget functionality.
Skilled C++ developers that want to build third-party libraries and widgets based on such frameworks, can do this as shown in Using OpenCV Camera View in HMI GUI. The example demonstrates how to add a third-party OpenCV library, create a custom OpenCV widget in a CDP library, and use a placeholder in the GUI form to make the GUI application load the custom widget.
Note that an alternative to adding widgets in C++ is to create them in QML.
How to Add Promoted Widgets in Design Mode
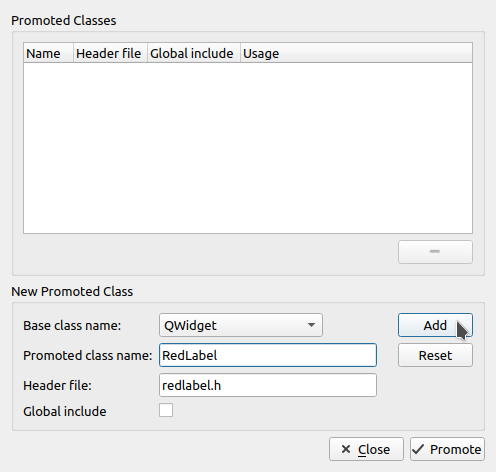
The following steps show how to create a widget of type RedLabel:
- Drag a widget of type Widget to the form.
- Right-click on the new widget and select Promote to ....
- In the dialog that pops up, we fill in the promoted class name, RedLabel.
- Finish by clicking Add and Promote.
To configure properties in the promoted widget we need to add dynamic properties. This is done using the button with a plus sign, located to the right of the filter at the top of the property panel. Click it and select Other... from the context menu to open a dialog for setting property name and type. The name and type must be identical to that of the custom widget to trigger the correct functions.
The RedLabel class is supposed to be a label that inherits the standard Label. To continue to the next section and make the example show something useful it needs to be configured with text. Create a dynamic property named text with type set to String. Configure the new property with "I am a red label".
How to Add Custom Widgets in GUI Applications
One way to enable the GUI Application to load promoted widgets is to add a custom builder class and widgets in the application project.
The following example shows a custom builder class, CustomBuilder, that can create a RedLabel widget. As indicated by the name, this is just a simple label widget that shows in white text on red background.
The header file, custombuilder.h:
#ifndef CUSTOMBUILDER_H
#define CUSTOMBUILDER_H

#include <CDP2Qt/CDP2QtBuilder.h>

#include <QWidget>
#include <QString>

class CustomBuilder : public CDP2QtBuilder
{
public:
  CustomBuilder(QString libName = "", QString timeStamp = "");
  virtual ~CustomBuilder(){}
  virtual QWidget * CreateNewWidget(const QString &className, QWidget *parent = 0, const QString &name = QString());
};

#endif
The implementation file that also includes the red label widget, custombuilder.cpp:
#include "custombuilder.h"
#include <CDPBaseWidgets/CDPBaseLabel.h>

class RedLabel : public CDPBaseLabel
{
public:
  RedLabel(QWidget* parent):CDPBaseLabel(parent)
  {
    setNoSystemBackground(false);
    setStylingType(NoFile);
    setStyleSheet("color: white; background: red; font-size: 40px;");
  };
};

CustomBuilder::CustomBuilder(QString libName, QString timeStamp)
{
  Q_INIT_RESOURCE(CDPBaseWidgetsLib);
  m_libName = libName;
  m_timeStamp = timeStamp.isEmpty() ? __DATE__ " " __TIME__ " Version 1.0" : timeStamp;
}

QWidget *CustomBuilder::CreateNewWidget(const QString &className, QWidget *parent, const QString& name)
{
  Q_UNUSED(name)
  QWidget *pWidget = 0;
  if (className == QLatin1String("RedLabel"))
    pWidget = new RedLabel(parent);
  return pWidget;
}
Add the following at the beginning of CDPMain.cpp to create an instance of the builder class:
#include "custombuilder.h"
CustomBuilder myCustomBuilder("CustomBuilder");

...
To test that the new widget works we can add a promoted widget to our GUI form as described in How to Add Promoted Widgets in Design Mode.
Get started with CDP Studio today
Let us help you take your great ideas and turn them into the products your customer will love.