How to Edit Model Configurations
How to Edit Model Configurations
This documentation extends the introductory documentation found in Code Mode and How to Create a Library, which detail how to do basic setup, coding and configuration of a model. The following sections present more in-depth information about models and show how to configure important aspects of them.
What is a Model?
In CDP Studio, a model refers to a fundamental concept used to define the structure, behavior, and configuration of objects within a control system. A model typically describes how a particular object should behave and what attributes it should have. It can be thought of as similar to a class definition in programming languages like C++. The model defines various elements, such as inputs, outputs, state-machine, parameters, and properties, which can be configured to control the functionality of the object it represents. When an object is instantiated in an application, it follows the structure and behavior defined by its model. Models also allow for hierarchical composition, where one model can include or extend other models, enabling complex system designs.
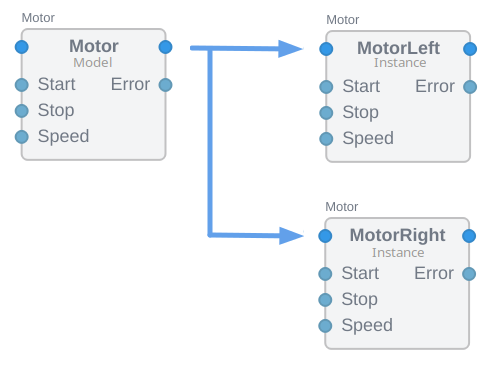
Note: Objects defined by a model cannot be deleted within an instance of that model. For instance, in the image above, Start, Stop, Speed and Error are described by the Motor model, so they can not be deleted from the Motor instances.
In practice, models are used extensively in both the design and configuration phases of developing a control system within CDP Studio. They ensure that components behave consistently according to predefined rules, which is crucial for maintaining system reliability and performance.
Models and Recipes
The Code Mode and How to Create a Library documentation describe how to create models in C++. The wizards available through the Add New... menu option help you create models for specific purposes. You can also create a recipe from a configured instance to make that specific model configuration available for reuse. This process is explained in How to Reuse Configurations with Library. While a model describes mandatory attributes of a object created by that model, a recipe is more relaxed, allowing all attributes specified by the recipe to be changed in objects created by that recipe. You can convert a recipe back and forth between a model and a recipe by right-clicking it in the library and selecting the Convert to Recipe or Convert to Model menu option.
Configuring Model Elements
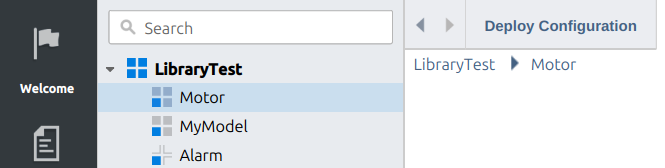
Models can be edited by selecting the model in the Library in the Project tree:
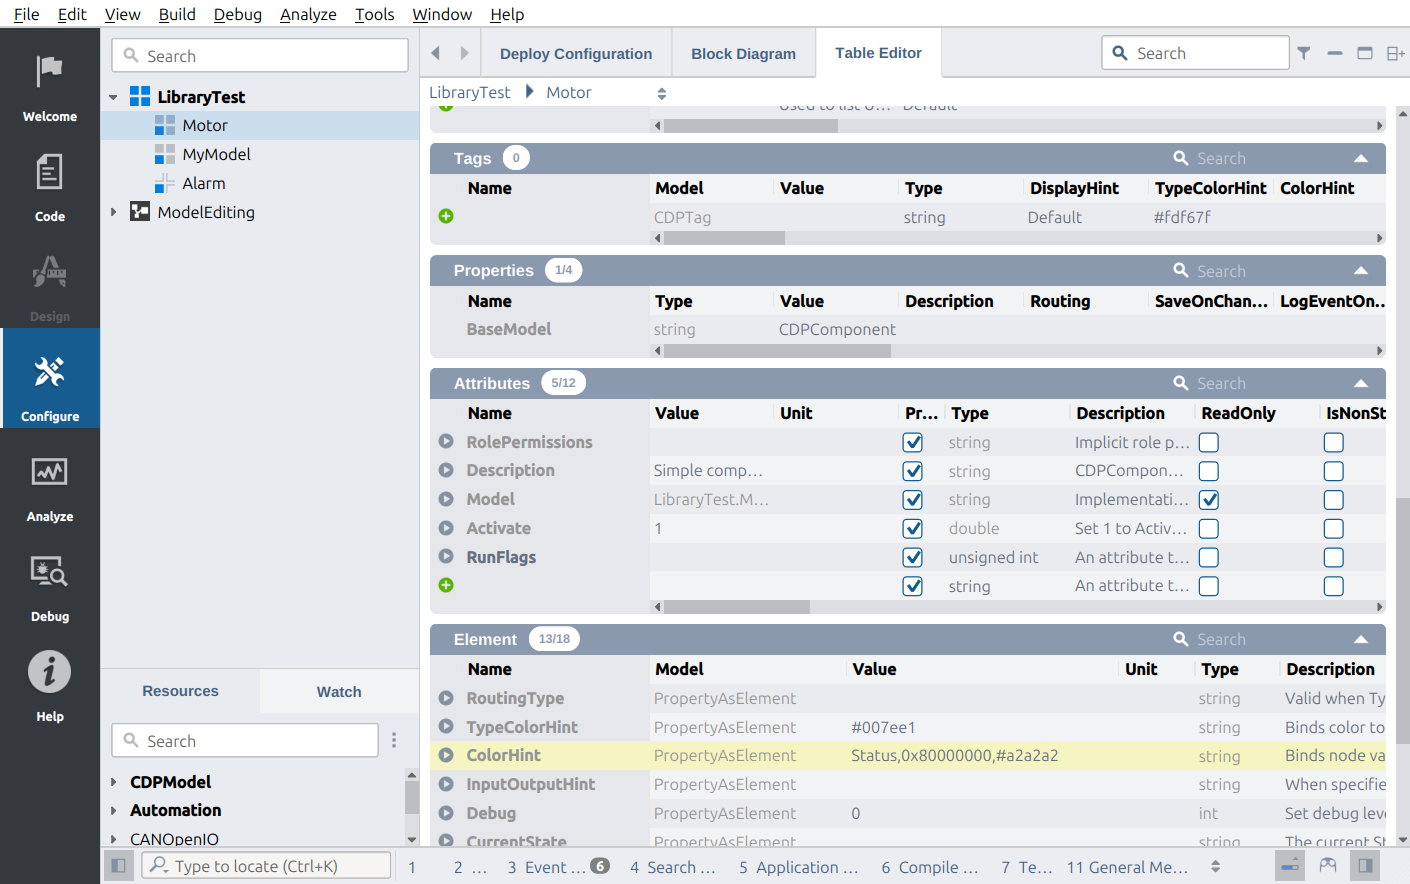
Some elements, such as inputs and outputs, can be edited in the Block Diagram, but the Table Editor lets you do more detailed editing as it provides access to more settings.
Note: For any model changes to take effect, the library must be built by right-clicking the library and selecting Build.
Editing in Table Editor
The Table Editor displays multiple tables that can contain pre-configured objects such as Subcomponents, Signals, Ports, and more. In each table, you can set the default settings for objects that will apply to instances of the model. You can freely add, rename, and remove objects in these tables, as long as the objects do not belong to the model's BaseModel. Objects that cannot be deleted are indicated by a Name property displayed in a lighter, more diffuse color, distinguishing them from deletable objects, which appear with a darker color.
Note: Renaming objects in the model will in some cases require code-changes in the model's Create() function, to make sure that the binding between the configuration-name and object-name remains intact.
How to Add Tables to a Model
You can add new tables to a model to aggregate specific objects. The process is described below.
Note: Only one table can accept a given model (or base model). This restriction ensures that CDP Studio knows which table to use when an object is added.
Let's assume your model needs to accept an object called Monitor, which resides in the MonitorLib resource. To add a table called MonitorItems, follow these steps:
- Open your model in the Table Editor.
- Locate the Element table.
- Next to the plus-button, in the Name column, type MonitorItems and press Enter.
- In the Model column on the same line, select AggregateModel.
- On the same line, locate the AcceptsModel column, type MonitorLib.Monitor, and press Enter.

- At the beginning of the line, click the plus-button to add the element.
- Build the Library. The Table Editor will now reload and include the MonitorItems table, which accepts Monitor items from the MonitorLib resource.

Note: The MonitorLib.Monitor resource must be available, or the new table will not display correctly.
- If you need the model to contain some pre-defined items in the MonitorItems table, you can add them and configure them here.
Note: You may need to write code in your model to handle the items that can be added to the instance. The Expose Custom Data in the Automation System example demonstrates how to do this.
Following the example above, let's assume Monitor is a base class, with derived models called ConveyorMonitor and LiftMonitor. To be able to display these objects in the same table, follow a similar process:
- Open your model in the Table Editor.
- Locate the Element table.
- Next to the plus-button, in the Name column, type MonitorItems and press Enter.
- In the Model column on the same line, select AggregateBaseModel.
- On the same line, locate the AcceptsBase column, type MonitorLib.Monitor, and press Enter.
- At the beginning of the line, click the plus-button to add the element.
- Build the Library. The Table Editor will now reload and include the MonitorItems table, which accepts Monitor and its derived items from the MonitorLib resource.
Templates
If the model is a C++ template, this table contains one entry, named T. The Value of T is a semicolon-separated (;) string that lists the C++ types the model should be generated for. Changing the content of the Value will change the types of the model that are made available under the Library in the Resource tree.

Conditionally Enabling Objects
Some objects can be conditionally enabled or disabled using the EnableIf setting. This setting can either contain a single statement or a list of statements separated by semicolons (;). All EnableIf statements must evaluate to true for the object to be Enabled.
EnableIf can evaluate the following properties:
- Node.type
- Node.parent.type
- Node.baseModel
- Node.parent.baseModel
- Node.ancestor.type
The evaluation is performed using:
- '=' for equality
- '!=' for inequality
The Node.type and Node.parent.type properties can be checked against the built-in NodeType keywords to match various types:
- System - The System node
- Application - A node representing or inheriting an Application
- Component - A node representing or inheriting a CDPComponent
- Object - A node inheriting from the CDPObject model, e.g. CDPSignal, CDPParameter, CDPAlarm
- Message - A node representing or inheriting a Message
- BaseObject - A node representing or inheriting a CDPBaseObject
- Property - A node representing or inheriting a CDPProperty
- Setting - A node representing or inheriting an CDPSetting
- Operator - A node representing or inheriting a CDPOperator
- Node - A node representing or inheriting a CDPNode
- Model - A Model node, see the Model documentation in the Glossary.
- Recipe - A Recipe node, see the Recipe documentation in the Glossary.
They can also be checked against any of the pre-defined or user-defined models available.
For example, if EnableIf is set to Node.type=Model, the object will be enabled only if it resides within a model. If EnableIf is set to Node.parent.baseModel!=CDPSignalBase, the object will only be enabled if the parent object’s base model is not derived from CDPSignalBase. The Node.ancestor.type property allows you to match an object type higher up in the hierarchy, determining whether this object resides within (or does not reside within) a specific type of object.
Attributes Table
In the Attributes table you can specify all the attributes for the model. New attributes to be used in code can be added or removed in this table.
Some pre-defined attributes are documented in the table below:
| Attribute Name | Description |
|---|---|
| InputOutputHint | The InputOutputHint can be used to instruct the UI how to present the object's input and outputs. It can for instance be used to demote items from being inputs or outputs in objects in Block Diagram by setting the flags "PRV". The following flags can be set:
|
| TypeColorHint | The TypeColorHint is used by CDP Studio Block Diagram to color a node-type such as gateway connectors or input/output connectors on items. The color can be simple color names such as Red, Green, Blue etc. or in the format #RRGGBB , where RR is the red color part (00-FF), GG is the green color part (00-FF) and BB is the blue color part (00-FF). |
| ColorHint | The ColorHint contains a priority-ordered list of color mappings, separated by the ';' character. It affects the coloring of the model instance in Block Diagram. Each entry in this list is a triplet of values, separated by the ',' character. For example, an entry might look like this: Status, 0x80000000, #a2a2a2 In this triplet:
Values are compared for equality against the named child's value (an empty value matches all values). Flags are compared using a binary AND against the named child's value. If both value and color use ranges, the resulting color is an interpolation based on the comparison of the current named child's value against the specified value range. If the color is left empty, the default color is used for both single colors and range ends. |
| ReadOnly | The ReadOnly attribute prevents the user from altering the value of the node. ReadOnly can be set to 0 or 1. It can be explicitly or implicitly defined for all instances. If the model node contains ReadOnly set to 1, the instance will explicitly be set read only and can not be changed. |
| IgnoreInDiff | The IgnoreInDiff attribute hints that runtime changes to the value of the node should not be committed to version control. This can be useful for values that must persist over CDP application reboot but are not part of the application configuration. Items marked with IgnoreInDiff are ignored when viewing differences during Deploy or when doing Fetch Configuration. |
| DisplayHint | Gives a hint to the presentation layer on how the node should be shown. The following display hints can be specified:
How CDP Studio handles display hints is described in the Configure mode Filtering chapter |
| IsSetting | The default configuration-element attributes in CDP are CDPProperty objects. IsSetting is intended to provide an override to the default attribute implementation based on CDPSetting which is less resource-hungry. CDPSetting is a [name, value] pair and no other attributes are allowed except the built-in ones. The Type must be a primitive type. The default value of IsSetting is '0'. CDPSetting can be used in coded models to set primitive values that don't need Routing. |
| Name | The instance Name is required and must be unique among other instances on the same level. It should be alphanumeric and may (except for Applications) contain space and underscore, but may not contain slashes or dots. Note: Code-based models can not have spaces in the name, as that is not allowed by the C++ language. |
| Model | 'Model' is used to indicate the concrete model type to be created for this instance of the prototype. |
| Property | Attribute forward declarations are created by setting Property='0'. This forward declares an attribute to be part of the API of some future model. This also affects what columns are shown in visualization when different types of models with common base model are in the same section. |
| Type | The attribute Type can be one of the built-in types: string, double, float, uint64_t, int64_t, unsigned int, int, unsigned short, short, unsigned char, char and bool. |
| IsNonSticky | This flag indicates that the value does not change when written to, but that the change can trigger some internal processing on write. |
| IsState | This flag indicates that a value should be flagged as a state: For instance, the value accumulates over time - meaning it is not calculated from input values every cycle, but it represents a state and should be indicated as such (for instance to be used by Redundancy synchronization). |
| ExternalType | This modifier indicates that the value has some external value linked to it that is not stored directly in the configuration. The CDP Framework - External Value Types page contains more information about how this modifier and external values can be used. |
| IsBinary | This boolean modifier indicates that the value is a binary value (or huge text value) that can be full-size fetched using separate async and chunk-based StudioAPI RequestValue() overloads. When set, the node value will show just the link to the external value, not the external value itself. Note: It is often useful to add IsBinary together with ExternalType="File" to support large or non-textual external files that otherwise could be unreadable via the CDP common value editor/viewer. |
| TypeHint | See the TypeHint Overview below. |
TypeHint Overview
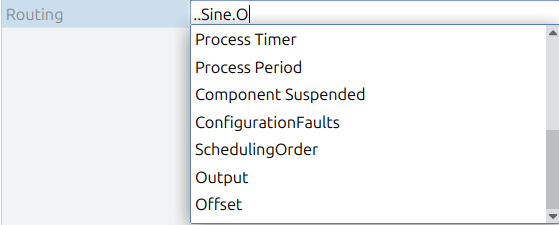
TypeHints in CDP Studio are used to determine how values are displayed and edited within the interface. The TypeHint directive tells CDP Studio which widget to use for showing or entering data. For example, when TypeHint is set to Routing, the routing helper widget is used to display and select the appropriate value.
To use a TypeHint, you set TypeHint="<name>", where "<name>" specifies how the widget should present or input the data. For example, TypeHint="Routing" with Routing="CDPBaseObject" will show a routing selector listing all models inheriting from CDPBaseObject
The following table provides details on the supported TypeHint names and their corresponding functionality.
| TypeHint Name | Description |
|---|---|
| Routing | Semicolon-spearated lists of models that the routing selector widget will show. Example: Routing="CDPBaseObject"
|
| RoutingList | Semicolon-spearated lists of models that the routinglist selector widget will show. Example: RoutingList="MessageArgument"
|
| Selection | A semicolon-separated list of possible values that can be set to this attribute. For numeric values, a description can be added for every possible value (after the hyphen), for example "200 - OK". Quotation can be used to include the separator (hyphen) in the value or description. Example: Selection="normal;high;low"
|
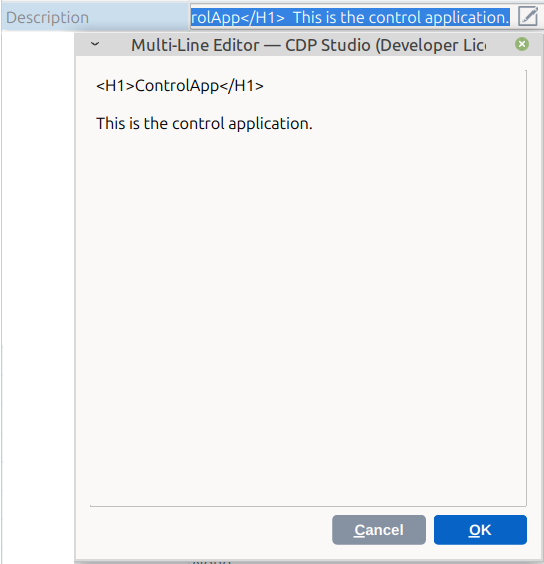
| MultiLineText | The attribute should be edited in a separate editor. This is useful for attributes that can have long text with newlines in it. The MultiLineText attribute can specify the programming/scripting language names (currently supported are "C++", "ChaiScript" and "Protobuf") whose syntax highlighting should be used in the editor.
|
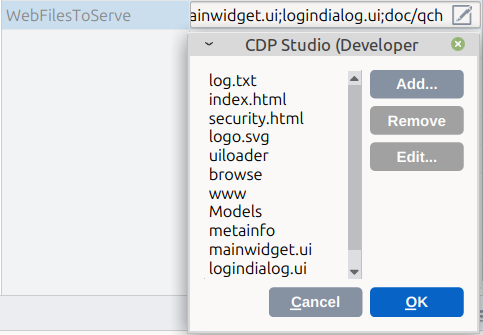
| File | Makes it possible to open the linked file or folder or URL. The file or folder can be located and added to the value via the file selector dialog. The selector can be instructed only to show specific types by (for instance) setting File="Images (*.png *.jpg *.svg);;Text files (*.txt *.rtf *.md)". To allow to select also folders, add ";;Folders" to the end of the filter. Note: When external file is linked to the attribute (using ExternalType="File"), then the located file can be copied to the application folder structure (instead of just referring to file location). Then, when value is changed the linked file is moved/renamed in the application folder structure. Also, the file can be removed from the application folder when the value is cleared.
Note: Multiple file types must be separated by two semicolons (;;) |
| FileList | Makes it possible to edit the attribute using a file list dialog.
|
| Radix | By setting Radix to either 8, 10 or 16, the widget will show the value as either octal, decimal or hexadecimal.
|
| Trigger | Trigger presents as a button with the text from the Trigger attribute. When the button is clicked, the value is set and then reset automatically. Example: Trigger="Set"
|
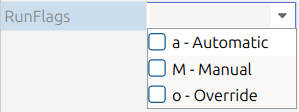
| Flags | The attribute should be viewed and edited as (binary) flags. A flag is a separately changeable part of the attribute value, shown as a single character and changeable as a checkbox. For numeric attributes, the flag corresponds to a bit-position in the value. The first flag is bit 0 (Least significant Bit), the second is bit 1 and so on. A flag can be specified as empty to skip a bit. The Flags are specified as a semicolon-separated list. Example: Flags="a - Automatic;;M - Manual;o - Override" When specified on Attribute RunFlags, it will display the flags like this:
For string attributes, flag is a unique character in the string. Example: Flags="a - Automatic;M - Manual;o - Override"
|
| ScopedNode | The attribute is to be viewed and edited as a single named node selectable from a list of nodes based on a given model, available directly under any of the parents from the current attribute location. In the case of multiple nodes with the same name the node nearest takes precedence. The number of parent levels to search from can be limited by prefixing type name with the corresponding number of dots. Example:
Example: ScopedNode="NetworkInterface"
|
| ScopedNodeList | Similar to ScopedNode, the attribute is to be viewed and edited as semicolon-separated list selectable from a list of nodes based on a given model, available directly under any of the parents from the current attribute location. In the case of multiple nodes with the same name the node nearest takes precedence. The number of parent levels to search from can be limited by prefixing type name with the corresponding number of dots. Example: ScopedNodeList="..ArgumentBase"
|
| SiblingNodeList | The attribute is to be viewed and edited as semicolon-separated list selectable from a list of nodes based on a given model, available as children at any level under the parent of the current attribute location. Example: SiblingNodeList="ValuedConnection<>"
|
| Angle | The attribute will be treated as an angle that will be displayed and can be edited both in degrees and in radians simultaneously. The actual format (Radians or Degrees) that is used to store in the configuration is specified in Angle attribute. Example: Angle="Radians"
|
| UID | The attribute value will be treated as a UID (Unique Identifier). When the attribute value is empty, it will be auto-created as a UID (Unique ID) value, based on the node's full path and set as the node value, on project load in Studio or application startup. This TypeHint is useful for having a creation-time unique identifier that stays the same even if the node is moved in the configuration tree later on. When the value is already set, it will be left unchanged, except when it is not unique in the configuration, in which case a new unique value will be generated and set. Note that TypeHint="UID" has no parameters - i.e. no UID="..." attribute is needed. |
| SUID | The attribute value will be treated as an SUID (System Unique Identifier). It is similar to UID, but the value is guaranteed to be unique across multiple configurations by prepending a system-unique prefix to the generated value. This TypeHint is useful when a stable identifier for a node is needed that is unique across CDP applications and systems, even if the node is moved within the application. For example, it can be used as a key in a database that is common for multiple systems. When the value is already set, it will be left unchanged, except when it is not unique in the configuration, in which case a new unique value will be generated and set. Note that TypeHint="SUID" has no parameters - i.e. no SUID="..." attribute is needed. |
| Password | Password - attribute value will be treated as a password and shown as masked in the presentation layer. This TypeHint is useful for string attributes that store sensitive information, such as passwords or API keys, to prevent them from being visible in plain text in the user interface. Note that this TypeHint only affects the presentation of the attribute value and does not provide any actual security for the stored value. It is still recommended to use appropriate security measures for sensitive data, such as encryption (for example using ExternalType="EncryptedXMLConf") and/or using access control to hide the value visibility in online mode. |


Get started with CDP Studio today
Let us help you take your great ideas and turn them into the products your customer will love.