Using QML in HMI GUI
Introduction
The purpose of this example is to show how QML can be used alongside CDP widgets in a QuickWidget using CDP Studio, the independent automation software for open PC-based real-time distributed control systems.
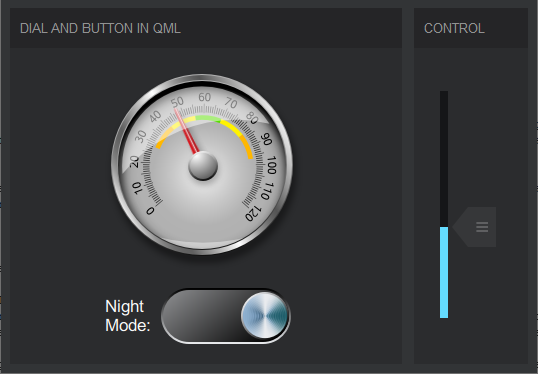
The QML consists of a dial and a switch. The dial shows the value of a slider while the switch toggles the global theme/styling/colors.

The example demonstrates the following:
- How the QuickWidget can be used to show QML in a widget form.
- How to make a slider widget control a dial in QML
- How to make a toggle button in QML change the global theme/styling/colors.
- How to make QML items send and receive data using CDP communication (CDPBaseComObj).
- How to connect QML items and CDP widgets in the same form.
How to Run the Example
To run the example from CDP Studio, open Welcome mode and find it under Examples. Next, in Configure mode right-click on the system project and select Run & Connect. See the Running the Example Project tutorial for more information.
Project Overview
The QML Files
The switch and dial QML items are copied from the content directory of the following Qt-5.6 quick examples:
The above files are located in the Application directory in the subdirs named dial and switch.
The main qml file, main.qml, is located next to the mainwidget.ui file. It initializes and controls the QML items and handles CDP communication using CDPBaseComObj. See the detailed description of the CDPBaseComObj class for more information and examples regarding usage.
Changes in CDPMain.cpp to Enable CDPBaseComObj in QML
To be able to use CDPBaseComObj in main.qml, it is registered in CDPMain.cpp:
#include <qqml.h>
#include <CDPBaseWidgets/CDPBaseComObj.h>

int main (int argc, char* argv[])
{
  int ret = 0;
  QApplication app(argc, argv);
  qmlRegisterType<CDPBaseComObj>("CDP2Qt", 1, 0, "CDPBaseComObj");
  ...
When registered as shown above we can import CDP2Qt and create communication objects in QML:
import CDP2Qt 1.0

Rectangle {
    ...
    CDPBaseComObj { id: com;  routing: "QuickWidgetDemoApp.SliderValue.Value"; }
    ...
The Form File
The mainwidget.ui file is the main gui/form file that loads all GUI in the project.
Moving the slider will update the CDP Parameter that controls the dial every time the mouse is released. We could make the slider send new values continuously by opening the form in design mode and configure CDPBaseSlider::cdpSend to onSliderMoved.
The control of the application theme/style/colors are controlled by adjusting QuickWidgetDemoApp.SwitchValue.Value. In the mainwidget.ui form, this is configured in CDPBaseMainWindow::themeRouting.
Note: The QuickWidget is unable to locate the main.qml in Design mode unless specified using full path. This is why it shows as a white rectangle.
Application Objects
Two CDP Parameter objects, SliderValue and SwitchValue, have been added to the Application component to handle communication between QML items and the form widgets. This could've been solved in multiple different ways. Like introducing a custom lib builder and adding a custom context object to the QuickWidget, but this is not covered in this example. In most cases, CDP communication is what you need.
Exercises
Here are a few optional excercises:
- Run and connect the application in CDP Studio. Adjust SliderValue between 0 and 100. Note that both the dial and the slider change value.
- Run and connect the application in CDP Studio. Adjust SwitchValue between 0 and 1. Note that the switch toggles and that the colors are changed both in QML and in the form.
- Modify the application by adding a Sine component and update the dial in main.qml to get its value from the Sine Output Value.
- Modify the form slider to adjust the Amplitude of the Sine in the previous excercise.
Get started with CDP Studio today
Let us help you take your great ideas and turn them into the products your customer will love.