Creating a Reusable GUI Dialog
Introduction
This example demonstrates connecting multiple variables from a control block using a single connection to a UI dialog that encompasses multiple widgets. Additionally, it shows how a UI dialog can be reused and loaded from different UI buttons within an application, such as clicking different UI pump icons/buttons to show a dialog for adjusting different pump variables.
The example application includes two Sine components and shows how they can both be controlled by the same dialog launched from two different buttons. Clicking the different buttons will change the target routing of the dialog and thus the routing of all its child widgets. This is achieved using relative routing in all widget properties related to communication.
The following shows the example GUI with the dialog open:
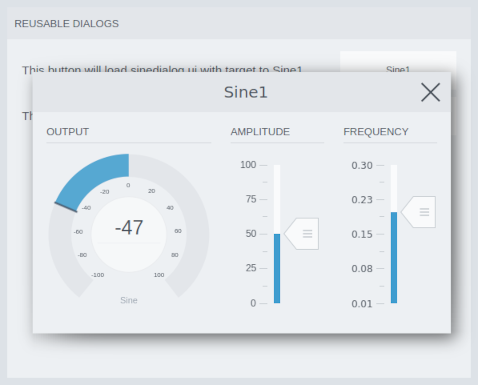
GUI Overview
The GUI dialog is designed in a separate UI/form, sinedialog.ui, created as described in the Design Mode Manual. It contains a Meter widget for showing the Sine output and two Slider widgets for controlling amplitude and frequency. All routings are relative to a Sine target routing set in the cdpTargetRouting property of the top-level container. The target routing is not required and is only used to ensure correct relative routing in the child widgets. It will get overridden when the UI file is loaded in mainwidget.ui using the Popup Dialog Button.
The main UI file, mainwidget.ui includes a container with two Popup Dialog Button widgets. Both buttons are configured to load the sinedialog.ui file using the uiFileName property. The property named cdpTargetRouting is used to configure what Sine component to show and control.
Looking at the sinedialog.ui example file, you might have noticed that the dialog class does not have a property for routing the title text. This was routed by creating a dynamic routing property, textRouting, as described in the Design Mode Manual.
Dynamic GUI
The current example is limited to showing GUI for two Sine components. Adding more Sine components to the application will require adding the same number of buttons in the mainwidget.ui file. To create a dynamic GUI that adjusts the number of buttons to the number of Sine components, the buttons can be replaced using a Node Container. This widget can be configured to search a target object for model types, and for every match, it will load a template UI file. The matching object will be set as a target to allow relative routing in the UI file.
Converting our current example using a Node Container will make it look identical in run-time and it won't save development time as the design is simple with a fixed number of components. However, in a system where we have a large or unknown number of components it would be a requirement rather than an option.
The first step in converting the example is to move one of the button rows into a separate form/UI file, row.ui to be loaded by the Node Container for each Sine. Select a Widget or Routing Container as the form template. The latter will enable code completion on relative routings if configured with a temporary cdpTargetRouting. There is no need to remove this afterwards as it will get overwritten by the Node Container.

Copying the button to the row.ui should make it look something like the above. The button should no longer be configured with routing in the cdpTargetRouting property as this is now handled by the Node Container. Similar to what we did to set the dialog text, dynamic property routing can be used to show the name of the Sine as the button text. Add a textRouting property in the button and configure it with .ShortName.
The button in row.ui is no longer configured with cdpTargetRouting. This means that it will no longer override any temporary cdpTargetRouting set on the top-level widget in sinedialog.ui. Hence, we have to make sure that this is now set empty.
Finally, the buttons and texts in mainwidget.ui can be replaced using a Node Container configured to load row.ui in the uiFileName property. Setting modelFilter to Sine and cdpTargetRouting to the component to search for Sine components, ReusableDialogGUI in this case, the widget will load button rows for all Sine components it finds in the application.
The result of converting the current example can be seen in the example named, Creating a Dynamic GUI for Showing Dialogs.
How to Run the Example
To run the example from CDP Studio, open Welcome mode and find it under Examples. Next, in Configure mode right-click on the system project and select Run & Connect. See the Running the Example Project tutorial for more information.
Get started with CDP Studio today
Let us help you take your great ideas and turn them into the products your customer will love.