Creating a Reusable GUI Element
Introduction
This example demonstrates connecting multiple variables from a control block using a single connection to a UI element that encompasses multiple widgets. Additionally, it shows how a UI element can be reused within an application, such as employing a single pump control UI element for multiple pumps.
The example aims to convey the following key points:
- How to connect multiple variables with a single connection
- Using relative routing in widgets enables changing all routings using one target routing.
- How to use UI files and the UI Loader Widget to create reusable UI elements consisting of multiple widgets
- The UI Loader Widget is used for loading a UI file and showing it as a standard widget.
- The UI Loader Widget supports setting a target routing for relative routings used in the loaded UI file.
- Using UI files for complex elements ensures changes affect all widgets loading the file, unlike scratchpad widgets which are added as duplicates.
These features enable you to easily create a UI consisting of identical UI elements controlling multiple instances of a control block, such as a UI controlling 20 pumps. The features become even more powerful when used in dynamic UIs as described in the section regarding Dynamic GUI.
Application Overview
The example application includes two Sine components. The GUI shows how to create one GUI element with multiple widgets and uses two instances of this element to show and control the components.
Using relative routing on the widgets in the GUI element enables us to add only one routing for each Sine.
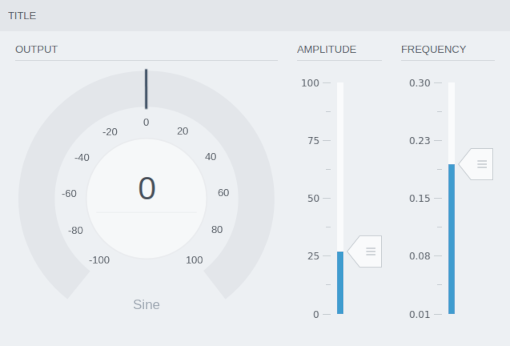
The following shows the example GUI element that will work as a "faceplate" for each Sine component:

GUI Overview
The reusable/complex GUI element is designed in a separate UI/form file, sine.ui, using CDPBaseContainer as the form template. It contains a Meter widget for showing the Sine output and two Slider widgets for controlling amplitude and frequency. All routings are relative to a Sine target routing set in the cdpTargetRouting property of the top-level container. The target routing is not required and is only used to ensure correct relative routing in the child widgets. It will get overridden when the UI file is loaded in mainwidget.ui using the UI Loader Widget.
The main UI file, mainwidget.ui includes a container with two UI Loader Widget elements in a vertical layout. Both widgets are configured to load the sine.ui file using the uiFileName property. The property named cdpTargetRouting is used to configure what Sine component to show and control.
Using separate ui files to create complex GUI elements has the advantage that a change or fix in the UI file will propagate into all locations where the file is loaded. Further, the designer can only update the element by editing the UI file directly, as GUI showing using the UI Loader Widget is read-only. This makes it harder to make accidental changes when working on the design.
In designs where multiple versions of the GUI element are required, the developer will have to decide whether to make multiple UI files or perhaps switch to using scratchpad files. Using scratchpad files and dragging in the elements from the widget panel will make unique copies rather than linking to the source file. Hence, the different copies can be changed without affecting the scratchpad or other copies in the UI. The obvious drawback is that a change or fix will have to be added to all copies in the UI. Other features, like relative routing, are supported in UI files and scratchpad widgets as long as a parent provides target routing.
Dynamic GUI
The current example is limited to showing GUI for two Sine components. Adding more Sine components to the application will require adding the same number of UI Loader Widgets in the mainwidget.ui file. To create a dynamic GUI that adjusts to the number of Sine components, the UI Loader Widgets can be replaced with a Node Container. Similar to the UI Loader Widget it is configured to load a UI file, but it also has a property for setting a model filter. To configure it for the current example, this should be set to Sine while the cdpTargetRouting should be configured with routing to the object to scan for the Sine model type. For each match, the widget will create an instance of the sine.ui file and set the correct target routing.
The Node Container supports different layouts and container types using the childContainerName property.
See Creating a Dynamic GUI for Showing Dialogs for an example demonstrating how the Node Container can be used to load dialog buttons for controlling Sine components.
How to Run the Example
To run the example from CDP Studio, open Welcome mode and find it under Examples. Next, in Configure mode right-click on the system project and select Run & Connect. See the Running the Example Project tutorial for more information.
Get started with CDP Studio today
Let us help you take your great ideas and turn them into the products your customer will love.