CDP Studio Basics
This page describes the very basics of CDP Studio.
System
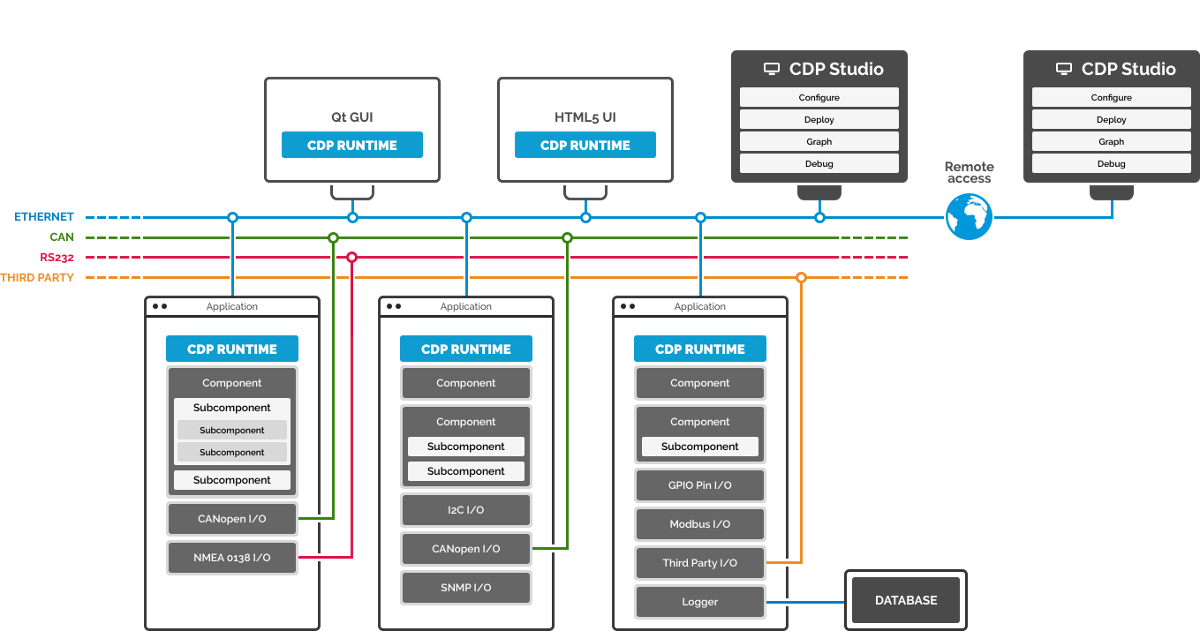
In CDP Studio, a system is a collection of one or more applications, usually running on multiple devices in the same ethernet network. Applications can have graphical user interfaces or be standard console applications. Each application has a set of xml-configured components where the logic is implemented. Each component can have subcomponents and each subcomponent in turn can have subcomponents on it's own. Applications and components can be interconnected with each other using input/output signals, and exchanging messages and events.
Creating a System
When creating a new system, a standard console application will be added to the system by default. You can add functionality by using existing libraries. You are free to change, add and build new libraries any time in the development phase.
To create a new System, see How to Create a System manual.

Applications
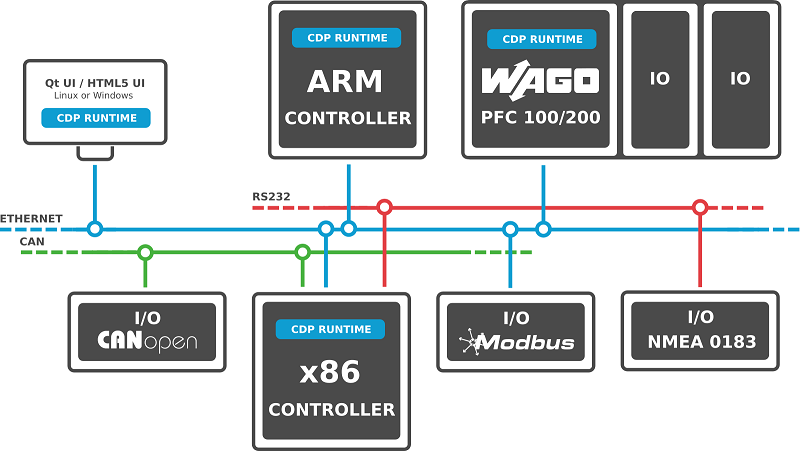
A system can have several applications running, usually on different target machines. You may also run several applications on the same target machine, but keep in mind that they might need to share common resources, like CPU, memory and IP stack.
Applications are either graphical applications or standard console applications.
- A graphical application will have some kind of graphical User Interface. In the Studio Design mode, you may visually edit your user interface using drag and drop, and configure graphical elements by adjusting properties from a table. All graphical elements (widgets) base on Qt's cross-platform GUI framework.
- Console applications will only have a command-line interface, where the application can print information, and user may give keyboard-input, see CDP Messagelog for more information and an example. When running online with applications in Studio, there is an Application Output pane at the bottom. No user input to the application may be given in this interface. To do that, follow description in Help menu.
When a System is created, a standard console application will be added to the system by default.
Adding Applications
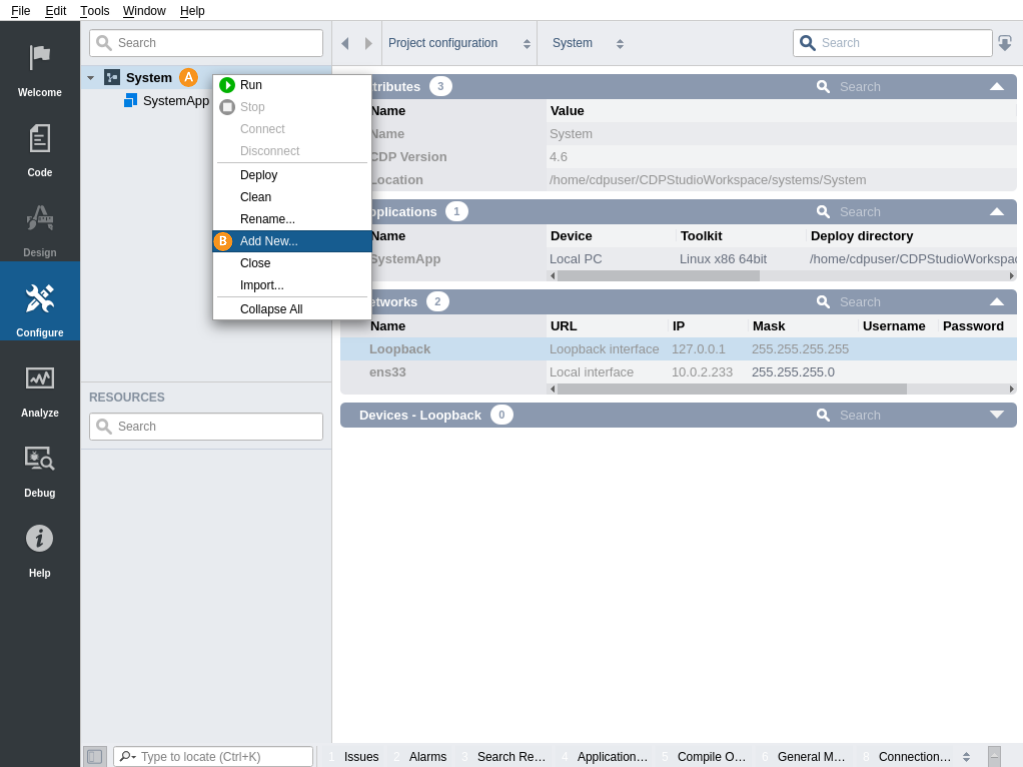
- In the Project tree right click on a system you want to add the application to.
- Select Add New....
- Select CDP Application and click Choose....
- Type in the name of the application and choose the application type.
- Verify the application is added under correct project and click Finish.
If you add a GUI application, the Design mode becomes available. For more information about creating GUI, see Design Mode Manual.

Components
An application consists of standard CDP components, pre-made components (like IO servers) and custom components.
- CDP standard components (named CDP and CDP2Qt) are components running system services and must not be removed.
- Pre-made components are typically I/O Servers to enable the system to communicate with a specific protocol to some HW device. These components are chosen from the Resource tree, and need only to be configured (no coding necessary).
- Custom components can be added from the Resource tree after implementing them in a library. The codegenerator will generate C++ code for the models/classes/objects. In libraries, you may also create your own threads. See How to Create a Library for further details.
See CDP Component for more information about components.
Adding Components and Objects
Different objects can be added to the applications and components of the system. These could be signals and alarms to monitor some values, or components like IO servers or custom made ones.
All objects are available in Resource tree and are sensitive to context.
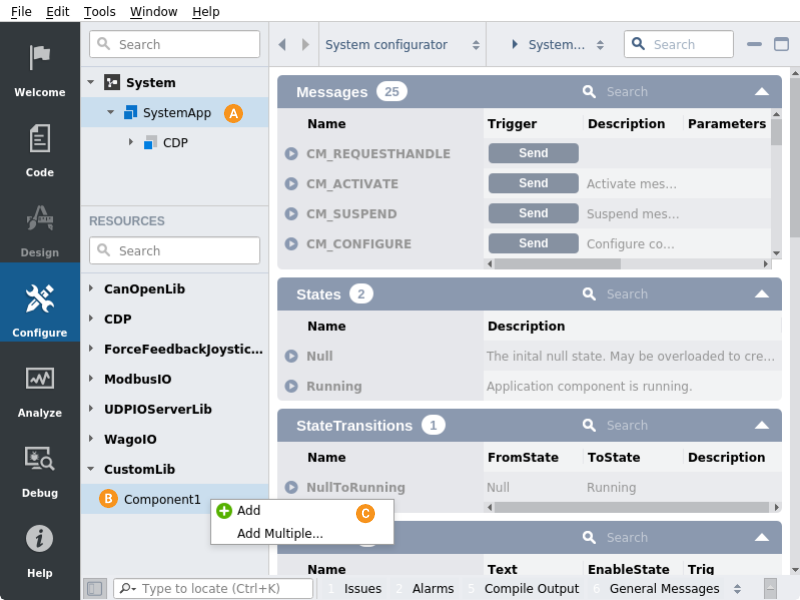
- In the Project tree select the application or a component to which you will be adding the object.
- In Resource tree right click a object that you want to add.
- Select Add in the context menu.
You may also move a component from one application/component to another by dragging it to correct place in the application/component tree structure.

Configuring Components
Components are configured in CDP Studio Configure mode, see Configure Mode Manual.
Component members are automatically created when the component is configured. The subcomponent members will be created according to component hierarchical ownership. Subcomponents, connectors, alarms, signals, parameters and properties are all members of the component. The component model specification/file determines which members the component can and should have.
The normal procedure for component configuration is simply to edit the configuration settings for the already defined members. See CDPComponent Class documentation for a detailed description of configuration attributes and values for the different component member types. To e.g. get debug-printouts from a component, see Debug printout and Debugging.
I/O Servers
I/O Servers (Signal servers) are components communicating with external Input/Output devices, using specific protocols. Values from the external Input/Output devices are converted to CDPSignals. CDP automatically makes the CDPSignals available for other applications and components in the system, by the signal routing property. And vice versa, CDPSignal values can also be used to set values on the external Input/Output devices. All external I/O signals go through I/O Servers. See CDPSignals in CDP Component and CDPSignal Class for more information about CDPSignals.
Note: The update rate of the signal values are decided by the frequency of the I/O Server.

Adding an I/O Server.
I/O Servers can be instantiated just like any other object by adding it to the application or component. The I/O Servers are available from the Resource tree.
See CANOpen I/O, Modbus I/O, UDP I/O, GPIO I/O, I2C I/O, Wago I/O, NMEA 0183 I/O, Seatex MRU I/O, SNMP I/O, etc for preinstalled I/O Servers.
Library
A library is a collection of components and objects that are reusable building blocks for other projects.
The simplest components and objects in a library can be based on other similar, already existing CDP objects and therefore do not have any C++ code associated. These configuration blocks are called recipes. Read how to use recipes from How to Reuse Configurations with Library. See How to Edit Model Configurations for more information about creating and editing models.
When there is no existing CDP element to be based on then more complex component or object with models has to be created, with corresponding C++ code attached.
CDP Studio codegenerator will generate much of the C++ code. When a library has been created, and a CDP Component Model has been added to it, the codegenerator will have created the following class functions: constructor-, destructor-, Create()-, CreateModel()-, Configure()- and a ProcessNull()-function. When CDP objects like Signal, State, State Transition, Message, Property, Alarm, Parameter and Connector are added to the class, the codegenerator will generate the neccessary code. Later, when the library has been deployed, component has been added to the application, and the application starts up, the call-sequence of the auto- generated functions are: constructor, Create() and CreateModel(), Configure() and then Process-function periodically.
If the component is simple, all processing-code may be put into the ProcessNull()-function. The ProcessNull()-function will be called periodically, with the priority and frequency as specified (when adding the CDP Component Model). The default priority is Normal, and the default frequency is 5Hz. This may be changed in Configure mode later without any coding.
Often it is better to add more states, so the process-code becomes simpler. If e.g. two new states called Running and Error are added, two new Process functions are generated: ProcessRunning() and ProcessError(). If adding State Transitions from Null to Running, from Running to Error and from Error to Running, the three new State Transition functions TransitionNullToRunning(), TransitionRunningToError() and TransitionErrorToRunning() are created. Before every Process function is run, each State Transition function for transitions out of the current state is run to check if a transition should occur. If a State Transition function returns true, the corresponding transition takes place.
Inside the different Process-functions, you must add your own code, like checking values and setting values on class members (e.g. signals and properties). As mentioned in CDP Framework, you must not do blocking operations in the Process-functions, as this will negatively impact other components. By setting the component-member requestedState to value "Running" in end of the Configure(), the TransitionNullToRunning()- function would return true, and the component would change state to Running. Then the ProcessRunning()-function will be called periodically. This can also be achieved by changing the code in the TransitionNullToRunning()-function to only one line, just return true.
bool TestClass::TransitionNullToRunning()
{
  if(requestedState=="Running")
    return true;
  else
    return false;
}
By adding code, either in the Process functions or State Transition functions, you should change state to Error in an error-situation, and change state to Running again if the error-situation disappears.
A library must be deployed for components to appear in Resource tree.
Creating a Library
- In Welcome mode click the Create New Library button.
- Type in the name of the library and click "Create."
See How to Create a Library for further details.
Get started with CDP Studio today
Let us help you take your great ideas and turn them into the products your customer will love.