How to Run a System
Running and Connecting to the System
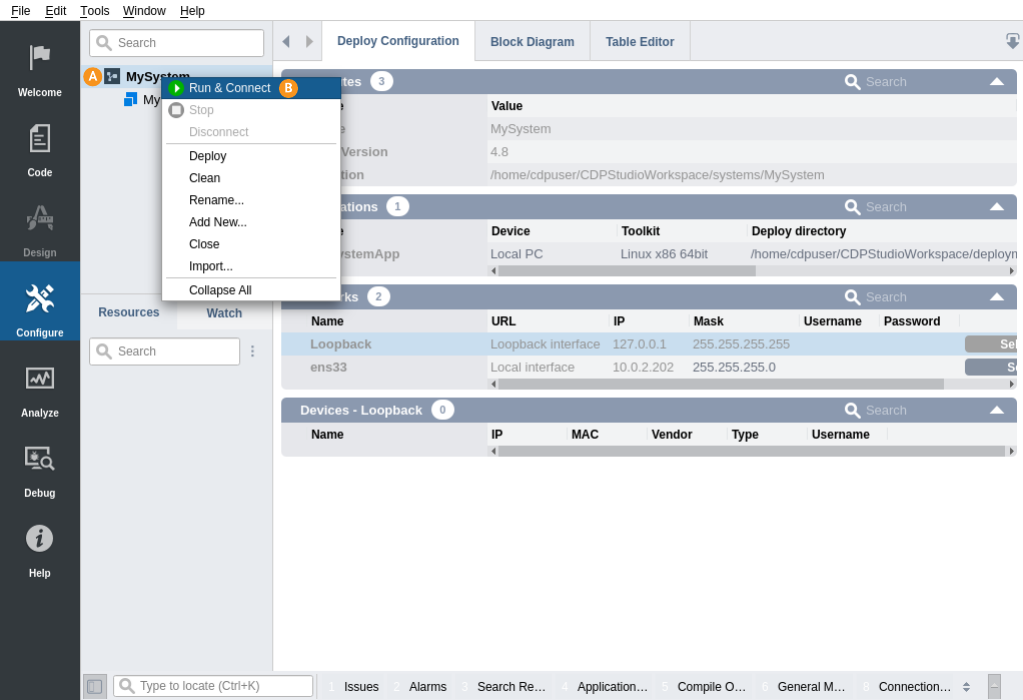
To run the system:
- Right click on the system name
- Select Run & Connect from the context menu.
The Run & Connect command will first build the system, then deploy (copy the files) to the target device, start (run) the system and then a connection is made from CDP Studio to the running system to obtain real-time data from the system. The system is by default configured to be run on your local PC. See the Deploy Configuration for further instruction on how to run systems on other target Devices.

CDP applications provide a way to do simple debugging using a web browser. Look for "StudioAPIServer: CDP Browser available at http://127.0.0.1:7689/browse" in the application output, to get the correct URL. This feature was introduced in CDP 4.10. Read more in the CDP Browser manual.
Troubleshooting Run Failure
If the application will not run, please take a look in the Compile Output pane and Application Output pane / CDP MessageLog windows at the bottom of CDP Studio to see if there are any hints to what the fault might be. If you can not figure out the cause of the failure, select the System (choose Deploy Configuration tab) and verify that the:
- Application Device is correct. The Application Device should be Local PC to run/test on your computer, or it should be a device listed in the Devices table. If not set correctly, change the Application Device to the correct one.
- Application Toolkit matches the Application Device. For Device Local PC, Toolkit should be either Windows x86 64-bit Toolkit or Linux x86 64-bit Toolkit. If it is set incorrectly, select the correct Toolkit. To see which Toolkit is the correct one for your device, search for 'Toolkit' in the Help and read the entries to find which Toolkit matches your device.
- Deploy-target is powered on and listed in the System Devices. If the device is not powered on, make sure that any connected equipment is in a non-hazardous safe state, then power the device on. If the device is not listed in the System Devices, make sure that it meets all the requirements of a target device.
- Deploy-target is correctly paired. When correctly paired, the device is visible in the Devices table, and the button to the right should show Paired. If the device is not correctly paired, see how to pair a device. Note that Local PC does not have to be paired.
- Correct Network for the deploy-target is selected in the Networks table. The network should be the same network that the device is on. A Local PC with no external communication usually runs on Loopback. If an incorrect network is selected, select the correct network in the Networks table by clicking the Select button in the same row as the correct network name.
- Libraries have been built successfully, with the correct Toolkit. See how to build a library for more information.
- Third-party libraries have been built successfully, with the correct Toolkit. See Third Party Library Support for more information.
Wi-Fi/Wireless Network
If the CDP MessageLog in Application Output pane shows many messages about Disconnecting and Connecting Applications, and your applications are using a Wi-Fi/Wireless network, you may try this:
- Verify with a wired ethernet network to see if the problem disappears.
- Other Wi-Fi networks may use the same frequency or channel as your Wi-Fi. If your Wi-Fi/Wireless network is configurable, try to use another less-used frequency or another channel. There exist mobile apps you may try to scan and get an overview of used frequencies/channels.
- Receiving packets from another application can improve problems with disconnects. If you do not have signal/property routing to the other application, add a routing so your application starts to receive packets regularly.
- You may configure your CDP applications to have longer timeouts, so they do not disconnect each other so soon. Try to increase the property called DisconnectTimeout (for all applications in your system): In Configure mode navigate to
YourApp.CDP.Messenger. In caseCDP.Messengeris not visible, the reason might be that these standard CDP components are filtered away. To get them visible again, see Filtering, and uncheckHide Internal Items. Then look into Subcomponents and click on the in front ofCDPandMessenger. Find the property called DisconnectTimeout in the Properties-section and increase the value.
Troubleshooting Web-UI Problems
If the application has a Web-UI, and it does not show, verify that:
- The application is running (see above).
- That an internet connection is available (unless all scripts and dependencies are deployed on the target device).
- Verify the URL by looking at the Application Output in CDP Studio to see where the StudioAPI server is listening, e.g: "StudioAPIServer: listening on 127.0.0.1:7689": Change the IP address in the URL <http://127.0.0.1:7689/www/index.html> to correspond with the StudioAPIServer IP address:port in the console output pane. If you are using CDP version 4.9 or later, you may also use a WebURL-link with updated StudioAPIServer IP found in Application's Properties, see Web UI Demo
- Have a look at common issues encountered while developing web interfaces.
See also How to Connect to a System, How to Analyze a System, Runtime Automatic Startup, Deploy Configuration, Remote Access Over SSH, and Troubleshooting.
Get started with CDP Studio today
Let us help you take your great ideas and turn them into the products your customer will love.