Open Bridge
Introduction

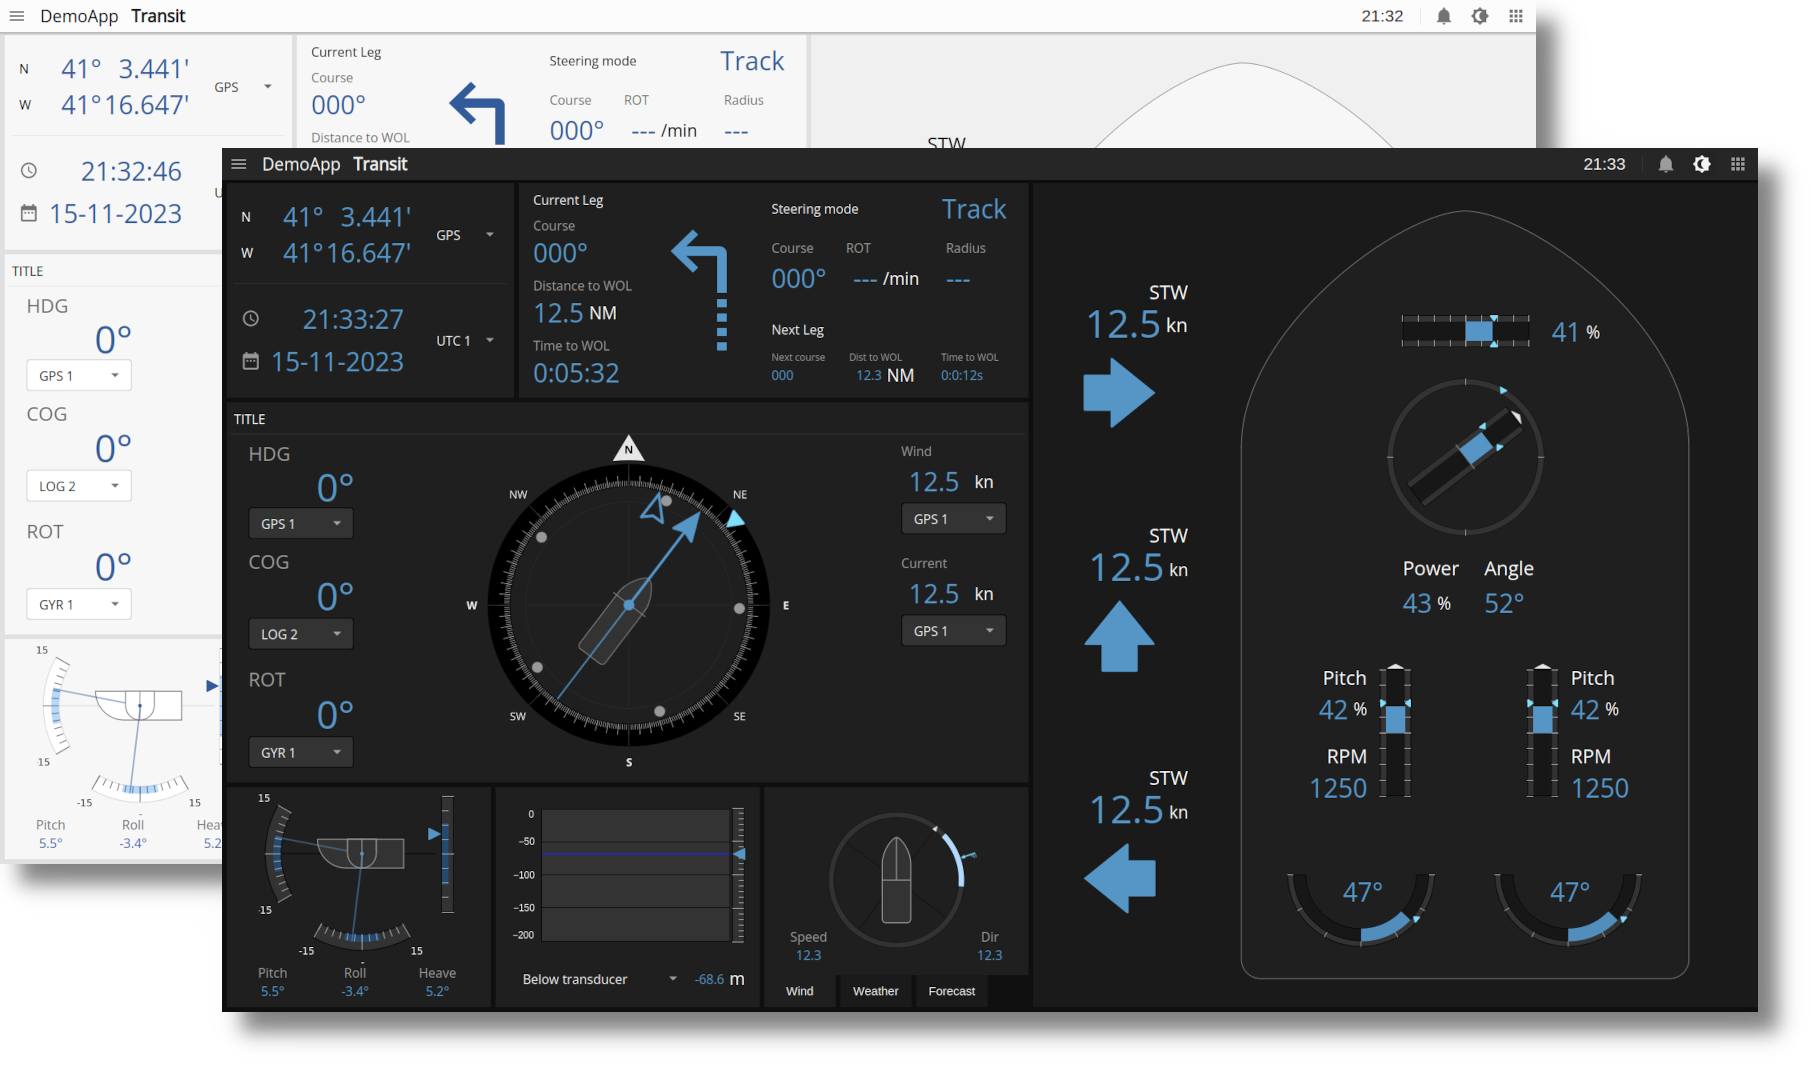
The Open Bridge Design Guideline is a free and open resource that draws from ongoing research conducted by multiple academic partners. It combines modern user interface design principles with maritime regulations to deliver a well-tailored user interface design for maritime applications.
The no-code drag-and-drop UI designer in CDP Studio includes the design elements from Open Bridge and allows developers to use them in their GUI projects. To enable Open Bridge, the user has to select one of the Open Bridge themes as described in How to Select Themes or use a template as a starting point. The template will also add containers and menus with buttons as described in the Open Bridge guidelines. It's included in a GUI project similarly to adding a Web UI, following the steps outlined in How To Add Web UI to an Application. Instead of a Web UI template, you select an Open Bridge UI:

In addition to the standard widgets in CDP Studio's Design mode, the Open Bridge Guideline provides composite UI elements that are available in the OpenBridge group of the widget box. When you drag one of these widgets into a form or canvas, it is inserted as a UI Loader Widget linked to the original .ui form, enabling reuse without copying.
In this configuration, individual child widgets inside the loaded form cannot be configured from the parent form. Routings inside the form can only be targeted when they are defined as relative within that form.
To modify all inner elements, hold the Ctrl key while dragging from the widget box to insert a local, editable copy. However, when copying in this way, any widget connections inside the form are not preserved and must be reconnected manually. Alternatively, copy the relevant .ui form(s) from the CDP Studio templates into your application's Application directory, or into a reusable library, and edit them directly. This gives full control over texts, properties, and routings.
For a widget overview covering usage and configuration, see Adding an Open Bridge Styled GUI to Automation System. The earlier scratchpad-based approach is now considered legacy and is covered in that example.
When using the CDP Studio Open Bridge template and themes, you have a solid starting point for creating GUI designs that adhere to the Open Bridge Guideline. However, it's important to note that CDP Studio allows for the addition of custom widgets, colors, and spacings, which may deviate from the guidelines. To ensure your design aligns with the Open Bridge Guideline, it's advisable to thoroughly review the reference designs available on the Open Bridge Website. At a minimum, take a closer look at the Open Bridge examples within CDP Studio, paying attention to the usage of containers, backgrounds, and titles:
- Adding an Open Bridge Styled GUI to Automation System
- Creating an Open Bridge Styled Conning GUI Using Drag and Drop
The latest themes, derived from Open Bridge 5.0, feature the day, dusk, and bright palettes. Additional palettes will be incorporated as they become available according to the Open Bridge Guidelines.
Adding a New Color Palette to an Open Bridge Theme
The Open Bridge Guideline is constantly evolving and we will strive to always keep CDP Studio updated with the latest color palettes and changes. Additionally, we offer scripts for those who prefer immediate access or customization, granting you the flexibility to manage your user experience according to your preferences.
To introduce a new color palette to an existing Open Bridge theme, you can either download a color palette from the Open Bridge sources or modify an existing one. The color palettes utilized by various themes are stored as .scss files located in the root of the respective theme directories.
Please note that 'openbridge_day' is the sole theme containing the required script and template files with named colors. Running the script will replace the named colors and generate optimized theme files in SVG and CSS format.
The following steps outline the process:
- Locate and copy the theme named 'openbridge_day' as explained in How to Create a Custom Theme.
- Provide it with a proper theme name and provide a new color palette or update the existing .scss file.
- Renaming the .scss file will require updating the CSS_FILE_PATH variable in the script, 'create-theme.py'.
- Execute the script as described in the script guideline, printed by executing
python3 create-theme.py.
Adding Custom Elements to the Open Bridge Theme
In CDP Studio Design mode, all elements are styled by an SVG or CSS styling file. The steps for creating custom elements are outlined in documents like CDP Widgets Themes (SVG) and illustrated through examples such as How to Create a Custom Lamp Using SVG Styling. Here's a quick summary:
- Determine the specific widget required to handle your SVG design. For example, if you need to display a value with a rotating needle, the 'Meter' widget is a suitable choice.
- To access documentation on naming elements in the SVG file for CDP Studio to parse and load it correctly, press 'F1' while selecting the widget in CDP Studio's Design mode.
- For instance, when loading a meter, CDP Studio requires information about which element in the file represents the needle, the center location of the needle, and the minimum and maximum positions of the needle's working area.
- Finish naming all elements in the file using Inkscape or a similar tool, and make sure to follow the guidelines described in CDP Widgets Themes (SVG)#Styling by SVG.
- Finally, add the new SVG file to your application as described in CDP Widgets Themes (SVG)#How to Extend an Existing Theme.
The above steps are similar when creating custom elements for Open Bridge. You can export an element to SVG from the Open Bridge Figma library:
- Click the link to the Figma library on the Figma page of the Open Bridge Website.
- Click on the element you wish to export and go to 'Export' in the pane to the right.
- Finally, choose SVG from the format dropdown and press the 'Export' button.

The remainder of this chapter will assume a design retrieved using Figma.
Converting your Custom SVG into a Theme Template File
To convert a custom SVG into a template file with named colors, ready to be replaced by the script introduced in Adding a New Color Palette to an Open Bridge Theme, there are some additional steps to follow:
- Rename the SVG file to end with the suffix '.ink.svg'.
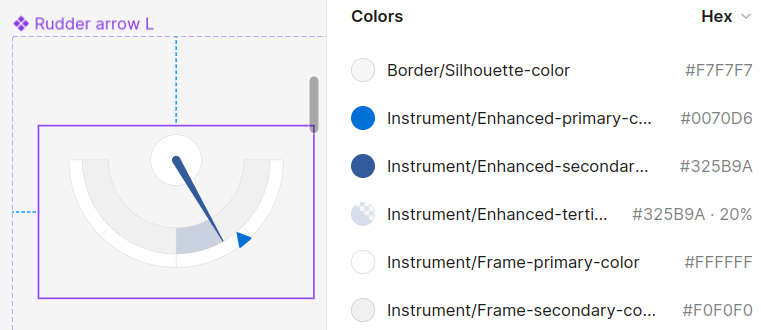
- Enable 'Dev Mode' in Figma by pressing 'Shift+D' or pressing the slide button in the upper right.
- Still in Figma, select the element that was previously exported and scroll down to the list of colors.

Note that hovering the colors will show on which elements they are used.
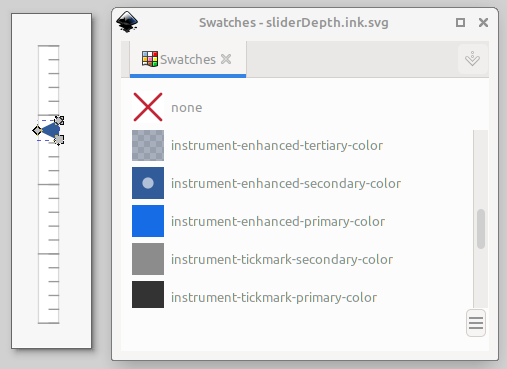
- To make the named colors selectable as swatches in Inkscape, they have to be manually added to the SVG template file. This can be done as shown in the below example:
<svg id="svg2245" ... xmlns:inkscape="http://www.inkscape.org/namespaces/inkscape">
  <defs id="defs1">
    <linearGradient id="element-active-color" inkscape:label="element-active-color" inkscape:swatch="solid"><stop id="stop1" stop-color="#000000" offset="0"/></linearGradient>
    <linearGradient id="instrument-tickmark-primary-color" inkscape:label="instrument-tickmark-primary-color" inkscape:swatch="solid"><stop id="stop6" stop-color="#999999" offset="0"/></linearGradient>
    <linearGradient id="instrument-enhanced-primary-color" inkscape:label="instrument-enhanced-primary-color" inkscape:swatch="solid"><stop id="stop3" stop-color="#166ce4" offset="0"/></linearGradient>
    ...
  </defs>
  ...
This will make the colors selectable in Inkscape using the swatches palette.
- Note that adding the above definitions correctly requires the following:
- Make sure that the svg element includes the 'xmlns:inkscape' attribute.
- Make sure that the id and inkscape:label attributes are identical and contain the correct color name.
- Make sure that the id in the stop element is unique.
- Make sure that the stop colors are unique to ensure that Inkscape won't collapse identical colors into one. For instance, if two named colors are both '#121212', rename one of the colors to '#121213'. Note that the colors in the final SVG are replaced when the Python script is executed.
- When you've added all color definitions to the SVG file, open it in Inkscape to update element colors using the swatches palette. Access the swatches palette from the file menu by navigating to 'View > Swatches...'.
- With the swatches palette open, select elements using the Selector Tool or, for more precise selection, the Node Tool. To set colors, click on an element and then choose a color from the palette. Clicking without holding any keys will apply the color as the fill while holding Shift and clicking will set the color as the stroke.

- Finally, save the file as described in Saving to SVG in Inkscape.
Get started with CDP Studio today
Let us help you take your great ideas and turn them into the products your customer will love.