How to Create a Custom Lamp Using SVG Styling
Introduction
This tutorial explains how to create a custom Lamp SVG file with a different style/color order than the default. The end result will be an SVG file that shows gray color on style 0 and red on style 1. All instructions and images regarding SVG editing in the tutorial are from Inkscape, a free vector graphics tool.
The Lamp widget is based on the Picture Sequence widget and is styled using an identical SVG file structure. By default, the lamp can show in multiple styles/colors controlled by an integer value. Using a bool type variable to control the lamp will only toggle it between the colors on index 0 and 1. Showing different colors can be done in more ways than using custom SVG as described in the Lamp documentation.
The new lamp SVG file could have been made from scratch using the SVG structure/names described in the Picture Sequence styling guidelines. In short, we would create one drawing with the id/name set to cdpPicture0 in a group named Layer1. Then, duplicate cdpPicture0 to a separate group named Styles and give it an id set to cdpPicture0Style1. This will be the drawing that shows when the style value is set to 1. Similar names are used if more styles are added with the last number in the name increasing for each new style. The style drawings can include any colors and shapes.
The custom SVG file created in this tutorial is demonstrated in the example named Creating GUI with Custom Graphics.
Step 1: Copy the Default Lamp SVG File
Start by creating a new GUI project in CDP Studio and open the Design mode. Drag a Lamp into the form and see its svgFile property to get the default SVG file path. Copy that file from the toolkit templates (<CDPStudio install dir>/toolkits/<architecture>/CDP-<version>/templates/themes) to the Application folder in the GUI project and name it lampRed.svg. The location of the directories is explained in the first sections of How to Create a Custom Theme.
Step 2: Switch Color or ID in the SVG File
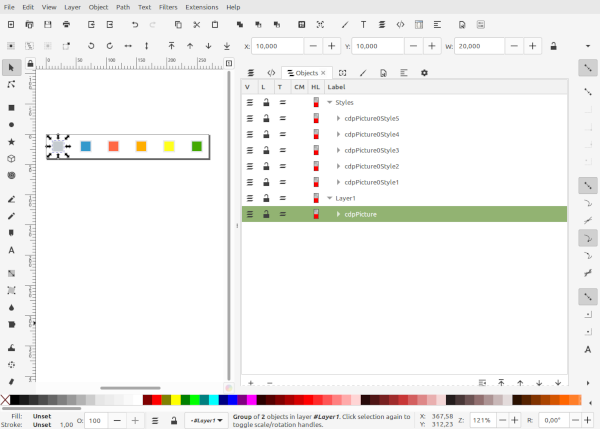
Open the lampRed.svg file in Inkscape. Use the Objects panel (Objects > Objects...) to select the different elements in the file and check what element contains the red color. To make the red color show on style 1 instead of style 2, the color or id of the two must be swapped.
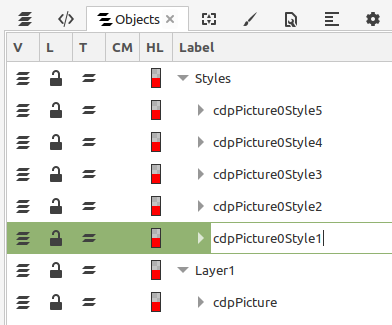
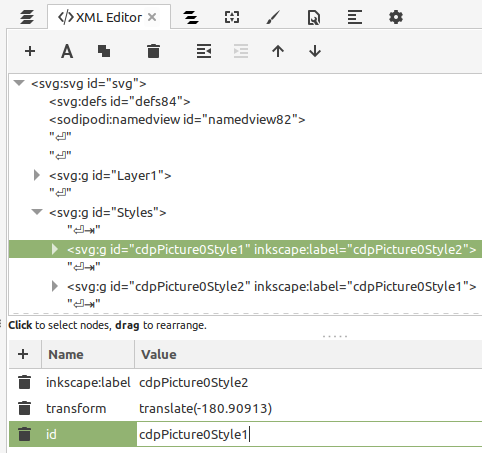
Double-clicking on cdpPicture0Style1 and cdpPicture0Style2 in the Objects panel to change the names will only change the display labels and not the id attributes. Hence, after updating the label, the id of the elements must be edited using either the Object Properties panel or the XML Editor (Edit > XML Editor...). The id must be unique at all times, meaning that the id in one element must be renamed to something else before that id can be used by a different element.
An alternative to switching id is to change the color of the cdpPicture0Style1 element. This is done by first locating and selecting the child element containing the fill color. The fill color is always visible at the bottom left. Clicking it will show the Fill and Stroke panel where the color can be changed.
Step 3: Save and Test
Saving the file from Inkscape must be done using the configuration described in Saving to SVG in Inkscape. Failing to follow these instructions might cause problems when showing the widget.
Next, it's time to test the new SVG file. Select the lamp in the Design mode form and configure the svgFile property with the full path of lampRed.svg relative to the Application directory. Depending on the selected theme, the path should be something like this, themes/flat_gray_light/pictures/lampRed.svg.
Toggling the widgetStyle property between 0 and 1 should now toggle the lamp between gray and red color.
How to Run the Tutorial
To run the tutorial from CDP Studio, select Configure mode, right-click on the system project and select Run & Connect. See the Running and Connecting to the System tutorial for more information.
Get started with CDP Studio today
Let us help you take your great ideas and turn them into the products your customer will love.