Configuration Manual
This manual describes the configuration options for CDP Simulator. The resources described here are:
- SimulatorManager - a place to set the integration method and other global simulation options like the processing frequency and time step.
- DynamicSimComponent - the base class for all simulator components (including the no-code SimComponent). It can be inherited to create a custom simulator component in C++.
- SimComponent - used either as a container for other simulator components, integrators, ports and operators or as a component for creating no-code simulation models.
- Integrator - Wraps a single StateVariable for no-code integration in a SimComponent.
- Script - a block to execute ChaiScript code before, during or after the integration step.
Note, the following simulator resources have their own manuals:
- SimSignal - a signal used to transfer a single value between simulator components.
- SimPort - a container to transfer a bulk of values between simulator components with a single two-way routing connection. It can be used similarly to PowerBond / Bondgraphs / Two-port systems.
- PortSimSignal - a SimSignal added to a SimPort. It includes additional properties to customize the connection options.
- Integration Methods - a guide to selecting the best integration algorithm for your simulation.
- FMI2Cosimulation - a guide to integrating with other simulation tools using the Functional Mock-up Interface (FMI) standard.
See Getting Started for creating a Simulator project.
SimulatorManager
Most simulation options are configured within the SimulatorManager component which is included by default in every simulator application. These options affect all DynamicSimComponents in the same application.
Integration Methods
In a simulation application, the integration algorithm is set in the SimulatorManager component by adding a new row into the Integration table from the Resource tree.
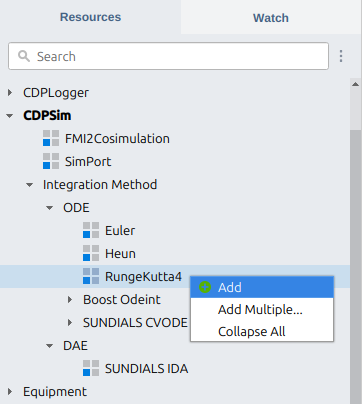
Only one ODE and only one DAE integration algorithm can be added to each application. When an integrator is not specified, the SimulatorManager will default to RungeKutta4 for ODE and SUNDIALS IDA for DAE.
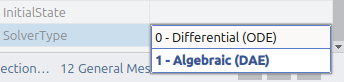
By default, the simulator components use the ODE integration algorithm. To use the DAE solver, each simulator component has a SolverType property which can be set to Algebraic (DAE).
It is possible to implement a custom algorithm by inheriting from CDPSim::IntegrationBase. However, CDPSim provides several built-in integration methods. For a detailed description and comparison of the available algorithms, see the Choosing an Integration Method documentation.
Properties
| Property | Description |
|---|---|
| Activate | When set to 1, the simulation is started immediately with the rest of the CDP system. When set to larger than 1, the startup is delayed by the given number of seconds. This is most useful for no-code simulation models to ensure that the initial values have propagated through the routing system between the no-code blocks before the simulation starts. |
| fs | Sets the processing frequency for DynamicSimComponents in this application. This is used to run component state machine and sync routed signal and property values from non-simulator components and also from simulator components which reside in other applications. Therefore it should be at least as high as the highest fs of other components which route values to/from DynamicSimComponents. When AdaptiveTimeStep is enabled, this property will also set the maximum allowed time step to 1 / fs (note, integration methods are allowed to internally set more strict limits). |
| TimeStep | Sets how frequently the Simulate routine is executed, including the update of SimSignals routed between simulator components within the same application. A high degree of accuracy is obtained by running the simulations at very small time steps, much smaller than the periodic processes of standard CDP components set by fs property. When AdaptiveTimeStep is enabled, this property will set the minimum allowed time step (note, integration methods are allowed to internally set more strict limits). |
| AdaptiveTimeStep | If true, integration methods are allowed to dynamically change the SimulatorManager time step (sets the frequency of the Simulate routine, which is also the SimSignal sync frequency between simulator components in the local application). When adaptive time step is enabled, the TimeStep property becomes the minimum allowed time step and the fs property will define the maximum allowed time step. The current time step is published as a signal with the name T. When adaptive time step is disabled, integration methods can still modify their internal step size but this will not affect SimSignal sync frequency. Note, as the SimulatorManager can contain one ODE and one DAE integration method, the minimum time step in adaptive mode is determined by the smallest of the two integration methods' minimum time steps. |
| Autostart | If false, the simulation is started once Start message is received. Otherwise, the simulation will start automatically. |
For the relation of fs, TimeStep and AdaptiveTimeStep properties, see also:
- Time Steps and Data Propagation section in the introduction manual.
- Adaptive Time Step section in the Choosing an Integration Method manual.
Note: When the component processing period (1 / fs) is not an exact multiple of TimeStep or if the selected integration algorithm (for example SUNDIALS CVODE) uses adaptive time step, then there can be slight inaccuracies in the values published by simulator. This is similar to real world control systems if CDP IOServer fs does not exactly match the actual sensor sampling frequency.
Alarms
| Alarm | Description |
|---|---|
| NotRealTime | Set when simulator is not able to run simulation components in real-time. Increase TimeStep and restart the simulation. |
Messages
| Message | Description |
|---|---|
| Start | Starts simulation. Happens automatically if Autostart property is true. |
| Stop | Stops simulation. |
| Reset | Calls CDPSim::DynamicSimComponent::Reset for all simulator components in this application. That will reset all CDPSignal, CDPSim::SimSignal and CDPSim::StateVariable variables back to their initial values set by configuration XML (by default 0), and Init() is called on all operators. |
Signals
The following are measured values describing the runtime performance of simulation. To configure expected values, modify the SimulatorManager properties.
| Signal | Description |
|---|---|
| RunsPerSchedule | Measured simulator iterations per simulator period. |
| dt | Time since previous run. Should equal T, but may not be exactly T because of scheduler imperfection. |
| T | Requested simulation period. Starting with value of property TimeStep, but may change dynamically. |
DynamicSimComponent
The CDPSim::DynamicSimComponent is the base class for all simulator components (including the no-code SimComponent). It can be inherited to create a custom simulator component in C++. Use this when implementing a complex model or when the best achievable processing speed is needed.
See the class documentation and the Getting Started guide for more information on implementing a custom simulator component.
SimComponent
The SimComponent inherits the DynamicSimComponent and is designed for:
- Structuring the project and serving as a container for other simulator components, integrators, ports, and operators.
- Creating no-code and low-code simulation models by connecting blocks like Integrators and CDPOperator in the Configure mode Block Diagram. For more complex models, a small amount of code could be added using an Evaluate operator or a Script block.
Basics
For each CDPSim.Integrator added to the SimComponent, the SimComponent will integrate the value in the Integrator and save the result in Integrator.State.
Note: For the no-code and low-code solutions, it is recommended to set the SimulatorManager Activate property larger than the default value of 1 to delay the simulation start, e.g. Activate=2. This is to make sure that the initial values have propagated through the routing system between the no-code blocks. Another alternative is to set Application StartupChecks to 1 and set StartupOverrideTime large enough for everything to connect before application is Running.
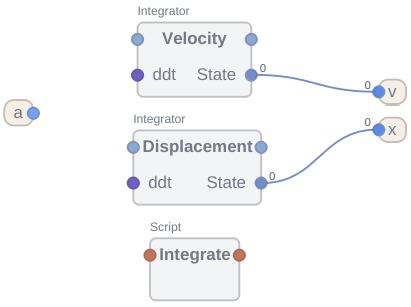
Example
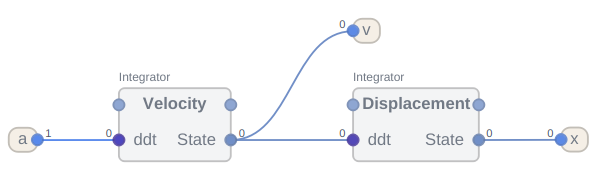
A Simple SimComponent with Two Integrators
To create a simple integrator that calculates the displacement of an object moving with a constant acceleration, follow these steps:
- In the simulator application, add a CDPSim.SimComponent from the Resource tree.
- Navigate into the SimComponent.
- Add input and output signals to the SimComponent:
- Add integrators to the SimComponent which will integrate the acceleration to first get the velocity and then the displacement:
The final configuration will look like this:
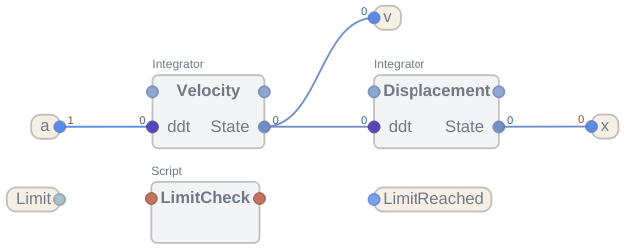
Using a Script to Limit Motion
Consider the case when the object's motion is limited by a wall. To prevent the object from moving through the wall, we will use the Script block to set the velocity to 0 when the object hits the wall.
- In the SimComponent, add a CDPCore.CDPParameter Limit from the Resource tree. This parameter will set the wall position.
- Add a CDPSim.SimSignal LimitReached to the SimComponent and set its Input property to
false. This signal will indicate when the object hits the wall. - Add a CDPSim.Script LimitCheck to the SimComponent. Click on the script block and edit the following properties:
- Set Execution to 3 - PostIntegrate. This will make the script run right after the integration step.
- Set Script to the following ChaiScript code:
if (Displacement.State > Limit) {
  Velocity.State = 0;
  LimitReached = 1;
}
This code will set the velocity to 0 and set the LimitReached signal to 1 when the object hits the wall.
Note: Avoid writing to an Integrator.State too often as it will cause jump discontinuities in the simulation and for some integration methods, the solver needs to reinitialize its internal state every time an Integrator.State is overridden.
The final configuration will look like this:
Integrator
The Integrator is a wrapper to CDPSim::StateVariable for no-code integration to be used with the SimComponent. It plays the same role as the StateVariable in a C++ simulator component but can be used in the Configure mode Block Diagram.
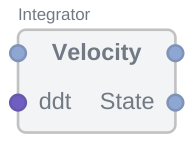
| Node | Direction | Description |
|---|---|---|
| ddt | Input | The rate of change of the signal. |
| StateOverride | Input | Overrides the state value before the next integration. Useful for setting limits to movement, e.g. object hitting the ground. |
| State | Output | During runtime - the integrated value. In offline configuration - the initial value. |
Script
The Script block can be added to any SimComponent to execute ChaiScript code before, after or during the integration step. This can be used to override any Integrator State or to perform any other calculations.
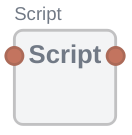
One can access any node in the parent SimComponent scope, but only some are writable:
- SimSignals are always writable (both input and output SimSignals).
- For Integrators, the ChaiScript mapping depends on context:
- Integrator.State is writable in PreIntegrate and PostIntegrate scripts.
- Integrator.ddt is writable in Integrate scripts if the parent SimComponent's SolverType property is set to
Differential (ODE). This is similar to the EvaluateDiffEquations() in C++ simulator components. - Integrator.residual is writable in Integrate scripts if the parent SimComponent's SolverType property is set to
Algebraic (DAE). This is similar to the EvaluateAlgebraicEquations() in C++ simulator components.Note: The residual is not visible in the no-code Block Diagram, but can be accessed in the script. The reason is algebraic equations often have cross-dependencies that must be solved all at once in the parent SimComponent level, which is not supported by the no-code blocks.
- All other value nodes like CDPParameters, CDPProperties, CDPOperator Arguments can still be accessed but are read-only.
For example, a PostIntegrate script might look like this:
if (Integrator1.State > MyCDPParameter) {
  // Integrator State is writable in PreIntegrate and PostIntegrate scripts
  Integrator2.State = 0;

  // SimSignals are always writable and any ChaiScript math function can be used
  MyOutputSignal = sin(MyOperator.MyArgument);
}
To enter the multiline code, click on the script block. In the Block Diagram sidebar, start editing the Script property and click on the editor icon to open a larger editor dialog.

See Sequencer - ChaiScript documentation for syntax help and a list of many useful functions.
Properties
| Property | Description |
|---|---|
| Execution | Whether to execute the script before, during or after the Integrate step of the parent SimComponent. Valid values are:
|
| Script | The ChaiScript to execute. All values in the parent SimComponent scope are available - simulator nodes like SimSignals or Integrators are writable, other nodes like CDPParameters, CDPProperties, Arguments are read-only. |
| Status | The status of the block:
|
| LastError | Displays the error message if Status is set to Error. |
PreIntegrate and PostIntegrate Scripts
The PreIntegrate and PostIntegrate scripts are executed once per simulation time period, before and after the Integrate step of the parent SimComponent. This is useful for setting initial values, checking limits, or performing any other calculations that should be done only once per simulation time period.
The following types of nodes are writable in the PreIntegrate and PostIntegrate scripts:
- SimSignal
- Integrator.State
Note: Avoid writing to an Integrator.State too often as it will cause jump discontinuities in the simulation and for some integration methods, the solver needs to reinitialize its internal state every time an Integrator.State is overridden.
Other nodes like CDPParameters, CDPProperties, Arguments, etc. can still be accessed but are read-only.
For example, given CDPParameter Limit, Integrators Displacement and Velocity, and SimSignal LimitReached, the following code in a LimitCheck script block (with the Execution property set to 3 - PostIntegrate) will check if the displacement is greater than the Limit and if so, set the velocity to 0 and the LimitReached signal to 1:
if (Displacement.State > Limit) {
  Velocity.State = 0;
  LimitReached = 1;
}
Advanced - ODE Integrate Scripts
Note: The Integrate script is only recommended for rapid prototyping and debugging as calling ChaiScript so frequently can slow down the simulation. See the Performance section for more information.
If the parent SimComponent's SolverType property is set to Differential (ODE) then the following types of nodes are writable in the Integrate script:
- SimSignal
- Integrator.ddt
Other nodes like CDPParameters, CDPProperties, Arguments, etc. can still be accessed but are read-only.
For example, given Integrators Displacement and Velocity and SimSignal a, the following code in an Integrate script block (with the Execution property set to 2 - Integrate) will integrate the acceleration to get the velocity and then integrate the velocity to get the displacement:
Displacement.ddt = Velocity.State;
Velocity.ddt = a;
The example above is equivalent to the no-code configuration shown in the A Simple SimComponent with Two Integrators section.
Advanced - DAE Integrate Scripts
Note: The Integrate script is only recommended for rapid prototyping and debugging as calling ChaiScript so frequently can slow down the simulation. See the Performance section for more information.
If the parent SimComponent's SolverType property is set to Algebraic (DAE) then the following types of nodes are writable in the Integrate script:
- SimSignal
- Integrator.residual
Other nodes are read-only for the script.
For instance, the DAE solution C++ code in Example 2: Rotary Inverted Pendulum could be replaced with the following ChaiScript code in an Integrate script block (with the Execution property set to 2 - Integrate):
theta.residual = theta.ddt - dtheta.State;
phi.residual = phi.ddt - dphi.State;
dtheta.residual = dtheta.ddt - (6.0 / (7.0 * l) *
    (g * sin(theta.State) - r * dphi.ddt * cos(theta.State) - (2.0 * c_rod / m_rod) * dtheta.State));
dphi.residual = dphi.ddt - (1.0 / (r * r * (m_rod + (1.0 / 3.0) * m_arm)) *
    (0.5 * m_rod * r * l * dtheta.State * dtheta.State * sin(theta.State) -
        0.5 * m_rod * r * l * dtheta.ddt * cos(theta.State) - c_arm * dphi.State + tau));

Error Handling
If the script contains an error, the Status property will be set to Error and the LastError property will contain the error message. The script will be disabled until the error is fixed. In addition, the parent SimComponent will set the ConfigurationFaults alarm.
Performance
The Script block is executed in the same thread as the simulation, so it is important to keep the script as simple as possible to avoid slowing down the simulation. It is recommended to use the Script block only for simple checks and calculations.
The Integrate step is the most performance-critical part of the simulation, so it is recommended to use only the PreIntegrate and PostIntegrate options for the script execution. If the script is executed during the Integrate step, it will be executed multiple times per simulation time period, depending on the integration method, e.g. 4 times for RungeKutta4 or 8 times for Fehlberg. Still, using the Script block in the Integrate step can be useful for rapid prototyping and debugging.
One can expect simple ChaiScripts to be around 10 times slower than the C++ code-based approach and 3 times slower than the no-code approach or the low-code Evaluate operator which uses a more limited muparser scripting language. For longer scripts, the ChaiScripts could be even 30 times slower than the C++ code-based approach, so if performance is a concern, consider implementing the logic in a C++ simulator component. See Measuring Performance for information on measuring the performance of the simulation.
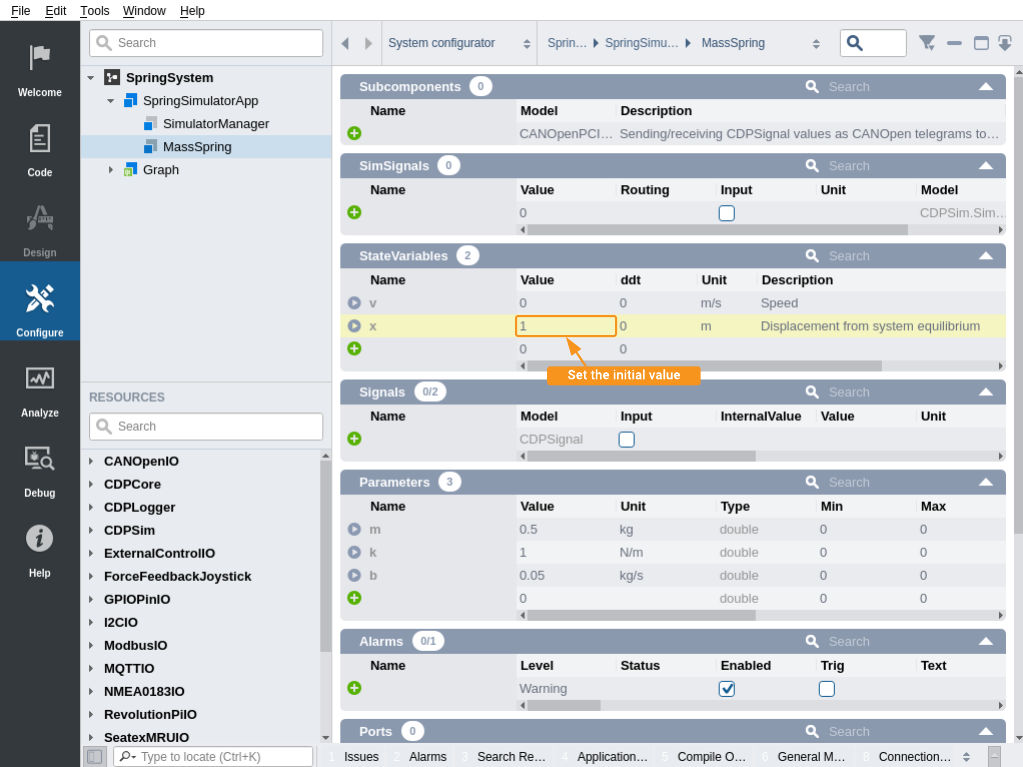
Simulator Initial Conditions
When simulating systems, it is important to set sensible initial values to every CDPSim::StateVariable, CDPSim::SimSignal and other objects the simulator is using. Initial conditions can be set from CDP Studio Configure mode by editing the Value attribute of a StateVariable, Integrator, SimSignal, signal, parameter or property before running the system. When SimulatorManager starts up (in SimulatorManager::Activate()), and if SimulatorManager's TimeStep or fs is changed during runtime, SimulatorManager's message 'Reset' is automatically called.
Measuring Performance
It is possible to monitor the simulator thread load by unchecking the Hide Internal Items filter and plotting the Process Timer signal of the SimulatorManager component. The simulator will fall behind real time if the process timer is higher than 1.
In addition, the NotRealTime alarm will be triggered if the simulator is not able to run simulation components in real time.
If the simulator is not running in real time, consider the following:
- Reduce the SimulatorManager sampling frequency (fs) and increase the time step (TimeStep).
- A low-code solution using the Evaluate operator is often faster than a full no-code solution due to fewer required value routings.
- When using no-code or low-code simulation models, consider converting it to a C++ simulator component.
- Use the best integration method for your simulation. Also, check the properties of the selected integration method, e.g. some have configurable RelativeTolerance and AbsoluteTolerance settings.
- Use the Script block only for simple checks and calculations in the PreIntegrate or PostIntegrate steps. Avoid using it in the Integrate step to prevent slowing down the simulation.
Further Reading
See also CDPSim C++ Classes documentation for information how to configure and use other objects provided with CDPSim. If you click on a simulator application in the Project tree, and then expand CDPSim in the Resource tree, DynamicSimComponent will appear. You may read more about them in DynamicSimComponent.
For integration with other simulation tools using the Functional Mock-up Interface (FMI) standard, see FMI Co-Simulation Support.
Get started with CDP Studio today
Let us help you take your great ideas and turn them into the products your customer will love.